GitHub Actions for Pulumi
Pulumi’s GitHub Actions help you deploy apps and infrastructure to your cloud of choice, using nothing but code in your favorite language and GitHub. This includes previewing, validating, and collaborating on proposed deployments in the context of Pull Requests, and triggering deployments or promotions between different environments by merging or directly committing changes.
Let’s see how to get started – it’s easy!
Pre-Requisites
Before proceeding, you’ll need to Sign Up for Pulumi (if you haven’t already). This guide also assumes you’ve reviewed the GitHub Actions documentation and are generally familiar with its concepts and syntax.
For your workflow to do anything interesting, you’ll want to create a new Pulumi project for it. There are three ways to do this:
- Clone an existing Pulumi example
- Use the New Project wizard
- Download the CLI and run
pulumi newto select a template
Creating a Workflow
Although the full power of the Pulumi CLI is available to use with GitHub Actions, we recommend starting with our standard workflow, which consists of two workflow files, each triggered by common GitHub events:
- Pulumi Preview runs
pulumi previewin response to a Pull Request, showing a preview of the changes to the target branch when the PR gets merged. - Pulumi Up runs
pulumi upon the target branch, in response to a commit on that branch.
Committing the Workflow Files
Let’s get started by adding these two new workflow files to the GitHub repository containing your Pulumi project.
The pull_request Workflow File
Add a new file to your Pulumi project repository at .github/workflows/pull_request.yml
containing the following workflow definition, which instructs GitHub Actions to run
pulumi preview in response to all pull_request events:
name: Pulumi
on:
  - pull_request
jobs:
  preview:
    name: Preview
    runs-on: ubuntu-latest
    steps:
      - uses: actions/checkout@v2
      - uses: actions/setup-node@v3.5.0
        with:
          node-version-file: package.json
      - name: Configure AWS Credentials
        uses: aws-actions/configure-aws-credentials@v1
        with:
          aws-access-key-id: ${{ secrets.AWS_ACCESS_KEY_ID }}
          aws-region: ${{ secrets.AWS_REGION }}
          aws-secret-access-key: ${{ secrets.AWS_SECRET_ACCESS_KEY }}
      - run: npm install
      - uses: pulumi/actions@v3
        with:
          command: preview
          stack-name: org-name/stack-name # When using an individual account, only use stack-name.
        env:
          PULUMI_ACCESS_TOKEN: ${{ secrets.PULUMI_ACCESS_TOKEN }}
name: Pulumi
on:
  - pull_request
jobs:
  preview:
    name: Preview
    runs-on: ubuntu-latest
    steps:
      - uses: actions/checkout@v2
      - uses: actions/setup-python@v2
        with:
          python-version: 3.10
      - name: Configure AWS Credentials
        uses: aws-actions/configure-aws-credentials@v1
        with:
          aws-access-key-id: ${{ secrets.AWS_ACCESS_KEY_ID }}
          aws-region: ${{ secrets.AWS_REGION }}
          aws-secret-access-key: ${{ secrets.AWS_SECRET_ACCESS_KEY }}
      - run: pip install -r requirements.txt
      - uses: pulumi/actions@v3
        with:
          command: preview
          stack-name: org-name/stack-name # When using an individual account, only use stack-name.
        env:
          PULUMI_ACCESS_TOKEN: ${{ secrets.PULUMI_ACCESS_TOKEN }}
name: Pulumi
on:
  - pull_request
jobs:
  preview:
    name: Preview
    runs-on: ubuntu-latest
    steps:
      - uses: actions/checkout@v2
      - uses: actions/setup-go@v3
        with:
          go-version: 'stable'
      - name: Configure AWS Credentials
        uses: aws-actions/configure-aws-credentials@v1
        with:
          aws-access-key-id: ${{ secrets.AWS_ACCESS_KEY_ID }}
          aws-region: ${{ secrets.AWS_REGION }}
          aws-secret-access-key: ${{ secrets.AWS_SECRET_ACCESS_KEY }}
      - run: go mod download
      - uses: pulumi/actions@v3
        with:
          command: preview
          stack-name: org-name/stack-name # When using an individual account, only use stack-name.
        env:
          PULUMI_ACCESS_TOKEN: ${{ secrets.PULUMI_ACCESS_TOKEN }}
name: Pulumi
on:
  - pull_request
jobs:
  preview:
    name: Preview
    runs-on: ubuntu-latest
    steps:
      - uses: actions/checkout@v2
      - uses: actions/setup-dotnet@v3
        with:
          dotnet-version: 6.0.x
      - name: Configure AWS Credentials
        uses: aws-actions/configure-aws-credentials@v1
        with:
          aws-access-key-id: ${{ secrets.AWS_ACCESS_KEY_ID }}
          aws-region: ${{ secrets.AWS_REGION }}
          aws-secret-access-key: ${{ secrets.AWS_SECRET_ACCESS_KEY }}
      - uses: pulumi/actions@v3
        with:
          command: preview
          stack-name: org-name/stack-name # When using an individual account, only use stack-name.
        env:
          PULUMI_ACCESS_TOKEN: ${{ secrets.PULUMI_ACCESS_TOKEN }}
The push Workflow File
Next, add a second workflow file at .github/workflows/push.yml containing the following
definition, which tells GitHub to run pulumi up in response to a commit on the main
branch:
name: Pulumi
on:
  push:
    branches:
      - main
jobs:
  update:
    name: Update
    runs-on: ubuntu-latest
    steps:
      - uses: actions/checkout@v2
      - uses: actions/setup-node@v3.5.0
        with:
          node-version-file: package.json
      - name: Configure AWS Credentials
        uses: aws-actions/configure-aws-credentials@v1
        with:
          aws-access-key-id: ${{ secrets.AWS_ACCESS_KEY_ID }}
          aws-region: ${{ secrets.AWS_REGION }}
          aws-secret-access-key: ${{ secrets.AWS_SECRET_ACCESS_KEY }}
      - run: npm install
      - uses: pulumi/actions@v3
        with:
          command: up
          stack-name: org-name/stack-name # When using an individual account, only use stack-name.
        env:
          PULUMI_ACCESS_TOKEN: ${{ secrets.PULUMI_ACCESS_TOKEN }}
name: Pulumi
on:
  push:
    branches:
      - main
jobs:
  update:
    name: Update
    runs-on: ubuntu-latest
    steps:
      - uses: actions/checkout@v2
      - uses: actions/setup-python@v2
        with:
          python-version: 3.9
      - name: Configure AWS Credentials
        uses: aws-actions/configure-aws-credentials@v1
        with:
          aws-access-key-id: ${{ secrets.AWS_ACCESS_KEY_ID }}
          aws-region: ${{ secrets.AWS_REGION }}
          aws-secret-access-key: ${{ secrets.AWS_SECRET_ACCESS_KEY }}
      - run: pip install -r requirements.txt
      - uses: pulumi/actions@v3
        with:
          command: up
          stack-name: org-name/stack-name # When using an individual account, only use stack-name.
        env:
          PULUMI_ACCESS_TOKEN: ${{ secrets.PULUMI_ACCESS_TOKEN }}
name: Pulumi
on:
  push:
    branches:
      - main
jobs:
  update:
    name: Update
    runs-on: ubuntu-latest
    steps:
      - uses: actions/checkout@v2
      - uses: actions/setup-go@v3
        with:
          go-version: 'stable'
      - name: Configure AWS Credentials
        uses: aws-actions/configure-aws-credentials@v1
        with:
          aws-access-key-id: ${{ secrets.AWS_ACCESS_KEY_ID }}
          aws-region: ${{ secrets.AWS_REGION }}
          aws-secret-access-key: ${{ secrets.AWS_SECRET_ACCESS_KEY }}
      - run: go mod download
      - uses: pulumi/actions@v3
        with:
          command: up
          stack-name: org-name/stack-name # When using an individual account, only use stack-name.
        env:
          PULUMI_ACCESS_TOKEN: ${{ secrets.PULUMI_ACCESS_TOKEN }}
name: Pulumi
on:
  push:
    branches:
      - main
jobs:
  update:
    name: Update
    runs-on: ubuntu-latest
    steps:
      - uses: actions/checkout@v2
      - uses: actions/setup-dotnet@v1
        with:
          dotnet-version: 3.1.x
      - name: Configure AWS Credentials
        uses: aws-actions/configure-aws-credentials@v1
        with:
          aws-access-key-id: ${{ secrets.AWS_ACCESS_KEY_ID }}
          aws-region: ${{ secrets.AWS_REGION }}
          aws-secret-access-key: ${{ secrets.AWS_SECRET_ACCESS_KEY }}
      - uses: pulumi/actions@v3
        with:
          command: up
          stack-name: org-name/stack-name # When using an individual account, only use stack-name.
        env:
          PULUMI_ACCESS_TOKEN: ${{ secrets.PULUMI_ACCESS_TOKEN }}
Now that you’ve got these two common workflows defined, you’ll need to configure your secrets. Secrets are exposed as environment variables to the GitHub Actions runtime environment. Minimally, you’ll need to supply a Pulumi access token to allow the Pulumi CLI to communicate with the Pulumi Cloud on your behalf, and you’ll probably want to provide credentials for communicating with your cloud provider as well.
Configuring Your Secrets
With your workflow files committed and pushed to GitHub, head on over to your repo’s Settings tab, where you’ll find the new Secrets area:
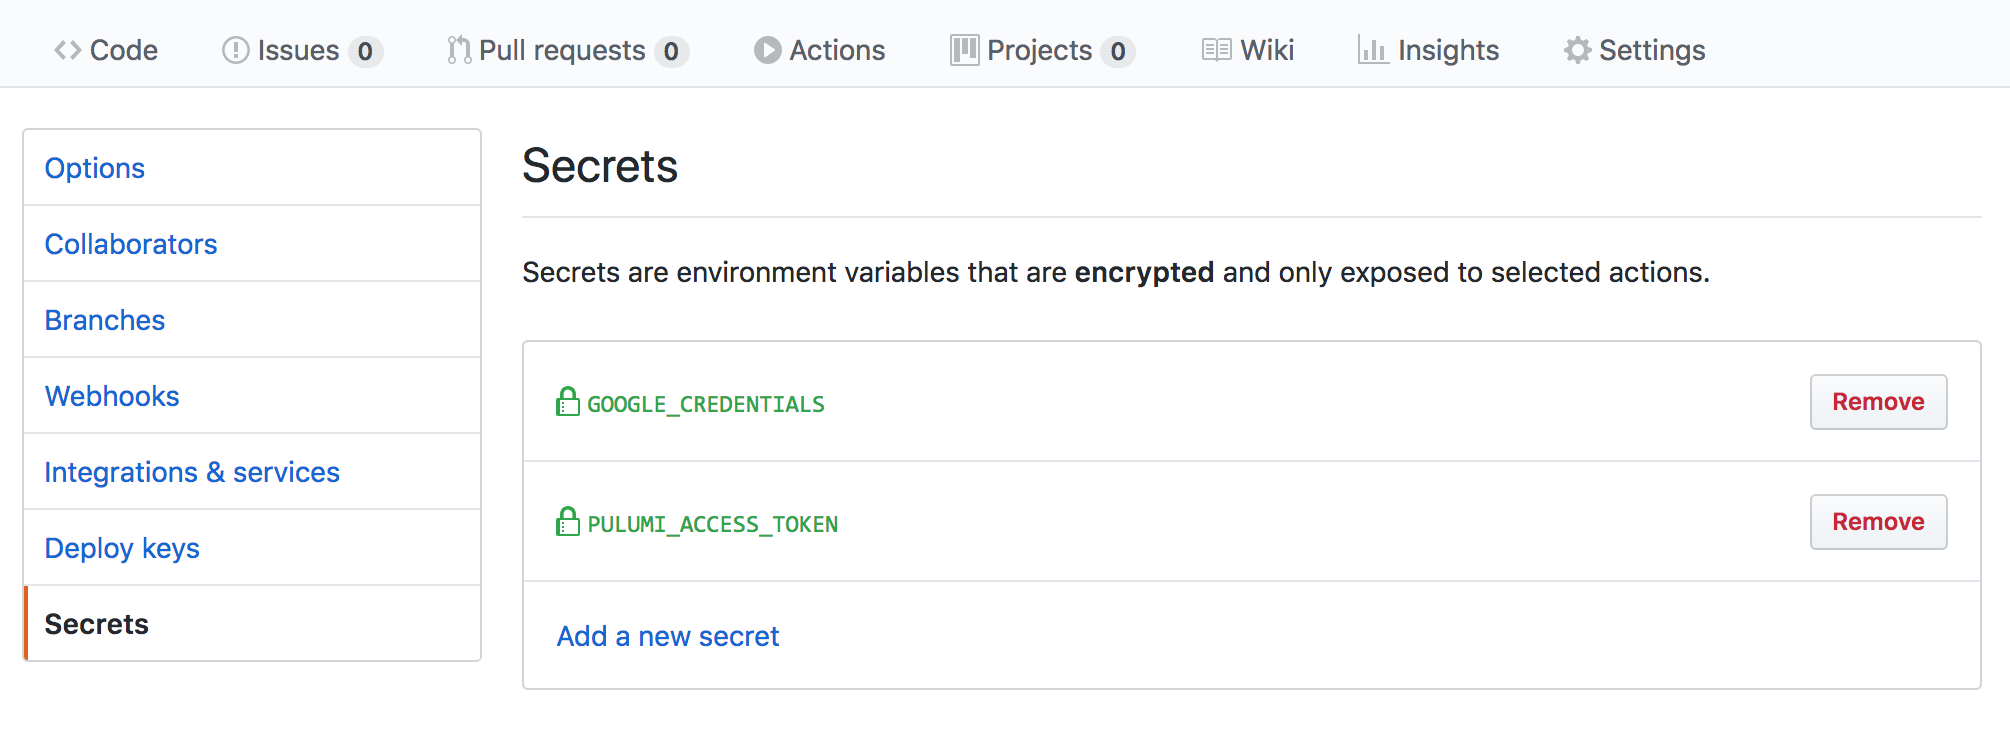
First, create a new Pulumi Access Token, then
submit that token as a new secret named named PULUMI_ACCESS_TOKEN. This enables your
GitHub Action to communicate with the Pulumi Cloud on your behalf.
Next, add secrets for your cloud credentials, just as you did PULUMI_ACCESS_TOKEN above,
based on your provider of choice. For example:
AWS_ACCESS_KEY_ID,AWS_REGIONandAWS_SECRET_ACCESS_KEYfor AWSARM_CLIENT_ID,ARM_CLIENT_SECRET, andARM_TENANT_IDfor AzureGOOGLE_CREDENTIALSfor Google CloudKUBECONFIGfor Kubernetes
Try It Out!
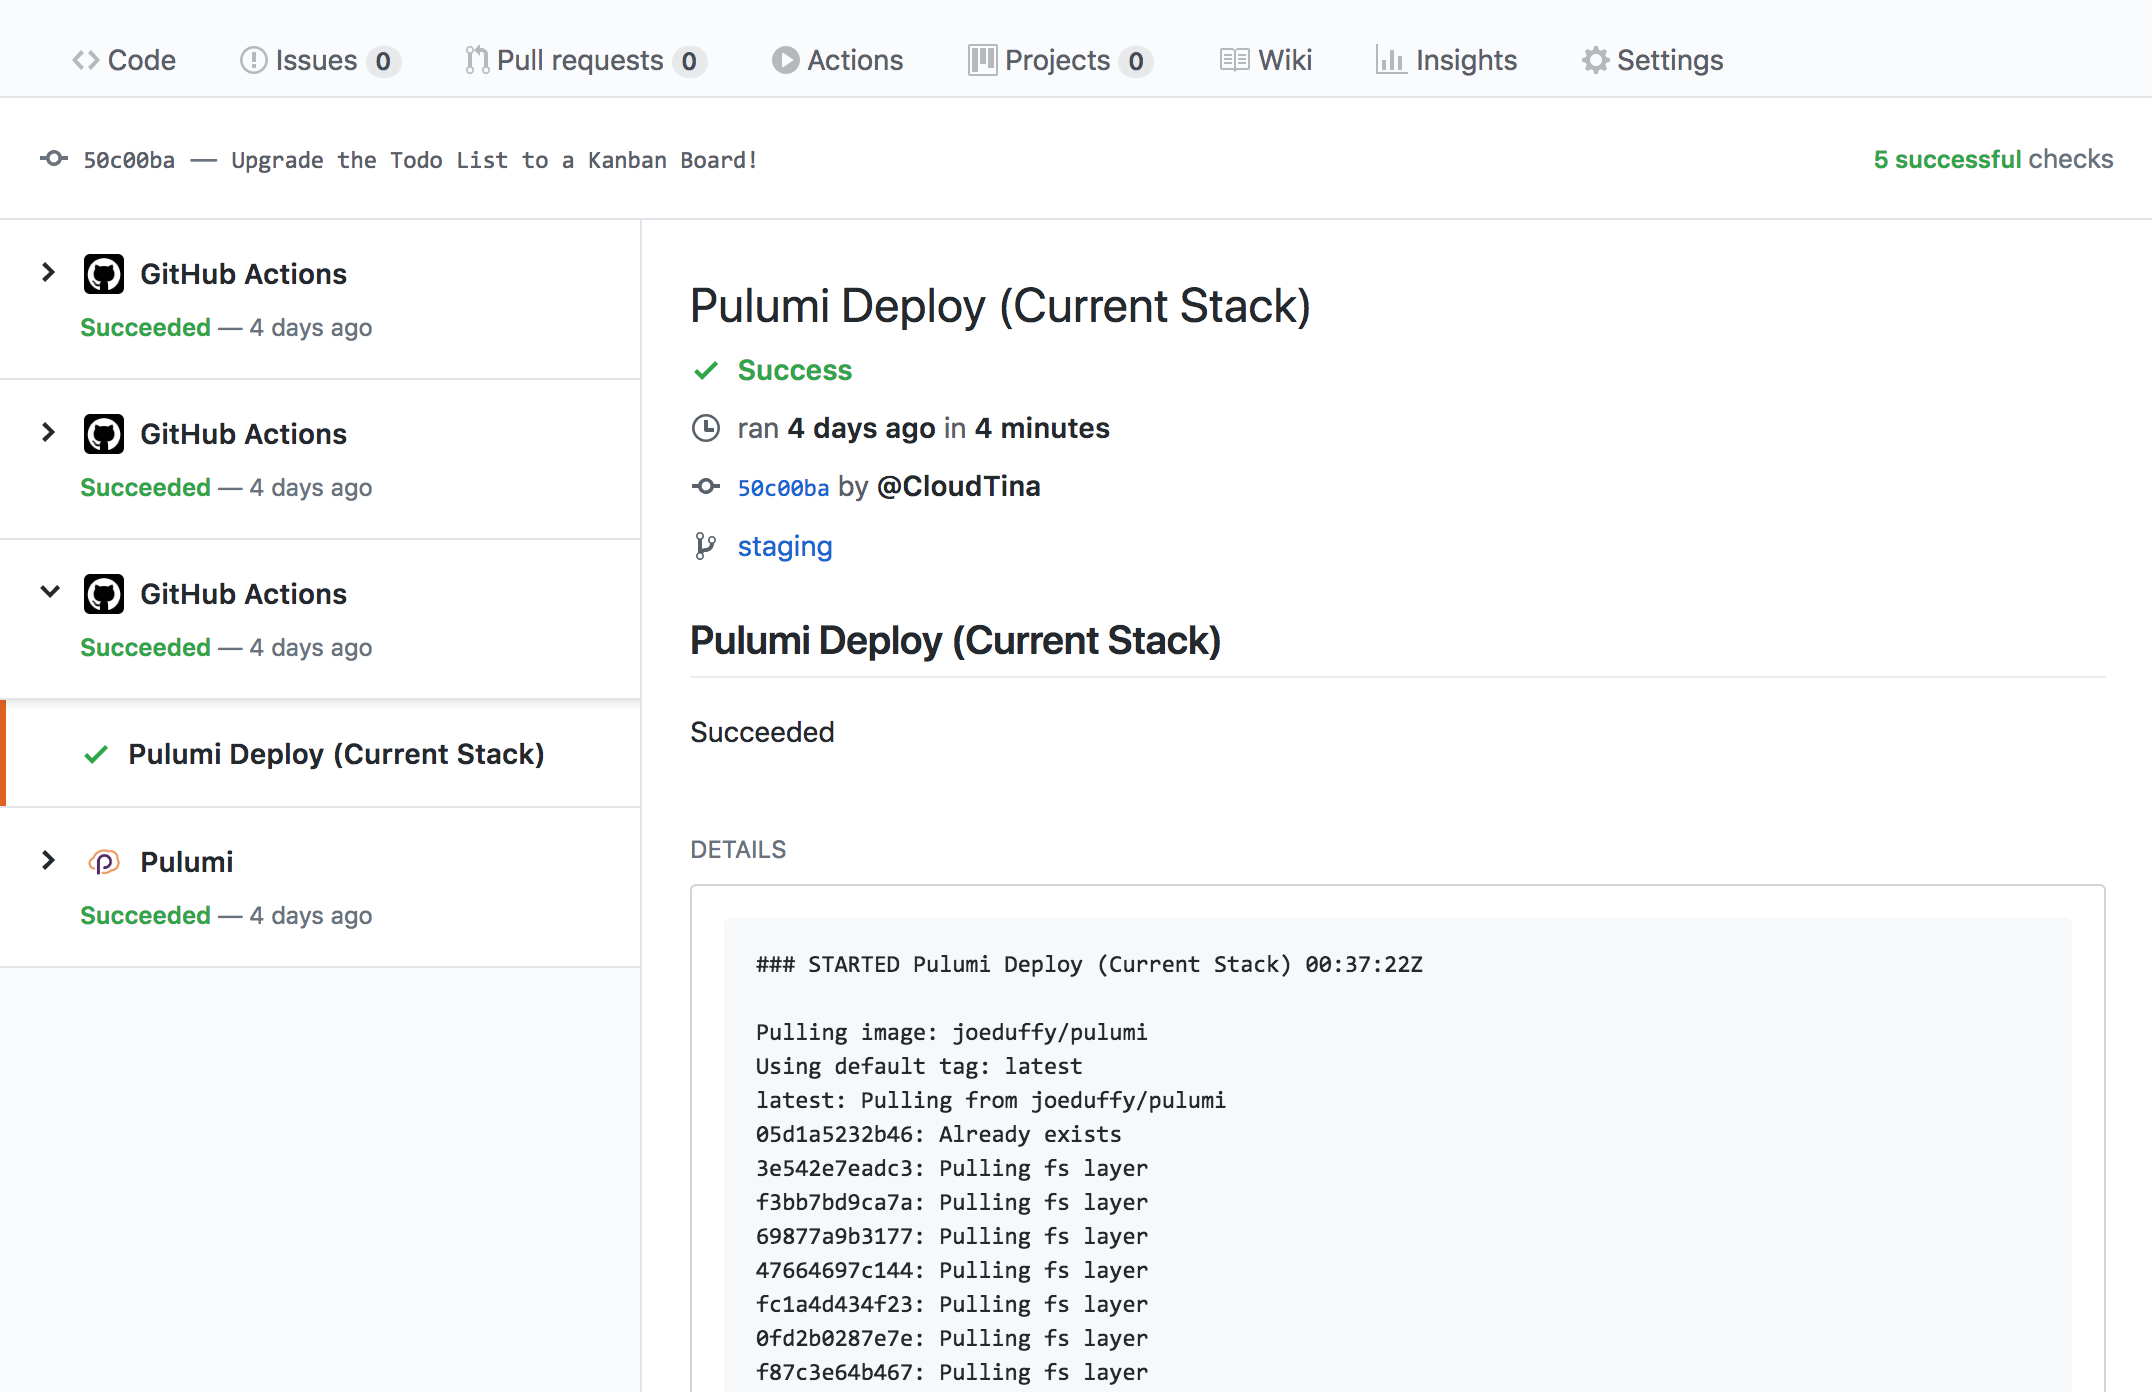
To try things out, create a Pull Request or commit, and you will see these new actions showing up in the usual GitHub Checks dialog, with a green checkmark if everything went as planned:

Select the Logs pane to see the full output of the Pulumi CLI, along with the URL of your deployment on the Pulumi Cloud with more details:
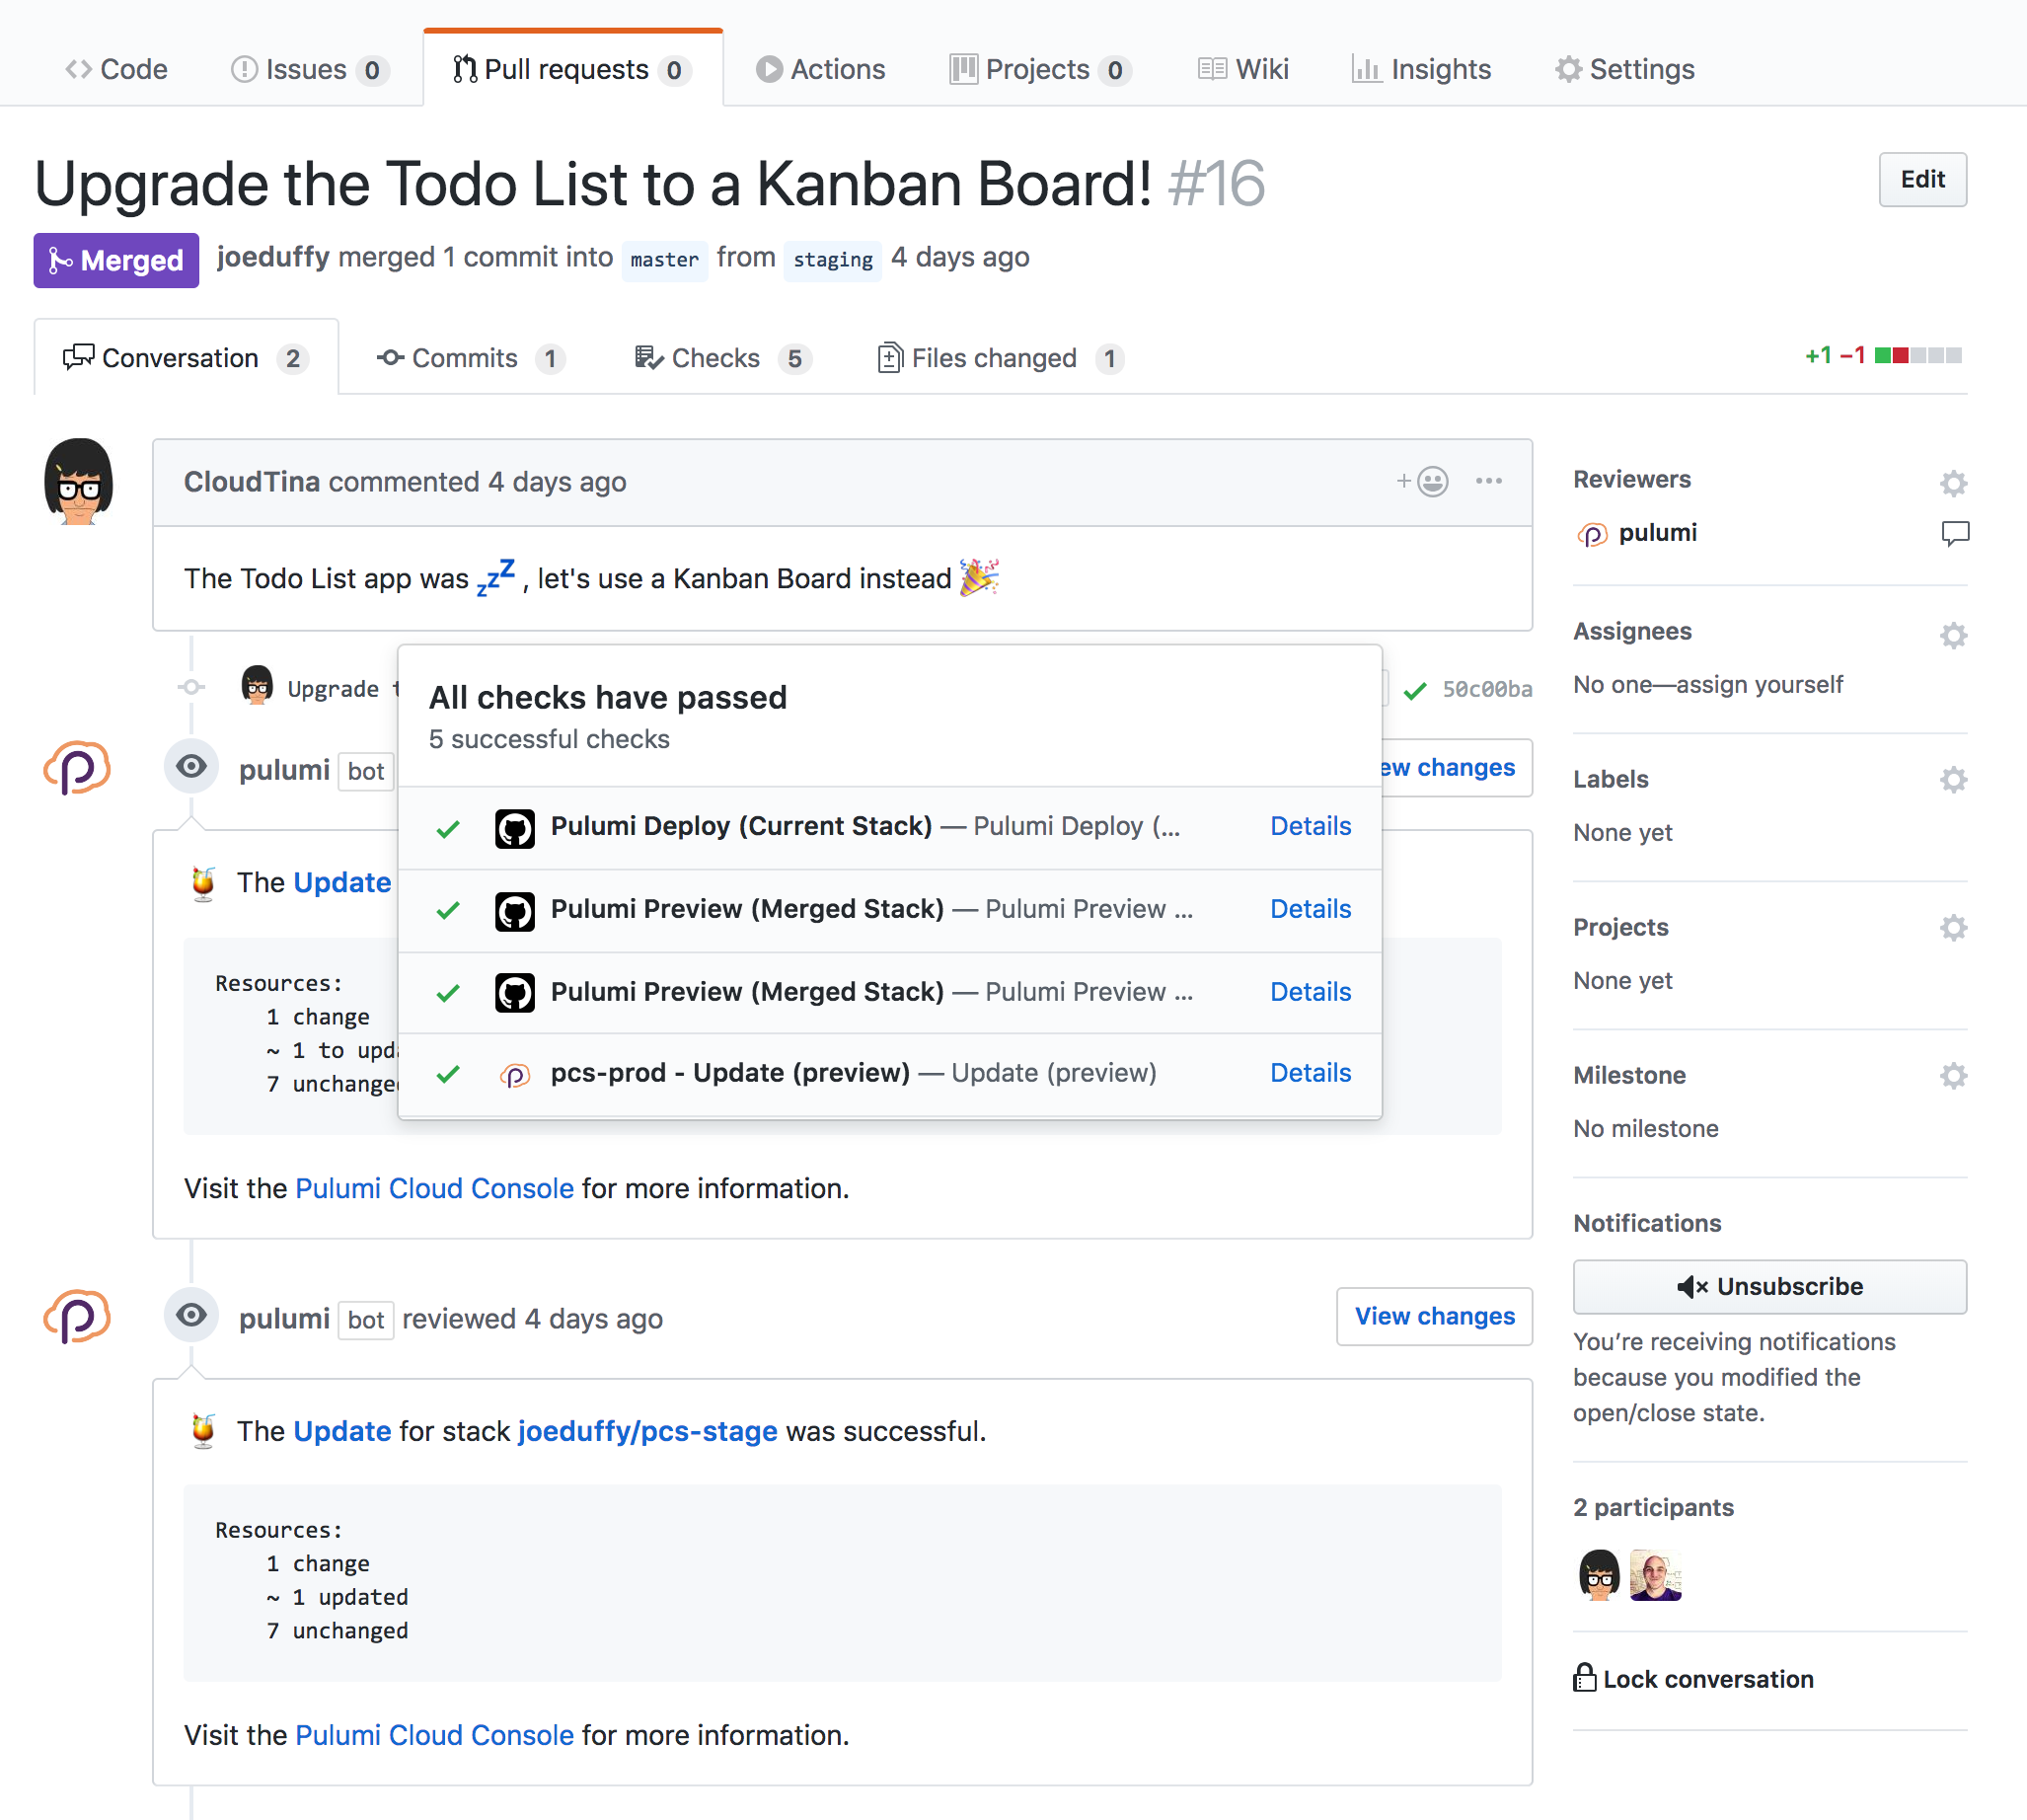
For even better Pull Request integration, make sure to also install our GitHub App!
Pull Request Flow
If you are using Pulumi’s GitHub Actions to preview infrastructure changes from Pull Requests, you may want to have Pulumi comment on those PRs so that you don’t need to look at the specific update logs to see if there were any changes.
There are two ways to do this: using the Pulumi GitHub App (recommended), or configuring the GitHub Actions container directly.
Pulumi GitHub App
The Pulumi GitHub App is something you install on your GitHub organization. It allows the Pulumi Cloud to leave comments on Pull Requests.
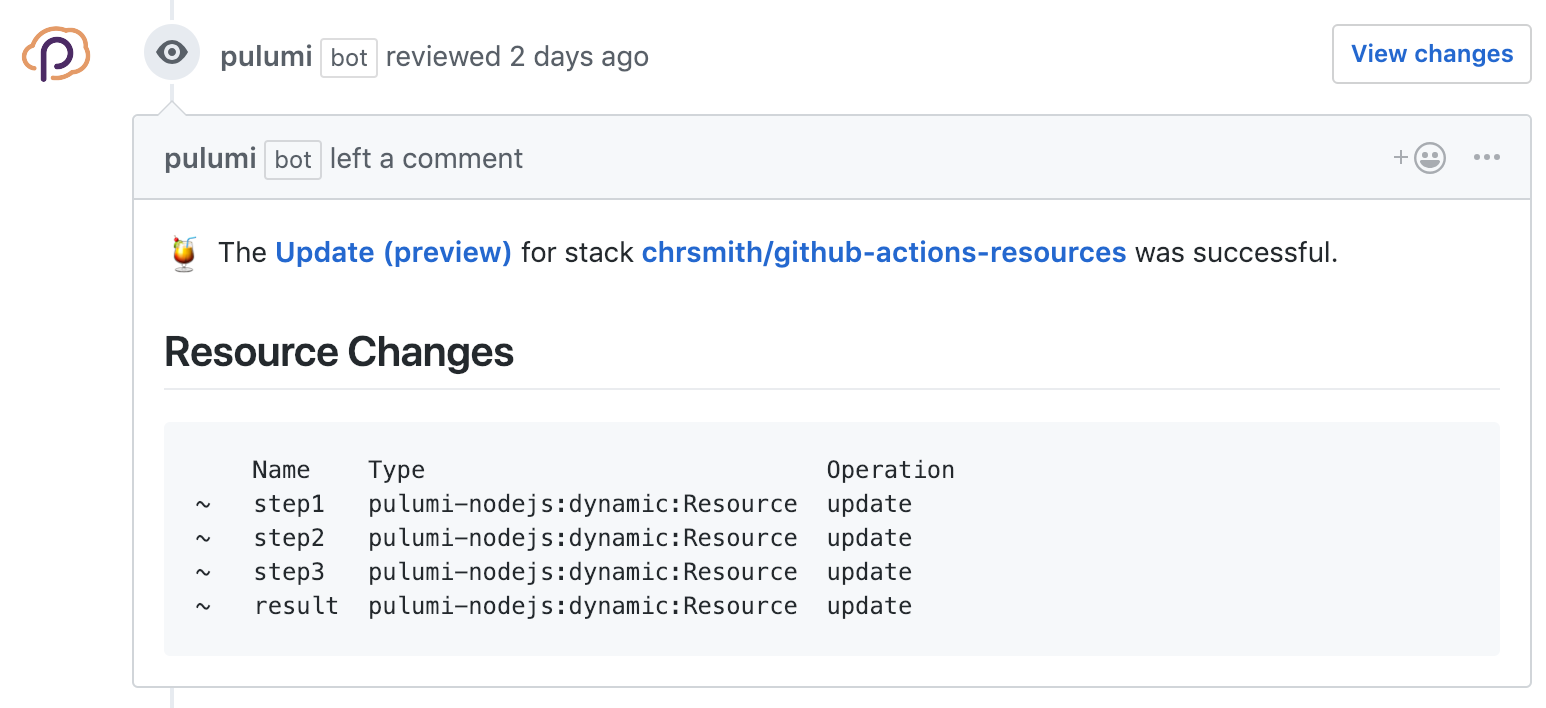
Once the Pulumi GitHub App is installed, when your GitHub Actions run Pulumi, a summary of any resource changes will be left on the Pull Request, as well as links to the Pulumi Console for more detailed information.
Install Pulumi GitHub AppExample comment when using the Pulumi GitHub App:
Comments By GitHub Actions
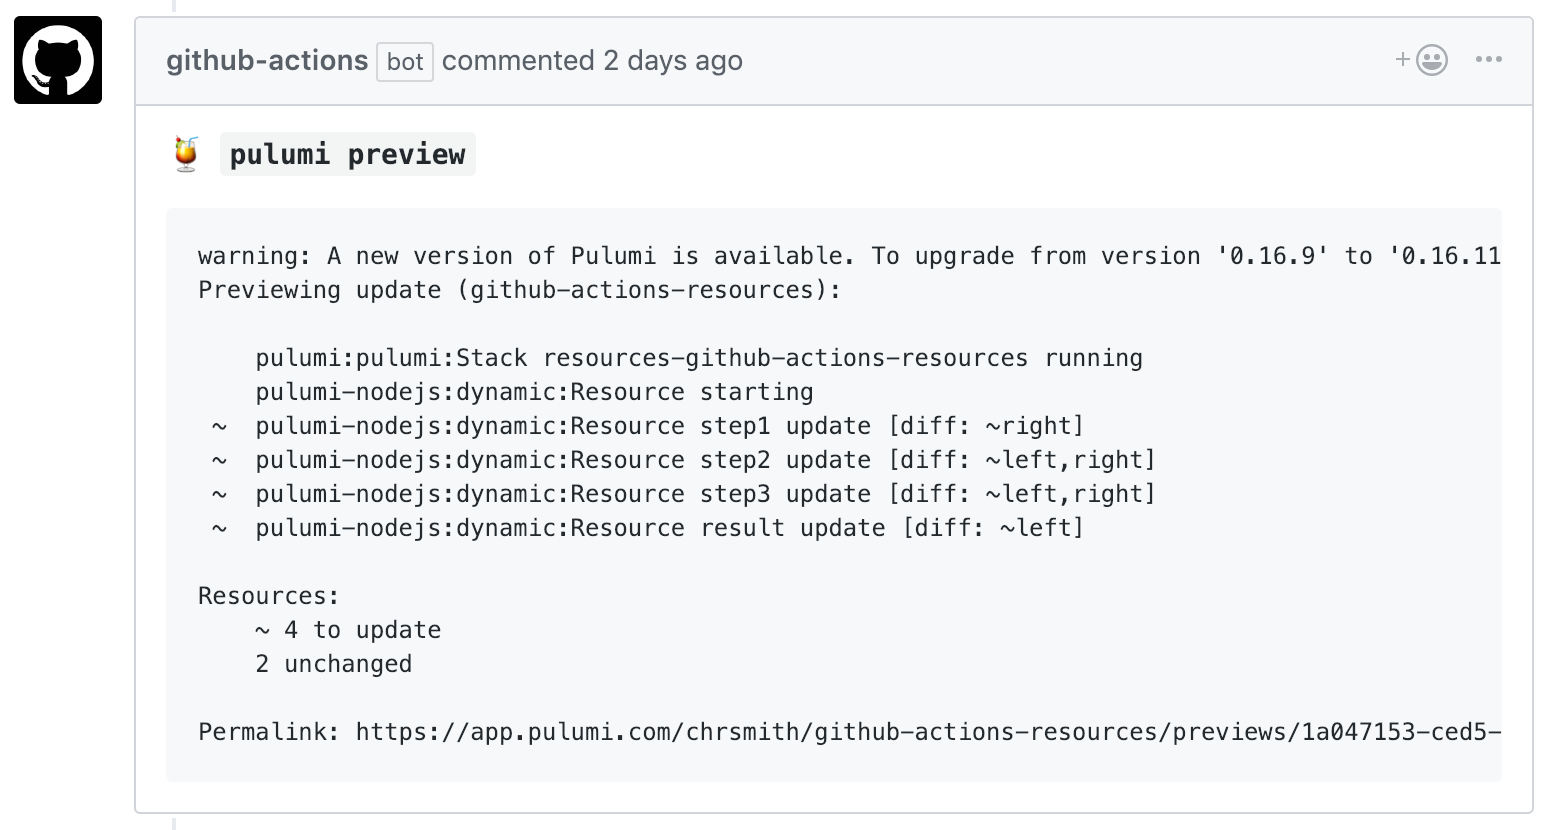
If you don’t want to use the Pulumi GitHub App, you can configure Pulumi’s GitHub Actions
to copy the output of the pulumi invocation on the Pull Request. This option doesn’t
have as rich an output display as the Pulumi GitHub App, as it copies the raw
output of the Pulumi CLI.
To allow your GitHub Action to leave Pull Request comments, you’ll need to add
comment-on-pr and github-token to the list of inputs
passed to the action. Update the action as follows:
name: Pulumi
on:
  - pull_request
jobs:
  preview:
    name: Preview
    runs-on: ubuntu-latest
    steps:
      - uses: actions/checkout@v2
      - uses: actions/setup-node@v3.5.0
        with:
          node-version-file: package.json
      - name: Configure AWS Credentials
        uses: aws-actions/configure-aws-credentials@v1
        with:
          aws-access-key-id: ${{ secrets.AWS_ACCESS_KEY_ID }}
          aws-region: ${{ secrets.AWS_REGION }}
          aws-secret-access-key: ${{ secrets.AWS_SECRET_ACCESS_KEY }}
      - run: npm install
      - uses: pulumi/actions@v3
        with:
          command: preview
          stack-name: org-name/stack-name # When using an individual account, only use stack-name.
          comment-on-pr: true
          github-token: ${{ secrets.GITHUB_TOKEN }}
        env:
          PULUMI_ACCESS_TOKEN: ${{ secrets.PULUMI_ACCESS_TOKEN }}
name: Pulumi
on:
  - pull_request
jobs:
  preview:
    name: Preview
    runs-on: ubuntu-latest
    steps:
      - uses: actions/checkout@v2
      - uses: actions/setup-python@v2
        with:
          python-version: 3.9
      - name: Configure AWS Credentials
        uses: aws-actions/configure-aws-credentials@v1
        with:
          aws-access-key-id: ${{ secrets.AWS_ACCESS_KEY_ID }}
          aws-region: ${{ secrets.AWS_REGION }}
          aws-secret-access-key: ${{ secrets.AWS_SECRET_ACCESS_KEY }}
      - run: pip install -r requirements.txt
      - uses: pulumi/actions@v3
        with:
          command: preview
          stack-name: org-name/stack-name # When using an individual account, only use stack-name.
          comment-on-pr: true
          github-token: ${{ secrets.GITHUB_TOKEN }}
        env:
          PULUMI_ACCESS_TOKEN: ${{ secrets.PULUMI_ACCESS_TOKEN }}
name: Pulumi
on:
  - pull_request
jobs:
  preview:
    name: Preview
    runs-on: ubuntu-latest
    steps:
      - uses: actions/checkout@v2
      - uses: actions/setup-go@v3
        with:
          go-version: 'stable'
      - name: Configure AWS Credentials
        uses: aws-actions/configure-aws-credentials@v1
        with:
          aws-access-key-id: ${{ secrets.AWS_ACCESS_KEY_ID }}
          aws-region: ${{ secrets.AWS_REGION }}
          aws-secret-access-key: ${{ secrets.AWS_SECRET_ACCESS_KEY }}
      - run: go mod download
      - uses: pulumi/actions@v3
        with:
          command: preview
          stack-name: org-name/stack-name # When using an individual account, only use stack-name.
          comment-on-pr: true
          github-token: ${{ secrets.GITHUB_TOKEN }}
        env:
          PULUMI_ACCESS_TOKEN: ${{ secrets.PULUMI_ACCESS_TOKEN }}
name: Pulumi
on:
  - pull_request
jobs:
  preview:
    name: Preview
    runs-on: ubuntu-latest
    steps:
      - uses: actions/checkout@v2
      - uses: actions/setup-dotnet@v1
        with:
          dotnet-version: 3.1.x
      - name: Configure AWS Credentials
        uses: aws-actions/configure-aws-credentials@v1
        with:
          aws-access-key-id: ${{ secrets.AWS_ACCESS_KEY_ID }}
          aws-region: ${{ secrets.AWS_REGION }}
          aws-secret-access-key: ${{ secrets.AWS_SECRET_ACCESS_KEY }}
      - uses: pulumi/actions@v3
        with:
          command: preview
          stack-name: org-name/stack-name # When using an individual account, only use stack-name.
          comment-on-pr: true
          github-token: ${{ secrets.GITHUB_TOKEN }}
        env:
          PULUMI_ACCESS_TOKEN: ${{ secrets.PULUMI_ACCESS_TOKEN }}
Example comment when using GitHub Actions directly:
Configuration
You can configure how Pulumi’s GitHub Actions work to have more control about which stacks get updated, and when.
Using a Different Root Directory
By default, the Pulumi GitHub Action assumes your Pulumi project is in your repo’s root
directory. If you are using a different root directory for your project, set the
work-dir variable in your workflow action, with a relative path to your Pulumi
project directory. For example:
name: Pulumi
on:
  - pull_request
jobs:
  preview:
    name: Preview
    runs-on: ubuntu-latest
    steps:
      - uses: actions/checkout@v2
      - uses: actions/setup-node@v3.5.0
        with:
          node-version-file: package.json
      - name: Configure AWS Credentials
        uses: aws-actions/configure-aws-credentials@v1
        with:
          aws-access-key-id: ${{ secrets.AWS_ACCESS_KEY_ID }}
          aws-region: ${{ secrets.AWS_REGION }}
          aws-secret-access-key: ${{ secrets.AWS_SECRET_ACCESS_KEY }}
      - run: npm install
        working-directory: infra
      - uses: pulumi/actions@v3
        with:
          command: preview
          stack-name: org-name/stack-name # When using an individual account, only use stack-name.
          comment-on-pr: true
          github-token: ${{ secrets.GITHUB_TOKEN }}
          work-dir: infra
        env:
          PULUMI_ACCESS_TOKEN: ${{ secrets.PULUMI_ACCESS_TOKEN }}
name: Pulumi
on:
  - pull_request
jobs:
  preview:
    name: Preview
    runs-on: ubuntu-latest
    steps:
      - uses: actions/checkout@v2
        with:
          fetch-depth: 1
      - uses: actions/setup-python@v2
        with:
          python-version: 3.9
      - name: Configure AWS Credentials
        uses: aws-actions/configure-aws-credentials@v1
        with:
          aws-access-key-id: ${{ secrets.AWS_ACCESS_KEY_ID }}
          aws-region: ${{ secrets.AWS_REGION }}
          aws-secret-access-key: ${{ secrets.AWS_SECRET_ACCESS_KEY }}
      - run: pip install -r requirements.txt
        working-directory: infra
      - uses: pulumi/actions@v3
        with:
          command: preview
          stack-name: org-name/stack-name # When using an individual account, only use stack-name.
          comment-on-pr: true
          github-token: ${{ secrets.GITHUB_TOKEN }}
          work-dir: infra
        env:
          PULUMI_ACCESS_TOKEN: ${{ secrets.PULUMI_ACCESS_TOKEN }}
name: Pulumi
on:
  - pull_request
jobs:
  preview:
    name: Preview
    runs-on: ubuntu-latest
    steps:
      - uses: actions/checkout@v2
        with:
          fetch-depth: 1
      - uses: actions/setup-go@v3
        with:
          go-version: 'stable'
      - name: Configure AWS Credentials
        uses: aws-actions/configure-aws-credentials@v1
        with:
          aws-access-key-id: ${{ secrets.AWS_ACCESS_KEY_ID }}
          aws-region: ${{ secrets.AWS_REGION }}
          aws-secret-access-key: ${{ secrets.AWS_SECRET_ACCESS_KEY }}
      - run: go mod download
        working-directory: infra
      - uses: pulumi/actions@v3
        with:
          command: preview
          stack-name: org-name/stack-name # When using an individual account, only use stack-name.
          comment-on-pr: true
          github-token: ${{ secrets.GITHUB_TOKEN }}
          work-dir: infra
        env:
          PULUMI_ACCESS_TOKEN: ${{ secrets.PULUMI_ACCESS_TOKEN }}
name: Pulumi
on:
  - pull_request
jobs:
  preview:
    name: Preview
    runs-on: ubuntu-latest
    steps:
      - uses: actions/checkout@v2
        with:
          fetch-depth: 1
      - uses: actions/setup-dotnet@v1
        with:
          dotnet-version: 3.1.x
      - name: Configure AWS Credentials
        uses: aws-actions/configure-aws-credentials@v1
        with:
          aws-access-key-id: ${{ secrets.AWS_ACCESS_KEY_ID }}
          aws-region: ${{ secrets.AWS_REGION }}
          aws-secret-access-key: ${{ secrets.AWS_SECRET_ACCESS_KEY }}
      - uses: pulumi/actions@v3
        with:
          command: preview
          stack-name: org-name/stack-name # When using an individual account, only use stack-name.
          comment-on-pr: true
          github-token: ${{ secrets.GITHUB_TOKEN }}
          work-dir: infra
        env:
          PULUMI_ACCESS_TOKEN: ${{ secrets.PULUMI_ACCESS_TOKEN }}
This tells Pulumi that the project can be found underneath the repo’s infra directory.
Stack Upsert
Pulumi has a concept of stacks, which are isolated environments for your application (e.g., production, staging, or even distinct services).
A stack name is a required input for the Pulumi Action. If you need the GitHub Action to create the stack
(passed through the stack-name parameter) on your behalf you can do so with the upsert config option
as follows:
name: Pulumi
on:
  - pull_request
jobs:
  preview:
    name: Preview
    runs-on: ubuntu-latest
    steps:
      - uses: actions/checkout@v2
        with:
          fetch-depth: 1
      - uses: actions/setup-node@v3.5.0
        with:
          node-version-file: package.json
      - name: Configure AWS Credentials
        uses: aws-actions/configure-aws-credentials@v1
        with:
          aws-access-key-id: ${{ secrets.AWS_ACCESS_KEY_ID }}
          aws-region: ${{ secrets.AWS_REGION }}
          aws-secret-access-key: ${{ secrets.AWS_SECRET_ACCESS_KEY }}
      - run: npm install
        working-directory: infra
      - uses: pulumi/actions@v3
        with:
          command: preview
          stack-name: org-name/stack-name # When using an individual account, only use stack-name.
          comment-on-pr: true
          github-token: ${{ secrets.GITHUB_TOKEN }}
          work-dir: infra
          upsert: true
        env:
          PULUMI_ACCESS_TOKEN: ${{ secrets.PULUMI_ACCESS_TOKEN }}
name: Pulumi
on:
  - pull_request
jobs:
  preview:
    name: Preview
    runs-on: ubuntu-latest
    steps:
      - uses: actions/checkout@v2
        with:
          fetch-depth: 1
      - uses: actions/setup-python@v2
        with:
          python-version: 3.9
      - name: Configure AWS Credentials
        uses: aws-actions/configure-aws-credentials@v1
        with:
          aws-access-key-id: ${{ secrets.AWS_ACCESS_KEY_ID }}
          aws-region: ${{ secrets.AWS_REGION }}
          aws-secret-access-key: ${{ secrets.AWS_SECRET_ACCESS_KEY }}
      - run: pip install -r requirements.txt
        working-directory: infra
      - uses: pulumi/actions@v3
        with:
          command: preview
          stack-name: org-name/stack-name # When using an individual account, only use stack-name.
          comment-on-pr: true
          github-token: ${{ secrets.GITHUB_TOKEN }}
          work-dir: infra
          upsert: true
        env:
          PULUMI_ACCESS_TOKEN: ${{ secrets.PULUMI_ACCESS_TOKEN }}
name: Pulumi
on:
  - pull_request
jobs:
  preview:
    name: Preview
    runs-on: ubuntu-latest
    steps:
      - uses: actions/checkout@v2
        with:
          fetch-depth: 1
      - uses: actions/setup-go@v3
        with:
          go-version: 'stable'
      - name: Configure AWS Credentials
        uses: aws-actions/configure-aws-credentials@v1
        with:
          aws-access-key-id: ${{ secrets.AWS_ACCESS_KEY_ID }}
          aws-region: ${{ secrets.AWS_REGION }}
          aws-secret-access-key: ${{ secrets.AWS_SECRET_ACCESS_KEY }}
      - run: go mod download
        working-directory: infra
      - uses: pulumi/actions@v3
        with:
          command: preview
          stack-name: org-name/stack-name # When using an individual account, only use stack-name.
          comment-on-pr: true
          github-token: ${{ secrets.GITHUB_TOKEN }}
          work-dir: infra
          upsert: true
        env:
          PULUMI_ACCESS_TOKEN: ${{ secrets.PULUMI_ACCESS_TOKEN }}
name: Pulumi
on:
  - pull_request
jobs:
  preview:
    name: Preview
    runs-on: ubuntu-latest
    steps:
      - uses: actions/checkout@v2
        with:
          fetch-depth: 1
      - uses: actions/setup-dotnet@v1
        with:
          dotnet-version: 3.1.x
      - name: Configure AWS Credentials
        uses: aws-actions/configure-aws-credentials@v1
        with:
          aws-access-key-id: ${{ secrets.AWS_ACCESS_KEY_ID }}
          aws-region: ${{ secrets.AWS_REGION }}
          aws-secret-access-key: ${{ secrets.AWS_SECRET_ACCESS_KEY }}
      - uses: pulumi/actions@v3
        with:
          command: preview
          stack-name: org-name/stack-name # When using an individual account, only use stack-name.
          comment-on-pr: true
          github-token: ${{ secrets.GITHUB_TOKEN }}
          work-dir: infra
          upsert: true
        env:
          PULUMI_ACCESS_TOKEN: ${{ secrets.PULUMI_ACCESS_TOKEN }}
Migrating from GitHub Action v1
If you previously used GitHub Action v1, the following are changes you should know about when migrating from v1 to v2:
The following inputs have changed from environment variables to action inputs:
PULUMI_ROOTis nowwork-dirPULUMI_BACKEND_URLis nowcloud-urlCOMMENT_ON_PRis nowcomment-on-prGITHUB_TOKENis nowgithub-token
IS_PR_WORKFLOWis no longer used. GitHub Action v2 (and above) is able to understand if the workflow is a pull_request due to the action type.GitHub Action v2 (and above) now runs natively, so the action workflow needs to have the correct environment configured. For example, if you are running a NodeJS (for example) app then you need to ensure that your action has NodeJS available to it. Specify the
enginesin yourpackage.jsonand configure the workflow using:
- uses: actions/setup-node@v3.5.0
  with:
    node-version-file: package.json
- A
.pulumi\ci.jsonfile is no longer used for defining stacks for each branch. You need to usestack-nameas described above.
For additional examples, see the sample workflows available in our Actions repository.
- GitHub Action v2 no longer runs
npm ci | npm install | pip3 install | pipenv install. Please ensure that you install your dependencies before Pulumi commands are executed. For example:
- run: pip install -r requirements
  working-directory: infra
Thank you for your feedback!
If you have a question about how to use Pulumi, reach out in Community Slack.
Open an issue on GitHub to report a problem or suggest an improvement.
