published on Wednesday, Mar 11, 2026 by Pulumi
Video Thumbnailer with AWS Lambda and Fargate

published on Wednesday, Mar 11, 2026 by Pulumi
In this tutorial, we’ll use combine serverless, containers and cloud infrastructure together into a fully functioning distributed application. We use serverless functions as event triggers and containers for longer-running tasks.
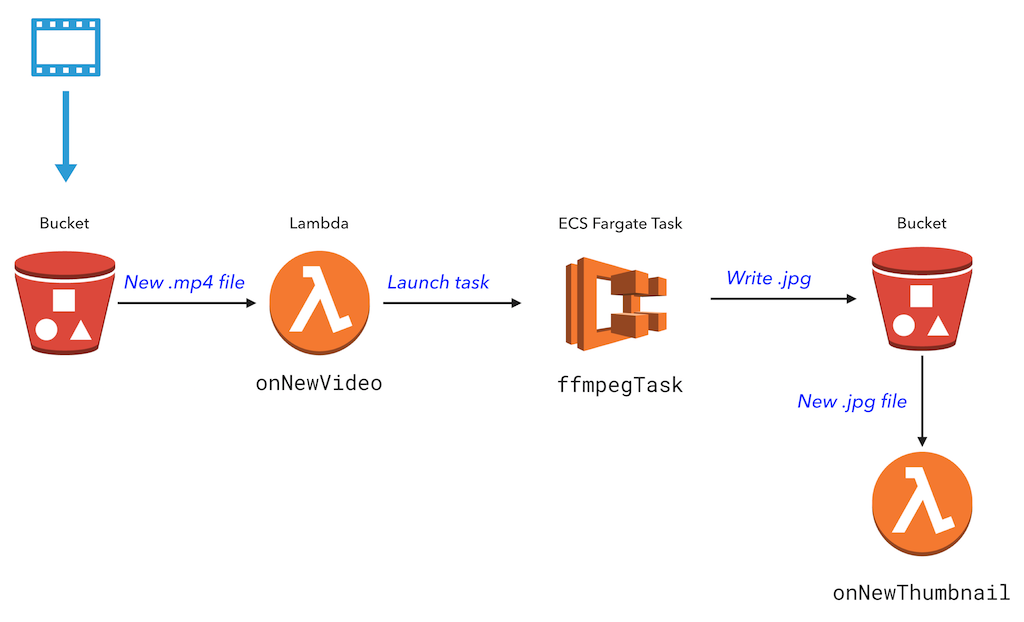
We’ll build an application that extracts a thumbnail from a video using AWS Lambda and Fargate. Below is the architecture of the Pulumi application. The code for this tutorial is available on GitHub, and a video walkthrough of this example is available on YouTube.
Prerequisites
Create and deploy the project
Make sure Docker is installed and running.
Run
pulumi new:$ mkdir video-thumbnail && cd video-thumbnail $ pulumi new aws-typescriptReplace the contents of
index.tswith the following:import * as aws from "@pulumi/aws"; import * as awsx from "@pulumi/awsx"; // A simple cluster to run our tasks in. const cluster = awsx.ecs.Cluster.getDefault(); // A bucket to store videos and thumbnails. const bucket = new aws.s3.Bucket("bucket"); // Export the bucket name. export const bucketName = bucket.id; // A task which runs a containerized FFMPEG job to extract a thumbnail image. const ffmpegThumbnailTask = new awsx.ecs.FargateTaskDefinition("ffmpegThumbTask", { container: { image: awsx.ecs.Image.fromPath("ffmpegThumbTask", "./docker-ffmpeg-thumb"), memoryReservation: 512, }, }); // When a new video is uploaded, run the FFMPEG task on the video file. // Use the time index specified in the filename (e.g. cat_00-01.mp4 uses timestamp 00:01) bucket.onObjectCreated("onNewVideo", new aws.lambda.CallbackFunction<aws.s3.BucketEvent, void>("onNewVideo", { // Specify appropriate policies so that this AWS lambda can run EC2 tasks. policies: [ aws.iam.ManagedPolicy.AWSLambdaExecute, // Provides access to logging and S3 aws.iam.ManagedPolicy.AmazonECSFullAccess, // Required for lambda compute to be able to run Tasks ], callback: async bucketArgs => { console.log("onNewVideo called"); if (!bucketArgs.Records) { return; } for (const record of bucketArgs.Records) { console.log(`*** New video: file ${record.s3.object.key} was uploaded at ${record.eventTime}.`); const file = record.s3.object.key; const thumbnailFile = file.substring(0, file.indexOf('_')) + '.jpg'; const framePos = file.substring(file.indexOf('_')+1, file.indexOf('.')).replace('-',':'); await ffmpegThumbnailTask.run({ cluster, overrides: { containerOverrides: [{ name: "container", environment: [ { name: "S3_BUCKET", value: bucketName.get() }, { name: "INPUT_VIDEO", value: file }, { name: "TIME_OFFSET", value: framePos }, { name: "OUTPUT_FILE", value: thumbnailFile }, ], }], }, }); console.log(`Running thumbnailer task.`); } }, }), { filterSuffix: ".mp4" }); // When a new thumbnail is created, log a message. bucket.onObjectCreated("onNewThumbnail", async bucketArgs => { console.log("onNewThumbnail called"); if (!bucketArgs.Records) { return; } for (const record of bucketArgs.Records) { console.log(`*** New thumbnail: file ${record.s3.object.key} was saved at ${record.eventTime}.`); } }, { filterSuffix: ".jpg" });This code declares the following resources:
- Cloud infrastructure. S3 bucket for videos and still frames. We define a stack output property
bucketName, to easily retrieve this value after the project has been deployed. - Containers. Uses awsx.ecs.FargateTaskDefinition, which is a high-level, convenient component for working with containers. The component automatically provisions a container registry instance in ECR, runs a Docker build, and saves the Docker image to the provisioned ECR instance. It also defines an ECS task and configures it to use the built image.
- Serverless functions
- The Lambda function
onNewVideois triggered whenever a new.mp4video file is uploaded to the S3 bucket. The Lambda extracts the time index that is encoded in the video filename (in the formfile_mm-ss) and launches the container task. - The Lambda function
onNewThumbnailis triggered when a new.jpgthumbnail file is uploaded to the S3 bucket, and prints a message to the log file.
- The Lambda function
- Cloud infrastructure. S3 bucket for videos and still frames. We define a stack output property
Create a directory named
docker-ffmpeg-thumb.$ mkdir docker-ffmpeg-thumbCreate a file named
Dockerfilein thedocker-ffmpeg-thumbfolder with the following contents. For the container setup, it uses an existing container for FFmpeg and installs Python and the AWS CLI. When the container is started, it copies the video file from S3, runsffmpeg, and copies the output back to S3.FROM jrottenberg/ffmpeg RUN apt-get update && \ apt-get install python-dev python-pip -y && \ apt-get clean && pip install --upgrade pip RUN pip install awscli WORKDIR /tmp/workdir ENTRYPOINT \ echo "Starting ffmpeg task..." && \ echo "Copying video from s3://${S3_BUCKET}/${INPUT_VIDEO} to ${INPUT_VIDEO}..." && \ aws s3 cp s3://${S3_BUCKET}/${INPUT_VIDEO} ./${INPUT_VIDEO} && \ ffmpeg -v error -i ./${INPUT_VIDEO} -ss ${TIME_OFFSET} -vframes 1 -f image2 -an -y ${OUTPUT_FILE} && \ echo "Copying thumbnail to S3://${S3_BUCKET}/${OUTPUT_FILE} ..." && \ aws s3 cp ./${OUTPUT_FILE} s3://${S3_BUCKET}/${OUTPUT_FILE}Configure Pulumi to use an AWS region that supports Fargate. (Note: Fargate is currently available only in
us-east-1,us-east-2,us-west-2, andeu-west-1).$ pulumi config set aws:region us-east-2Preview and deploy changes via
pulumi up, which will take a few minutes. During the preview phase, Pulumi runs the Docker build.$ pulumi up Previewing update of stack 'thumbnailer-testing' ... Diagnostics: ... global: global info: Building container image 'pulum-dc8d99de-container': context=./docker-ffmpeg-thumb Do you want to perform this update? yes Updating stack 'thumbnailer-testing' Performing changes: ... ---outputs:--- bucketName: "bucket-0c91106" info: 32 changes performed: + 32 resources created Update duration: 1m48.486679173s
Test the application
To test the application, we’ll upload a video to S3, view the running application logs, then download the thumbnail from S3.
1. Upload a video to S3
Download a short sample video to your project folder.
Copy the video to S3, encoding the time index in the filename (00:01 becomes
00-01):$ aws s3 cp cat.mp4 s3://$(pulumi stack output bucketName)/cat_00-01.mp4 upload: cat.mp4 to s3://bucket-0c91106/cat_00-01.mp4
2. View logs
Run pulumi logs -f for the streaming logs of the Lambda functions as well as the Fargate task. Note that the log contains a prefix that matches the functions and tasks in your code, such as onNewVideo and ffmpegThumbTask:
$ pulumi logs -f
Collecting logs for stack thumbnail-quickstart-dev since 2018-05-25T13:32:27.000-07:00.

 2018-05-25T14:29:17.935-07:00[                    onNewVideo] *** New video: file cat_00-01.mp4 was uploaded at 2018-05-25T21:29:17.230Z.
 2018-05-25T14:29:22.319-07:00[                    onNewVideo] Running thumbnailer task.
 2018-05-25T14:30:25.995-07:00[               ffmpegThumbTask] Starting ffmpeg task...
 2018-05-25T14:30:25.995-07:00[               ffmpegThumbTask] Copying video FROM S3
download: s3://bucket-756b44a/cat_00-01.mp4 to ./cat_00-01.mp4    pleted 256.0 KiB/666.5 KiB (1.9 MiB/s) with 1 file(s) remaining
 2018-05-25T14:30:31.037-07:00[               ffmpegThumbTask] Copying thumbnail TO S3
upload: ./cat.jpg to s3://bucket-756b44a/cat.jpg                  pleted 86.6 KiB/86.6 KiB (303.9 KiB/s) with 1 file(s) remaining
 2018-05-25T14:30:34.298-07:00[                onNewThumbnail] *** New thumbnail: file cat.jpg was saved at 2018-05-25T21:30:33.724Z.
3. Download the thumbnail file
After you see the *** New thumbnail message, copy the jpg from S3.
$ aws s3 cp s3://$(pulumi stack output bucketName)/cat.jpg .
download: s3://bucket-0c91106/cat.jpg to ./cat.jpg
Clean up
Before moving on, tear down the resources that are part of your stack to avoid incurring any charges.
- Run
pulumi destroyto tear down all resources. You'll be prompted to make sure you really want to delete these resources. A destroy operation may take some time, since Pulumi waits for the resources to finish shutting down before it considers the destroy operation to be complete. - To delete the stack itself, run
pulumi stack rm. Note that this command deletes all deployment history from the Pulumi Service.
Next steps
For a version of this sample that includes AWS Rekognition, see the Video Thumbnailer with Machine Learning JavaScript example.
For an example application that connects two containers, see the Voting App TypeScript sample.
published on Wednesday, Mar 11, 2026 by Pulumi
