Migrate EKS Node Groups with Zero Downtime
60 minIn this tutorial you'll launch a new, managed Kubernetes cluster in Elastic Kubernetes Service (EKS) on AWS. Then you'll walk through Kubernetes Day 2 operations to help you administer and update the cluster, and your workloads running on it.
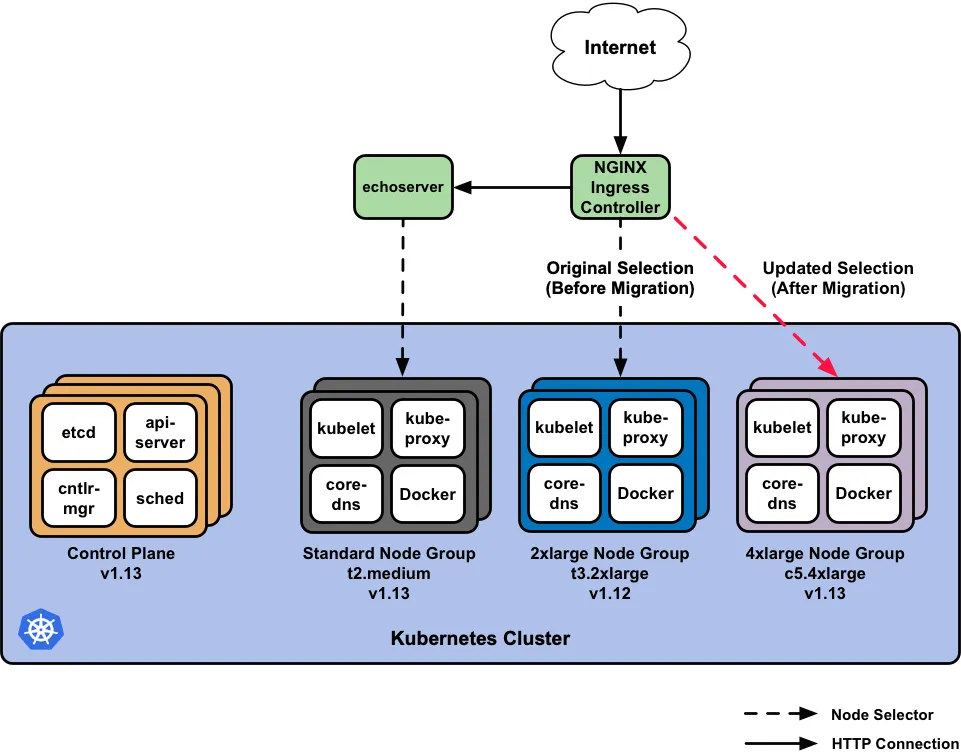
You'll create worker node groups with different instance types and AMIs, deploy the NGINX Ingress Controller and a simple echoserver app, migrate NGINX from its original node group to a new, updated node group with zero downtime while load testing, and finally decommission the original node group from both Kubernetes and AWS.
- How Pulumi's create-before-delete model enables blue/green replacements
- How to create EKS worker node groups with different instance types and AMIs
- How to migrate a running workload across node groups with zero downtime
- How to load-test a migration with the hey tool
- How to safely decommission a node group from Kubernetes and AWS
- The Pulumi CLI
- A Pulumi Cloud account and an access token
- An AWS account with credentials configured
- The Kubernetes command line tool kubectl installed
- Node.js installed
In this tutorial we’ll launch a new, managed Kubernetes cluster in Elastic Kubernetes Service (EKS) on AWS. Then we’ll walk through Kubernetes Day 2 operations to help you administer and update the cluster, and your workloads running on it.
We’ll cover how to:
- Create various worker node groups with different settings, such as instance types and AMIs.
- Deploy a workload to the set of node groups: the NGINX Ingress Controller, and a simple echoserver app that echo’s client request headers.
- Migrate NGINX from its original node group to a new, updated node group with zero downtime to it or the echoserver during load testing.
- And lastly, once migration has completed, we’ll decomission the original node group from Kubernetes and AWS.
Initialize the Pulumi Project#
Start by cloning the example to your local machine.
Terminal window git clone https://github.com/pulumi/examplescd examples/aws-ts-eks-migrate-nodegroupsInstall the dependencies.
Terminal window npm installCreate a new Pulumi stack named
dev.Terminal window pulumi stack init devSet the Pulumi configuration variables for the project.
Terminal window pulumi config set aws:region us-west-2
Create an EKS cluster and Deploy the Workload#
Create the cluster and deploy the workload by running an update:
pulumi upThe update takes ~15 minutes and will create the following resources in AWS:
- A VPC in our region, with public & private subnets across all of the region’s availability zones.
- The IAM Roles & Instance Profiles for each node group.
- An EKS cluster with
v1.13of Kubernetes. - A standard
t2.mediumworker node group using the recentv1.13.7worker AMI, for use by general purpose workloads such as the EchoServer. - A 2xlarge
t3.2xlargeworker node group using an olderv1.12.7worker AMI, for use use by larger, intensive workloads such as the NGINX Ingress Controller.
Once the update is complete, verify the cluster, node groups, and Pods are up and running:
pulumi stack output kubeconfig > kubeconfig.json && export KUBECONFIG=$PWD/kubeconfig.jsonkubectl get nodes -o wide --show-labels -l beta.kubernetes.io/instance-type=t2.mediumkubectl get nodes -o wide --show-labels -l beta.kubernetes.io/instance-type=t3.2xlargekubectl get pods --all-namespaces -o wide --show-labelsAccess the Workload#
With the deployment from the previous step completed, we can leverage Pulumi stack outputs to retrieve the public endpoint of the AWS Classic Load Balancer exported by the Pulumi program.
This load balancer fronts the NGINX Ingress Controller, which in turn manages the ingress for the echoserver:
pulumi stack output nginxServiceUrlExample:
$ pulumi stack output nginxServiceUrl
a3a6ae14f9e6d11e99ea4023e81f316e-1155138699.us-east-2.elb.amazonaws.com
After the load balancer is provisioned and resolvable on AWS, let’s access the echoserver behind NGINX:
export LB=`pulumi stack output nginxServiceUrl`curl -Lv -H "Host: apps.example.com" $LB/echoserverOn success, we’ll see output similar to the following:
Hostname: echoserver-xlvnkcng-74648fd4dd-8jck4
Pod Information:  -no pod information available-
Server values:  server_version=nginx: 1.13.0 - lua: 10008
Request Information:  client_address=172.16.247.199  method=GET  real path=/echoserver  query=  request_version=1.1  request_uri=http://apps.example.com:8080/echoserver
Request Headers:  accept=*/*  host=apps.example.com  user-agent=curl/7.58.0  x-forwarded-for=172.16.200.230  x-forwarded-host=apps.example.com  x-forwarded-port=80  x-forwarded-proto=http  x-original-uri=/echoserver  x-real-ip=172.16.200.230  x-request-id=b874c43cc675d28c68a0c39069799b10  x-scheme=http
Request Body:  -no body in request-
With our apps now verified as working and accessible, we’re ready to see how we can leverage Kubernetes and Pulumi to migrate workloads across worker node groups.
Resource Updates#
Pulumi’s create-before-delete Approach#
Resources under management in Pulumi are uniquely named using a Universal Resource Name (URN) to identify and track resources across program deployments and state changes. Additionally, a random postfix is added to resource instantiations to avoid collisions, and to assist in zero-downtime replacements. This is achieved by using a create-before-delete approach in the Pulumi programming model where:
- The new version of the resource is created.
- Any references to the original resource are updated to point to the new resource.
- On success of the updates, the original resource is deleted.
These semantics allow Pulumi to replace resources using a blue/green deployment strategy by default, and this works for most scenarios.
There are situations, as with many Kubernetes workloads, where the intrinsic details of Pod updates and replacements are encoded in Kubernetes API resources and scheduling predicates that are managed by the control plane for high-availability. These management constructs are exempt from the Pulumi engine and require granular handling of the blue/green deployment of the Pods, and the underlying cloud provider resources that Kubernetes depends on.
In these specific cases, we can stand up overlapping copies of the infrastruture stack in the Kubernetes layers and in the cloud provider for as long as we need to guarantee a smooth transition. This affords us the ability to administer proper migrations in a blue/green strategy catered to our use-case, and scenarios like this are completely possible to achieve in Pulumi.
Kubernetes Workloads: High-Availability (HA) & Rolling Updates#
Before we perform an update to our node groups and migrate our workloads, it’s important to consider how equipped our workloads are for rolling updates, if they employ high availability, and if they can gracefully terminate within the Kubernetes Pod lifecycle.
Kubernetes has many knobs and levers through API resources to describe your app’s requirements, runtime settings, and update strategy. But it requires you take the necessary steps to refactor your apps to execute, and survive in a Kubernetes cluster.
In our example, both NGINX and the echoserver are stateless apps, which means that there is no active state to manage nor persist across running sessions. Both apps are also equipped to gracefully terminate, and process SIGTERM where necessary. Kubernetes is great at managing stateless apps because it’s straight-forward to run, delete, and most importantly, cleanly recovers in the case of failure or lack of quorum, as availability is as simple as spinning up another replica.
If you’re managing stateful apps, you should consider leveraging StatefulSets, as they provide each Pod in the set with a unique identity and index to employ a systematic approach and ordering to the app’s lifecycle. With that said, Kuberenetes has no insight into the details of your workload, nor how it operates - this is purposefully done by design. The work to fully run and operate stateful apps in Kubernetes ultimately lies with the app developers, operators, and administrators to bake-in and fine-tune the necessary resilience into the workload and its dependencies to safely apply updates, and terminate as expected.
As you’ll see shortly, we’ve taken the liberty of using the various capabilities that Kubernetes offers for HA and rolling updates to support migration of the NGINX Ingress Controller example.
We highly encourage you to check out the references below to help your apps achieve proper Kubernetes and production readiness.
References#
- Deployments
- PodDisruptionBudget
- Node Selectors & Affinity
- Pod Affinity & Anti-Affinity
- Service Selectors
- Readiness & Liveness Probes
- Lifecycle Hooks
- Termation Grace Period & Graceful Shutdown
- Pod Termination Lifecycle
- Zero-downtime Deployment in Kubernetes with Jenkins
The Great Migration#
Upon initial deployment of our workload stack, the echoserver will ultimately land on the Standard node group we’ve created, given our lack of specificity for where the Kubernetes scheduler should place it. The NGINX Ingress Controller instead, specifically targets the 2xlarge node group given its heftier specs. Both scheduling choices were made with the intent of segmenting our workloads by use-case, and performance requirements we’ve identified.
In our initial update we selected that our EKS control plane run on v1.13.7 of Kubernetes, that the Standard node group use v1.13.7 of the EKS-optimized worker AMIs, and that the 2xlarge node group use v1.12.7 workers.
Since we do not want our 2xlarge workers to drift too far apart from the control plane’s version to cause unsupported skew, and we ultimately realize that the 2xlarge node group may not suffice for a large, anticipated request load, we’ve decided to update various settings of the node group for NGINX.
The node group that NGINX will select and target will go from:
Using v1.12.7of Kubernetes, in a pool of (3) t3.2xlarge worker instances ->
Using v1.13.7of Kubernetes, in a pool of (5) c5.4xlarge worker instances.
(Optional) Launch load tests.#
As we migrate NGINX from the 2xlarge -> 4xlarge node group, we’ll kick off a load testing script against the endpoint and path of the echoserver on our cluster to ensure we acheive zero-downtime.
You can install the hey load testing tool locally to your machine by doing the following:
go get -u github.com/rakyll/heyUsing the LB environment variable previously defined in the pulumi stack output for NGINX’s AWS load balancer, and a helper script in ./scripts, we’ll load test for many iterations of 50,000 requests, with 100 concurrent requests at a time, e.g. run testing across 75 iterations:
export LB=`pulumi stack output nginxServiceUrl`./scripts/load-testing.sh $LB 75Step 1: Create the new 4xlarge node group.#
Next, we’ll create a new node group in AWS using Pulumi for the 4xlarge node group. This is as simple as defining a new node group at the end of index.ts:
// Create a 4xlarge node group of c5.4xlarge workers. This new node group will// be used to migrate NGINX away from the 2xlarge node group.const ng4xlarge = utils.createNodeGroup(`${projectName}-ng-4xlarge`, { ami: "ami-03a55127c613349a7", // k8s v1.13.7 in us-west-2 instanceType: "c5.4xlarge", desiredCapacity: 5, cluster: myCluster, instanceProfile: instanceProfiles[2], taints: {"nginx": { value: "true", effect: "NoSchedule"}},});Append the above snippet into the Pulumi program, and run an update:
pulumi upOnce the update is complete, verify the new c5.4xlarge node group is up and running:
kubectl get nodes -o wide --show-labels -l beta.kubernetes.io/instance-type=c5.4xlargeStep 2: Migrate NGINX to the 4xlarge node group.#
Now, we’ll migrate the NGINX service away from the 2xlarge node group over to the 4xlarge node group, by changing its node selector scheduling terms.
This change updates the NGINX Deployment spec to require the use of c5.4xlarge nodes during scheduling, and forces a rolling update over to the 4xlarge node group.
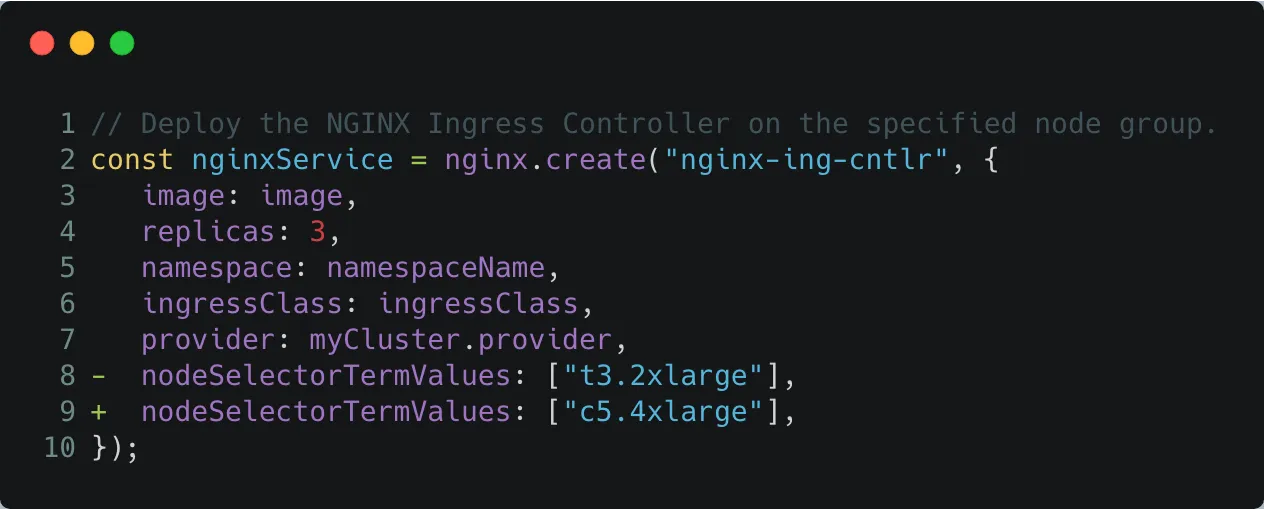
Edit index.ts by setting nodeSelectorTermValues to c5.4xlarge, and run an update:
pulumi upNGINX is able to successfully migrate across node groups because it is configured with HA settings, spread-type scheduling predicates, and can gracefully terminate within the Kubernetes Pod lifecycle. Check out its setup to learn more.
Once the update is complete, verify the NGINX pods are now running in the new 4xlarge node group by retrieving its Pods, the c5.4xlarge nodes, and noticing that the Pods are in fact running on updated nodes.
kubectl get pods --all-namespaces -o wide --show-labels -l app=nginx-ing-cntlrkubectl get nodes -o wide --show-labels -l beta.kubernetes.io/instance-type=c5.4xlargeStep 3: Decommission the 2xlarge node group.#
With NGINX validated to be up and running on the 4xlarge node group, we can now commence the decomissioning of the original 2xlarge node group no longer in use.
Decommissioning the node group means that we’ll:
- Drain the Kubernetes nodes.
- Delete the Kubernetes nodes from the APIServer.
- Scale down the Auto Scaling Group to 0.
- Delete the node group.
Setup kubectl by using the kubeconfig from the stack output.
pulumi stack output kubeconfig > kubeconfig.jsonexport KUBECONFIG=$PWD/kubeconfig.jsonInstruct the Kubernetes APIServer to drain the 2xlarge node group using kubectl drain. We’ve added a helper script to facilitate this process:
./scripts/drain-t3.2xlarge-nodes.shAfter draining has completed, let’s instruct the Kubernetes APIServer to delete the nodes from the cluster using kubectl delete node:
./scripts/delete-t3.2xlarge-nodes.shScale down the node group Auto Scaling Group completely:
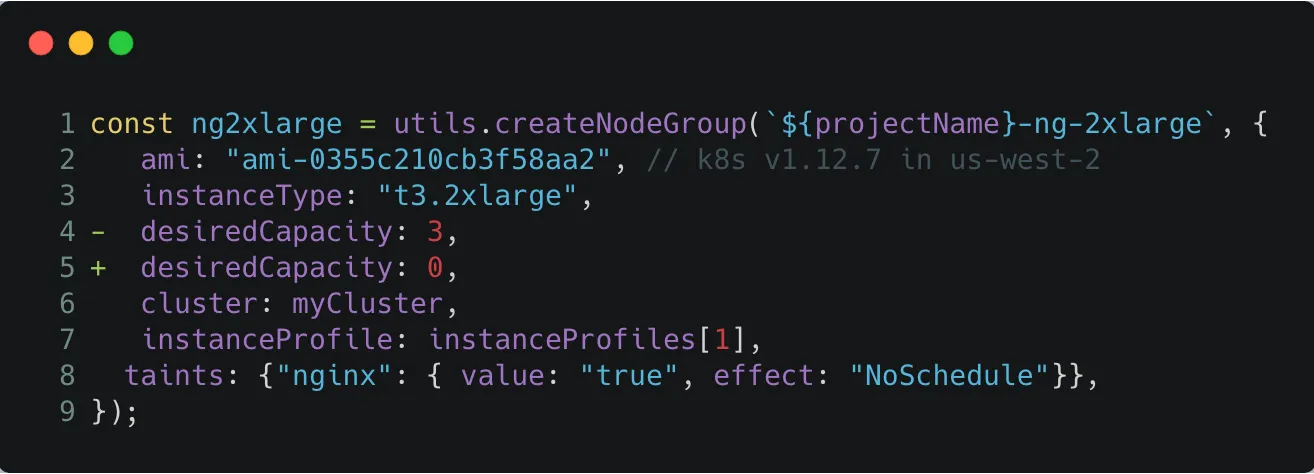
Edit index.ts by setting the desiredCapacity to 0 for the 2xlarge node group, and run an update:
pulumi upOnce the Auto Scaling Group has scaled down, we can delete the node group from AWS and the Pulumi program:
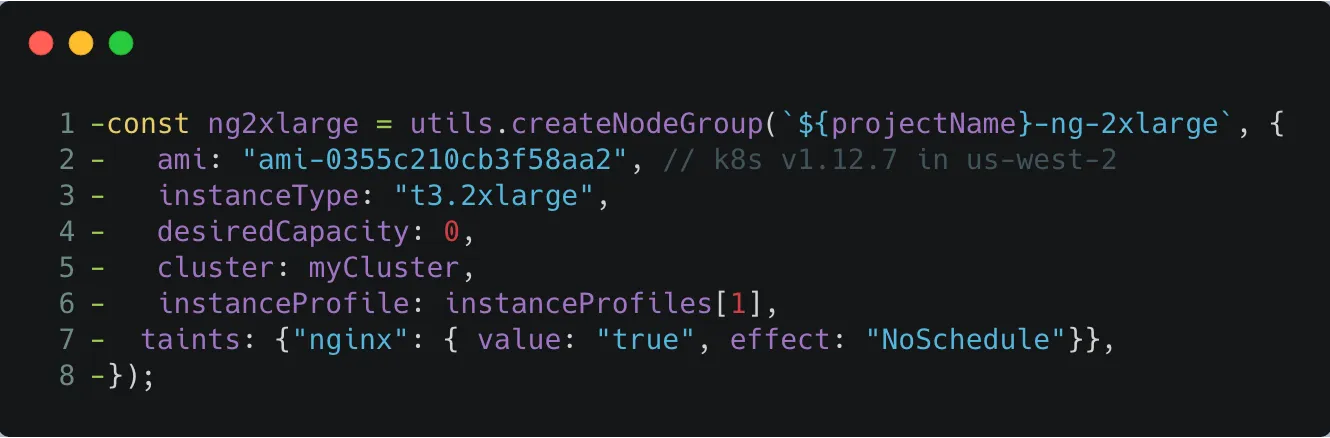
Delete the snippet above from index.ts, and run an update:
pulumi upIf you’ve executed all of the previous steps, then you’ll have successfully migrated NGINX from the 2xlarge node group to the 4xlarge group with zero downtime to it or the echoserver, and removed the 2xlarge node group completely from Kubernetes and AWS.
You can also verify the load testing results to validate that our requests have all returned with HTTP 200 status codes through out the entire migration process. 🍹🎉
Clean Up#
Run the following command to tear down the resources that are part of our stack.
Run
pulumi destroyto tear down all resources. You’ll be prompted to make sure you really want to delete these resources.Terminal window pulumi destroyTo delete the stack, run the following command.
Terminal window pulumi stack rm
Summary#
In this tutorial, we saw how to use Pulumi to launch a managed Kubernetes cluster on AWS EKS with active workloads. Then, we performed a migration of the apps and underlying cloud provider resources over to new, updated resources with zero downtime.
Leveraging Kubernetes control plane with Pulumi’s Infrastrcture-as-Code (IaC) semantics allows us to administer over many kinds of update scenarios with ease. This provides the ability to manage clusters with real code that can be tracked in version control systems, and deployed as a series of Pulumi updates through CI/CD.
For a follow-up example on how to further use Pulumi to create Kubernetes clusters, or deploy workloads to a cluster, check out the rest of the Kubernetes tutorials.
Related
Kubernetes RBAC in AWS EKS with open source Pulumi packages
