Hub-and-spoke network with centralized egress and traffic inspection using AWS Transit Gateway and AWS Firewall
A minimal Python Pulumi program
This example lives in the pulumi/examples repository. Check out just this directory to use it:
git clone --filter=blob:none --sparse https://github.com/pulumi/examples pulumi-examplesgit -C pulumi-examples sparse-checkout set aws-py-hub-and-spoke-networkcd pulumi-examples/aws-py-hub-and-spoke-networkThis example creates a hub and spoke network in AWS with centralized egress and (optional) traffic inspection using AWS VPC, AWS Transit Gateway, and AWS Firewall for traffic inspection. The code creates 2 spoke networks, but additional networks can be added quickly by modifying the code (see “Additional options” below).
About the architecture#
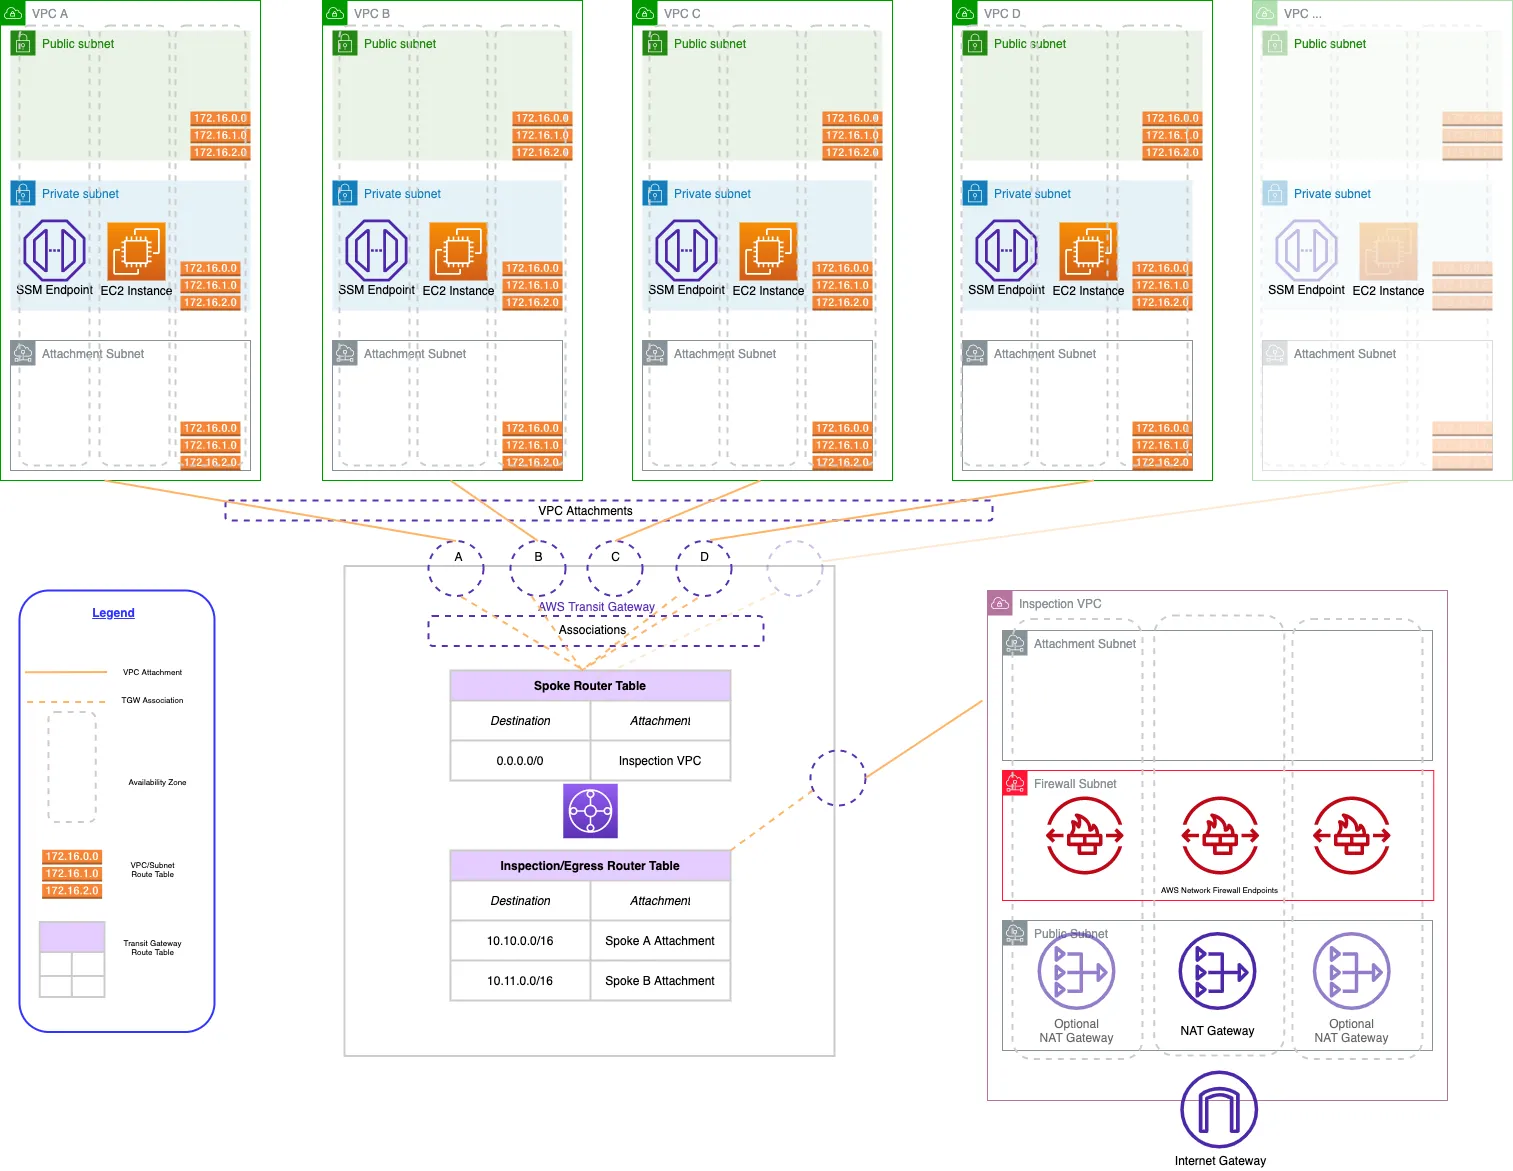
A hub-and-spoke network is a common architecture for creating a network topology that provides isolation and security for your workloads. The hub-and-spoke architecture you’ll be creating on AWS has three main components: an inspection VPC, AWS Transit Gateway, and a series of spoke VPCs.
- The inspection VPC provides centralized egress. It is the only VPC that has a route to the internet, so all other VPCs in the architecture must route their traffic through the inspection VPC. The inspection VPC has optional traffic inspection capabilities.
- Network connectivity between VPCs is accomplished via AWS Transit Gateway. The Transit Gateway maintains a central routing table that is used to route traffic from the spoke VPCs to the internet. We also need to maintain routes so that return traffic from the internet can be routed back to the correct spoke VPC.
- The spoke VPCs are where we run our application workloads. They are isolated from each other and cannot communicate with each other unless we explicitly allow a network path. They will be able to communicate with the internet by default, but only through the inspection VPC’s NAT gateways.
Prerequisites#
Deploying the example#
-
Create a new Pulumi stack:
Terminal window pulumi stack init -
Configure the AWS region to deploy into:
Terminal window pulumi config set aws:region us-east-2 -
Install dependencies:
Terminal window python3 -m venv venvsource venv/bin/activatepip install -r requirements.txt -
Deploy the stack:
Terminal window pulumi up
Testing the network#
-
Take note of the
nat-gateway-eipoutput from the stack. This is the Elastic IP address of the NAT gateway in the inspection VPC. -
Log into the AWS Console in the region in which you deployed the project.
-
Navigate to the EC2 service home page.
-
Select one of the spoke workload instances and under “Actions”, click “Connect”.
-
Under the Session Manager section, click “Connect”. This will create a terminal session to the instance.
-
Run the following command. The resulting output should be identical to the
nat-gateway-eipoutput from the stack. This means that your EC2 instance is able to reach the internet through the NAT gateway in the inspection VPC.Terminal window curl -s http://icanhazip.com
You can comment out the SpokeWorkload components after testing as it is not required for the network to function.
Additional options#
There are several modifications to the code that can be made:
-
To enable traffic inspection, set the
create-firewallconfig variable totrue.Terminal window pulumi config set create-firewall trueBy default, the firewall rules will only allow traffic to amazon.com. You can modify the rules by editing the contents of
firewall.py. -
To add additional spoke networks, initiate additional instances of the
SpokeVpccomponent resource in__main__.py. Be sure that each spoke VPC has a CIDR block that does not overlap with any other spoke VPCs.
Cleaning up#
Once you’re finished experimenting, you can destroy your stack and remove it to avoid incurring any additional cost:
pulumi destroypulumi stack rmTroubleshooting#
You may encounter a condition where the security group fails to delete. This may be due to incomplete deletion of VPC endpoints. To fix this condition, perform the following in the AWS console:
- Delete all VPC endpoints in the VPC that contains the security group that is failing to delete. Wait for the endpoints to finish deleting.
- Once the VPC endpoints are deleted, attempt to delete the security group in the console. If any ENIs are still using the security group, wait a few seconds and try again. ENIs created for VPC endpoints may take an additional minute or two to be deleted after deleting the associated VPC endpoint.
- Run
pulumi destroyagain.
Summary#
In this tutorial, you created a hub and spoke network with centralized egress and (optional) traffic inspection. Now you can deploy workloads into the VPCs and enjoy the benefits of this architecture.