Deploy the Kubernetes Guestbook App
15 minThe Guestbook is a simple, multi-tier web application that uses Redis and Nginx, powered by Docker containers and Kubernetes. In this tutorial, you will build and deploy the standard Kubernetes Guestbook example with Pulumi.
Unlike the original example, which is authored in YAML and deployed with kubectl, you will author this one in a general-purpose language and deploy it with pulumi. This gives you the full power of real programming languages, combined with immutable infrastructure, for a robust and repeatable update experience.
You will stand up a Redis leader, Redis replicas, and the Guestbook frontend, expose and view the frontend service, perform an incremental update that scales the frontend, and then clean everything up.
- How to model a multi-tier app — Redis leader, Redis replicas, and an Nginx frontend — as Kubernetes Deployments and Services in code
- How to parameterize the frontend Service between
ClusterIPandLoadBalancerwith configuration - How to view the running application with
kubectlandpulumi stack output - How Pulumi computes the minimal set of changes when you update your program
- How to tear the application down cleanly
- The Pulumi CLI
- A Pulumi Cloud account and an access token
- A running Kubernetes cluster
- The Kubernetes command line tool kubectl installed
- Your desired language runtime installed
In this tutorial, you will build and deploy the standard Kubernetes Guestbook example using Pulumi.
The Guestbook is a simple, multi-tier web application that uses Redis and Nginx, powered by Docker containers and Kubernetes. The primary difference between this example and the standard Kubernetes one is that you will author it in a general-purpose language instead of YAML, and deploy it with pulumi rather than kubectl. This gives you the full power of general-purpose languages, combined with immutable infrastructure, delivering a robust and repeatable update experience.
The code for this tutorial is available on GitHub.
Objectives#
- Start up a Redis leader
- Start up Redis replicas
- Start up the Guestbook frontend
- Expose and view the frontend service
- Clean up
Before you begin#
You need to have the Pulumi CLI and a working Kubernetes cluster.
Running the Guestbook#
The Guestbook application uses Redis to store its data. It writes its data to a Redis leader instance and reads data from multiple Redis replica instances.
Normally you would write YAML files to configure them, and then run kubectl commands to create and manage the services. Instead of doing that, you will author your program in code and deploy it with pulumi.
To start, you’ll need to create a project and stack (a deployment target) for your new project.
Create and configure a project#
To create a new Pulumi project, use a template:
 TypeScript
 Python
 Go
Go C#
C#mkdir k8s-guestbook && cd k8s-guestbookpulumi new kubernetes-typescriptmkdir k8s-guestbook && cd k8s-guestbookpulumi new kubernetes-pythonmkdir k8s-guestbook && cd k8s-guestbookpulumi new kubernetes-gomkdir k8s-guestbook && cd k8s-guestbookpulumi new kubernetes-csharpThis command will initialize a fresh project in the newly-created k8s-guestbook directory.
Next, replace the minimal contents of the template’s main file with the full Guestbook code:
import * as k8s from "@pulumi/kubernetes";import * as pulumi from "@pulumi/pulumi";
// Create only services of type `ClusterIP`// for clusters that don't support `LoadBalancer` servicesconst config = new pulumi.Config();const useLoadBalancer = config.getBoolean("useLoadBalancer");
//// REDIS LEADER.//
const redisLeaderLabels = { app: "redis-leader" };const redisLeaderDeployment = new k8s.apps.v1.Deployment("redis-leader", {    spec: {        selector: { matchLabels: redisLeaderLabels },        template: {            metadata: { labels: redisLeaderLabels },            spec: {                containers: [                    {                        name: "redis-leader",                        image: "redis",                        resources: { requests: { cpu: "100m", memory: "100Mi" } },                        ports: [{ containerPort: 6379 }],                    },                ],            },        },    },});const redisLeaderService = new k8s.core.v1.Service("redis-leader", {    metadata: {        name: "redis-leader",        labels: redisLeaderDeployment.metadata.labels,    },    spec: {        ports: [{ port: 6379, targetPort: 6379 }],        selector: redisLeaderDeployment.spec.template.metadata.labels,    },});
//// REDIS REPLICA.//
const redisReplicaLabels = { app: "redis-replica" };const redisReplicaDeployment = new k8s.apps.v1.Deployment("redis-replica", {    spec: {        selector: { matchLabels: redisReplicaLabels },        template: {            metadata: { labels: redisReplicaLabels },            spec: {                containers: [                    {                        name: "replica",                        image: "pulumi/guestbook-redis-replica",                        resources: { requests: { cpu: "100m", memory: "100Mi" } },                        // If your cluster config does not include a dns service, then to instead access an environment                        // variable to find the leader's host, change `value: "dns"` to read `value: "env"`.                        env: [{ name: "GET_HOSTS_FROM", value: "dns" }],                        ports: [{ containerPort: 6379 }],                    },                ],            },        },    },});const redisReplicaService = new k8s.core.v1.Service("redis-replica", {    metadata: {        name: "redis-replica",        labels: redisReplicaDeployment.metadata.labels    },    spec: {        ports: [{ port: 6379, targetPort: 6379 }],        selector: redisReplicaDeployment.spec.template.metadata.labels,    },});
//// FRONTEND//
const frontendLabels = { app: "frontend" };const frontendDeployment = new k8s.apps.v1.Deployment("frontend", {    spec: {        selector: { matchLabels: frontendLabels },        replicas: 3,        template: {            metadata: { labels: frontendLabels },            spec: {                containers: [                    {                        name: "frontend",                        image: "pulumi/guestbook-php-redis",                        resources: { requests: { cpu: "100m", memory: "100Mi" } },                        // If your cluster config does not include a dns service, then to instead access an environment                        // variable to find the leader's host, change `value: "dns"` to read `value: "env"`.                        env: [{ name: "GET_HOSTS_FROM", value: "dns" /* value: "env"*/ }],                        ports: [{ containerPort: 80 }],                    },                ],            },        },    },});const frontendService = new k8s.core.v1.Service("frontend", {    metadata: {        labels: frontendDeployment.metadata.labels,        name: "frontend",    },    spec: {        type: useLoadBalancer ? "LoadBalancer" : "ClusterIP",        ports: [{ port: 80 }],        selector: frontendDeployment.spec.template.metadata.labels,    },});
// Export the frontend IP.export let frontendIp: pulumi.Output<string>;if (useLoadBalancer) { frontendIp = frontendService.status.loadBalancer.ingress[0].ip;} else { frontendIp = frontendService.spec.clusterIP;}import pulumifrom pulumi_kubernetes.apps.v1 import Deploymentfrom pulumi_kubernetes.core.v1 import Service, Namespace
# Create only services of type `ClusterIP`# for clusters that don't support `LoadBalancer` servicesconfig = pulumi.Config()useLoadBalancer = config.get_bool("useLoadBalancer")
redis_leader_labels = { "app": "redis-leader",}
redis_leader_deployment = Deployment( "redis-leader", spec={ "selector": { "match_labels": redis_leader_labels, }, "replicas": 3, "template": { "metadata": { "labels": redis_leader_labels, }, "spec": { "containers": [{ "name": "redis-leader", "image": "redis", "resources": { "requests": { "cpu": "100m", "memory": "100Mi", }, }, "ports": [{ "container_port": 6379, }], }], }, }, })
redis_leader_service = Service( "redis-leader", metadata={ "name": "redis-leader", "labels": redis_leader_labels }, spec={ "ports": [{ "port": 6379, "target_port": 6379, }], "selector": redis_leader_labels })
redis_replica_labels = { "app": "redis-replica",}
redis_replica_deployment = Deployment( "redis-replica", spec={ "selector": { "match_labels": redis_replica_labels }, "replicas": 3, "template": { "metadata": { "labels": redis_replica_labels, }, "spec": { "containers": [{ "name": "redis-replica", "image": "pulumi/guestbook-redis-replica", "resources": { "requests": { "cpu": "100m", "memory": "100Mi", }, }, "env": [{ "name": "GET_HOSTS_FROM", "value": "dns", # If your cluster config does not include a dns service, then to instead access an environment # variable to find the leader's host, comment out the 'value: dns' line above, and # uncomment the line below: # value: "env" }], "ports": [{ "container_port": 6379, }], }], }, }, })
redis_replica_service = Service( "redis-replica", metadata={ "name": "redis-replica", "labels": redis_replica_labels }, spec={ "ports": [{ "port": 6379, "target_port": 6379, }], "selector": redis_replica_labels })
# Frontendfrontend_labels = { "app": "frontend",}
frontend_deployment = Deployment( "frontend", spec={ "selector": { "match_labels": frontend_labels, }, "replicas": 3, "template": { "metadata": { "labels": frontend_labels, }, "spec": { "containers": [{ "name": "php-redis", "image": "pulumi/guestbook-php-redis", "resources": { "requests": { "cpu": "100m", "memory": "100Mi", }, }, "env": [{ "name": "GET_HOSTS_FROM", "value": "dns", # If your cluster config does not include a dns service, then to instead access an environment # variable to find the leader's host, comment out the 'value: dns' line above, and # uncomment the line below: # "value": "env" }], "ports": [{ "container_port": 80, }], }], }, }, })
frontend_service = Service( "frontend", metadata={ "name": "frontend", "labels": frontend_labels, }, spec={ "type": "LoadBalancer" if useLoadBalancer else "ClusterIP", "ports": [{ "port": 80 }], "selector": frontend_labels, })
frontend_ip = ""if useLoadBalancer: ingress = frontend_service.status.apply(lambda status: status["load_balancer"]["ingress"][0]) frontend_ip = ingress.apply(lambda ingress: ingress.get("ip", ingress.get("hostname", "")))else: frontend_ip = frontend_service.spec.apply(lambda spec: spec.get("cluster_ip", ""))pulumi.export("frontend_ip", frontend_ip)
package main
import (    appsv1 "github.com/pulumi/pulumi-kubernetes/sdk/v3/go/kubernetes/apps/v1"    corev1 "github.com/pulumi/pulumi-kubernetes/sdk/v3/go/kubernetes/core/v1"    metav1 "github.com/pulumi/pulumi-kubernetes/sdk/v3/go/kubernetes/meta/v1"    "github.com/pulumi/pulumi/sdk/v3/go/pulumi"    "github.com/pulumi/pulumi/sdk/v3/go/pulumi/config")
func main() {    pulumi.Run(func(ctx *pulumi.Context) error {        // Initialize config        conf := config.New(ctx, "")
        // Create only services of type `ClusterIP`        // for clusters that don't support `LoadBalancer` services        useLoadBalancer := conf.GetBool("useLoadBalancer")
        redisLeaderLabels := pulumi.StringMap{            "app": pulumi.String("redis-leader"),        }
        // Redis leader Deployment        _, err := appsv1.NewDeployment(ctx, "redis-leader", &appsv1.DeploymentArgs{            Metadata: &metav1.ObjectMetaArgs{                Labels: redisLeaderLabels,            },            Spec: appsv1.DeploymentSpecArgs{                Selector: &metav1.LabelSelectorArgs{                    MatchLabels: redisLeaderLabels,                },                Replicas: pulumi.Int(1),                Template: &corev1.PodTemplateSpecArgs{                    Metadata: &metav1.ObjectMetaArgs{                        Labels: redisLeaderLabels,                    },                    Spec: &corev1.PodSpecArgs{                        Containers: corev1.ContainerArray{                            corev1.ContainerArgs{                                Name:  pulumi.String("redis-leader"),                                Image: pulumi.String("redis"),                                Resources: &corev1.ResourceRequirementsArgs{                                    Requests: pulumi.StringMap{                                        "cpu":    pulumi.String("100m"),                                        "memory": pulumi.String("100Mi"),                                    },                                },                                Ports: corev1.ContainerPortArray{                                    &corev1.ContainerPortArgs{                                        ContainerPort: pulumi.Int(6379),                                    },                                },                            }},                    },                },            },        })        if err != nil {            return err        }
        // Redis leader Service        _, err = corev1.NewService(ctx, "redis-leader", &corev1.ServiceArgs{            Metadata: &metav1.ObjectMetaArgs{                Name:   pulumi.String("redis-leader"),                Labels: redisLeaderLabels,            },            Spec: &corev1.ServiceSpecArgs{                Ports: corev1.ServicePortArray{                    corev1.ServicePortArgs{                        Port:       pulumi.Int(6379),                        TargetPort: pulumi.Int(6379),                    },                },                Selector: redisLeaderLabels,            },        })        if err != nil {            return err        }
        redisReplicaLabels := pulumi.StringMap{            "app": pulumi.String("redis-replica"),        }
        // Redis replica Deployment        _, err = appsv1.NewDeployment(ctx, "redis-replica", &appsv1.DeploymentArgs{            Metadata: &metav1.ObjectMetaArgs{                Labels: redisReplicaLabels,            },            Spec: appsv1.DeploymentSpecArgs{                Selector: &metav1.LabelSelectorArgs{                    MatchLabels: redisReplicaLabels,                },                Replicas: pulumi.Int(2),                Template: &corev1.PodTemplateSpecArgs{                    Metadata: &metav1.ObjectMetaArgs{                        Labels: redisReplicaLabels,                    },                    Spec: &corev1.PodSpecArgs{                        Containers: corev1.ContainerArray{                            corev1.ContainerArgs{                                Name:  pulumi.String("redis-replica"),                                Image: pulumi.String("pulumi/guestbook-redis-replica"),                                Resources: &corev1.ResourceRequirementsArgs{                                    Requests: pulumi.StringMap{                                        "cpu":    pulumi.String("100m"),                                        "memory": pulumi.String("100Mi"),                                    },                                },                                Env: corev1.EnvVarArray{                                    corev1.EnvVarArgs{                                        Name:  pulumi.String("GET_HOSTS_FROM"),                                        Value: pulumi.String("dns"),                                    },                                },                                Ports: corev1.ContainerPortArray{                                    &corev1.ContainerPortArgs{                                        ContainerPort: pulumi.Int(6379),                                    },                                },                            }},                    },                },            },        })        if err != nil {            return err        }
        // Redis replica Service        _, err = corev1.NewService(ctx, "redis-replica", &corev1.ServiceArgs{            Metadata: &metav1.ObjectMetaArgs{                Name:   pulumi.String("redis-replica"),                Labels: redisReplicaLabels,            },            Spec: &corev1.ServiceSpecArgs{                Ports: corev1.ServicePortArray{                    corev1.ServicePortArgs{                        Port: pulumi.Int(6379),                    },                },                Selector: redisReplicaLabels,            },        })        if err != nil {            return err        }
        frontendLabels := pulumi.StringMap{            "app": pulumi.String("frontend"),        }
        // Frontend Deployment        _, err = appsv1.NewDeployment(ctx, "frontend", &appsv1.DeploymentArgs{            Metadata: &metav1.ObjectMetaArgs{                Labels: frontendLabels,            },            Spec: appsv1.DeploymentSpecArgs{                Selector: &metav1.LabelSelectorArgs{                    MatchLabels: frontendLabels,                },                Replicas: pulumi.Int(1),                Template: &corev1.PodTemplateSpecArgs{                    Metadata: &metav1.ObjectMetaArgs{                        Labels: frontendLabels,                    },                    Spec: &corev1.PodSpecArgs{                        Containers: corev1.ContainerArray{                            corev1.ContainerArgs{                                Name:  pulumi.String("php-redis"),                                Image: pulumi.String("pulumi/guestbook-php-redis"),                                Resources: &corev1.ResourceRequirementsArgs{                                    Requests: pulumi.StringMap{                                        "cpu":    pulumi.String("100m"),                                        "memory": pulumi.String("100Mi"),                                    },                                },                                Env: corev1.EnvVarArray{                                    corev1.EnvVarArgs{                                        Name:  pulumi.String("GET_HOSTS_FROM"),                                        Value: pulumi.String("dns"),                                    },                                },                                Ports: corev1.ContainerPortArray{                                    &corev1.ContainerPortArgs{                                        ContainerPort: pulumi.Int(80),                                    },                                },                            }},                    },                },            },        })        if err != nil {            return err        }
        // Frontend Service        var frontendServiceType string        if useLoadBalancer {            frontendServiceType = "LoadBalancer"        } else {            frontendServiceType = "ClusterIP"        }        frontendService, err := corev1.NewService(ctx, "frontend", &corev1.ServiceArgs{            Metadata: &metav1.ObjectMetaArgs{                Labels: frontendLabels,                Name:   pulumi.String("frontend"),            },            Spec: &corev1.ServiceSpecArgs{                Type: pulumi.String(frontendServiceType),                Ports: corev1.ServicePortArray{                    corev1.ServicePortArgs{                        Port: pulumi.Int(80),                    },                },                Selector: frontendLabels,            },        })        if err != nil {            return err        }
        if useLoadBalancer {            ctx.Export("frontendIP", frontendService.Status.ApplyT(func(status *corev1.ServiceStatus) *string {                ingress := status.LoadBalancer.Ingress[0]                if ingress.Hostname != nil {                    return ingress.Hostname                }                return ingress.Ip            }))        } else {            ctx.Export("frontendIP", frontendService.Spec.ApplyT(func(spec *corev1.ServiceSpec) *string {                return spec.ClusterIP            }))        }
return nil })}using Pulumi;using Pulumi.Kubernetes.Types.Inputs.Core.V1;using Pulumi.Kubernetes.Types.Inputs.Apps.V1;using Pulumi.Kubernetes.Types.Inputs.Meta.V1;
class Guestbook : Stack{ public Guestbook() { // Create only services of type `ClusterIP` // for clusters that don't support `LoadBalancer` services var config = new Config(); var useLoadBalancer = config.GetBoolean("useLoadBalancer") ?? false;
// // REDIS LEADER. //
var redisLeaderLabels = new InputMap<string> { {"app", "redis-leader"} };
var redisLeaderDeployment = new Pulumi.Kubernetes.Apps.V1.Deployment("redis-leader", new DeploymentArgs { Spec = new DeploymentSpecArgs { Selector = new LabelSelectorArgs { MatchLabels = redisLeaderLabels }, Template = new PodTemplateSpecArgs { Metadata = new ObjectMetaArgs { Labels = redisLeaderLabels }, Spec = new PodSpecArgs { Containers = { new ContainerArgs { Name = "redis-leader", Image = "redis", Resources = new ResourceRequirementsArgs { Requests = { {"cpu", "100m"}, {"memory", "100Mi"} } }, Ports = { new ContainerPortArgs {ContainerPortValue = 6379} } } } } } } });
var redisLeaderService = new Pulumi.Kubernetes.Core.V1.Service("redis-leader", new ServiceArgs { Metadata = new ObjectMetaArgs { Name = "redis-leader", Labels = redisLeaderDeployment.Metadata.Apply(metadata => metadata.Labels), }, Spec = new ServiceSpecArgs { Ports = { new ServicePortArgs { Port = 6379, TargetPort = 6379 }, }, Selector = redisLeaderDeployment.Spec.Apply(spec => spec.Template.Metadata.Labels) } });
// // REDIS REPLICA. //
var redisReplicaLabels = new InputMap<string> { {"app", "redis-replica"} };
var redisReplicaDeployment = new Pulumi.Kubernetes.Apps.V1.Deployment("redis-replica", new DeploymentArgs { Spec = new DeploymentSpecArgs { Selector = new LabelSelectorArgs { MatchLabels = redisReplicaLabels }, Template = new PodTemplateSpecArgs { Metadata = new ObjectMetaArgs { Labels = redisReplicaLabels }, Spec = new PodSpecArgs { Containers = { new ContainerArgs { Name = "redis-replica", Image = "pulumi/guestbook-redis-replica", Resources = new ResourceRequirementsArgs { Requests = { {"cpu", "100m"}, {"memory", "100Mi"} } }, // If your cluster config does not include a dns service, then to instead access an environment // variable to find the leader's host, change `value: "dns"` to read `value: "env"`. Env = { new EnvVarArgs { Name = "GET_HOSTS_FROM", Value = "dns" }, }, Ports = { new ContainerPortArgs {ContainerPortValue = 6379} } } } } } } });
var redisReplicaService = new Pulumi.Kubernetes.Core.V1.Service("redis-replica", new ServiceArgs { Metadata = new ObjectMetaArgs { Name = "redis-replica", Labels = redisReplicaDeployment.Metadata.Apply(metadata => metadata.Labels) }, Spec = new ServiceSpecArgs { Ports = { new ServicePortArgs { Port = 6379, TargetPort = 6379 }, }, Selector = redisReplicaDeployment.Spec.Apply(spec => spec.Template.Metadata.Labels) } });
// // FRONTEND //
var frontendLabels = new InputMap<string> { {"app", "frontend"}, };
var frontendDeployment = new Pulumi.Kubernetes.Apps.V1.Deployment("frontend", new DeploymentArgs { Spec = new DeploymentSpecArgs { Selector = new LabelSelectorArgs { MatchLabels = frontendLabels }, Replicas = 3, Template = new PodTemplateSpecArgs { Metadata = new ObjectMetaArgs { Labels = frontendLabels }, Spec = new PodSpecArgs { Containers = { new ContainerArgs { Name = "php-redis", Image = "pulumi/guestbook-php-redis", Resources = new ResourceRequirementsArgs { Requests = { {"cpu", "100m"}, {"memory", "100Mi"}, }, }, // If your cluster config does not include a dns service, then to instead access an environment // variable to find the leaders's host, change `value: "dns"` to read `value: "env"`. Env = { new EnvVarArgs { Name = "GET_HOSTS_FROM", Value = "dns", /* Value = "env"*/ } }, Ports = { new ContainerPortArgs {ContainerPortValue = 80} } } } } } } });
var frontendService = new Pulumi.Kubernetes.Core.V1.Service("frontend", new ServiceArgs { Metadata = new ObjectMetaArgs { Name = "frontend", Labels = frontendDeployment.Metadata.Apply(metadata => metadata.Labels) }, Spec = new ServiceSpecArgs { Type = useLoadBalancer ? "LoadBalancer" : "ClusterIP", Ports = { new ServicePortArgs { Port = 80, TargetPort = 80 } }, Selector = frontendDeployment.Spec.Apply(spec => spec.Template.Metadata.Labels) } });
if (useLoadBalancer) { this.FrontendIp = frontendService.Status.Apply(status => status.LoadBalancer.Ingress[0].Ip ?? status.LoadBalancer.Ingress[0].Hostname); } else { this.FrontendIp = frontendService.Spec.Apply(spec => spec.ClusterIP); } }
[Output] public Output<string> FrontendIp { get; set; }}This code creates three Kubernetes Services, each with an associated Deployment. The full Kubernetes object model is available to you, giving you the full power of Kubernetes right away.
(Optional) By default, your frontend Service will be of type ClusterIP. This will work on Minikube and similar dev/local clusters; however, for most production Kubernetes clusters, you’ll want a LoadBalancer Service to ensure a load balancer gets allocated in your target cloud environment.
The above code uses configuration to make this parameterizable. If you’d like your program to use a load balancer, simply run:
pulumi config set useLoadBalancer trueIf you’re not sure, it’s safe to skip this step.
Deploying#
Now you’re ready to deploy your code. To do so, simply run pulumi up:
$ pulumi upThe command will first show you a complete preview of what will take place, with a confirmation prompt. No changes will have been made yet. It should look something like this:
Previewing update of stack 'k8s-guestbook-dev'Previewing changes:
    Type                           Name                             Plan       Info+   pulumi:pulumi:Stack            k8s-guestbook-k8s-guestbook-dev  create+   ├─ kubernetes:core:Service     redis-leader                     create+   ├─ kubernetes:core:Service     redis-replica                    create+   ├─ kubernetes:core:Service     frontend                         create+   ├─ kubernetes:apps:Deployment  redis-leader                     create+   ├─ kubernetes:apps:Deployment  redis-replica                    create+   └─ kubernetes:apps:Deployment  frontend                         create
info: 7 changes previewed:    + 7 resources to create
Do you want to perform this update?> yesnodetails
Select “yes” and hit enter. The deployment will proceed, and the output will look like this:
Updating stack 'k8s-guestbook-dev'Performing changes:
    Type                           Name                             Status      Info+   pulumi:pulumi:Stack            k8s-guestbook-k8s-guestbook-dev  created+   ├─ kubernetes:core:Service     redis-replica                    created     1 info message+   ├─ kubernetes:core:Service     frontend                         created     1 info message+   ├─ kubernetes:core:Service     redis-leader                     created     1 info message+   ├─ kubernetes:apps:Deployment  redis-leader                     created+   ├─ kubernetes:apps:Deployment  redis-replica                    created+   └─ kubernetes:apps:Deployment  frontend                         created
Diagnostics:kubernetes:core:Service: redis-replica    info: ✅ Service 'redis-replica' successfully created endpoint objects
kubernetes:core:Service: frontend    info: ✅ Service 'frontend' successfully created endpoint objects
kubernetes:core:Service: redis-leader    info: ✅ Service 'redis-leader' successfully created endpoint objects
---outputs:---frontendIP: "10.102.193.86"
info: 7 changes performed:    + 7 resources createdUpdate duration: 16.226520447s
Permalink: https://app.pulumi.com/joeduffy/k8s-guestbook-dev/updates/1
Viewing the Guestbook#
The application is now running in your cluster. Let’s inspect the cluster state to validate the deployment.
Use kubectl to see the deployed services:
kubectl get servicesYou should see entries for each of the four Services you’ve created in your program:
NAME TYPE CLUSTER-IP EXTERNAL-IP PORT(S) AGEfrontend ClusterIP 10.102.193.86 <none> 80/TCP 2mkubernetes ClusterIP 10.96.0.1 <none> 443/TCP 1dredis-leader ClusterIP 10.98.205.37 <none> 6379/TCP 2mredis-replica ClusterIP 10.96.9.70 <none> 6379/TCP 2mThe pulumi stack output command prints exported program variables:
pulumi stack output frontendIPThe value of the frontendIP variable matches either frontend’s CLUSTER-IP (if you’re deploying with useLoadBalancer set to false) or frontend’s EXTERNAL-IP (if you’re deploying with useLoadBalancer set to true). For example:
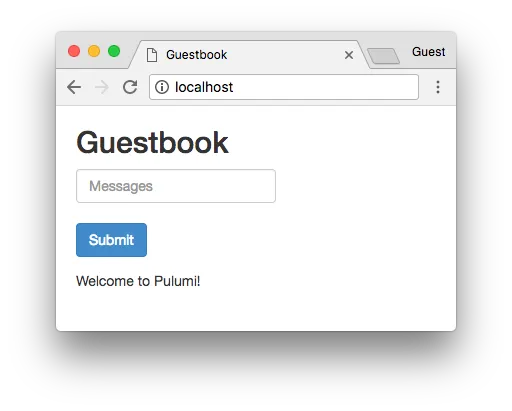
10.102.193.86Now let’s see the Guestbook application in action.
Without a LoadBalancer
As the example above uses ClusterIP, in order to access it in a browser over HTTP, you must first forward a local port on localhost to it. To do so, run:
kubectl port-forward svc/frontend 8765:80At this point, you can view your running Guestbook application:
curl localhost:8765The HTML from the Guestbook will be fetched and printed:
<html ng-app="redis"> <head> <title>Guestbook</title> ...</html>With a LoadBalancer
If you are instead running this program in a full-featured production cluster, and set useLoadBalancer to true earlier, then you can simply access your Guestbook application with:
curl $(pulumi stack output frontendIP)The HTML from the Guestbook will be fetched and printed:
<html ng-app="redis"> <head> <title>Guestbook</title> ...</html>Making an incremental update#
You’re almost done. To demonstrate incremental updates, however, let’s make an update to your program to scale the frontend from 3 replicas to 5. Find the line:
replicas: 3,and change it to:
replicas: 5,Or simply run sed -i "s/replicas: 3/replicas: 5/g" index.ts.
"replicas": 3,and change it to:
"replicas": 5,Or simply run sed -i "s/\"replicas\": 3/\"replicas\": 5/g" __main__.py.
Replicas: pulumi.Int(3),and change it to:
Replicas: pulumi.Int(5),Or simply run sed -i "s/Replicas = pulumi\.Int(3)/Replicas = pulumi\.Int(5)/g" main.go.
Replicas = 3,and change it to:
Replicas = 5,Or simply run sed -i "s/Replicas = 3/Replicas = 5/g" MyStack.cs.
Now all you need to do is run pulumi up, and Pulumi will figure out the minimal set of changes to make:
pulumi up -y --skip-previewThe output from running this command should look something like this:
Updating stack 'k8s-guestbook-dev'Performing changes:
        Type                           Name                             Plan          Info    *   pulumi:pulumi:Stack            k8s-guestbook-k8s-guestbook-dev  no change    ~   └─ kubernetes:apps:Deployment  frontend                         updated       changes: ~ spec
info: 1 change performed:    ~ 1 resource updated      6 resources unchanged
Cleaning up#
Feel free to experiment. As soon as you’re done, let’s clean up and destroy the resources and remove the stack:
pulumi destroy --yespulumi stack rm --yesAfterwards, query the list of pods to verify that none are remaining:
kubectl get podsIf your cluster is empty, you will see output along the following lines:
No resources found.Of course, if you have other applications deployed, you should still see them, but not the Guestbook.