Importing AWS Infrastructure
15 minMost infrastructure as code projects require working with existing cloud resources, whether those resources were originally created with another Infrastructure as Code (IaC) tool or manually provisioned with a cloud provider console or CLI. In this tutorial, you will learn how to import your existing AWS resources to bring it under the management of Pulumi.
- How to import resources using the CLI
- How to import resources in bulk
- How to import resources in code
- The Pulumi CLI
- A Pulumi Cloud account and an access token
- An Amazon Web Services account
- The AWS CLI
- Your desired language runtime installed
Create initial resources#
To start, login to the AWS Console and create a new S3 bucket. You can create the bucket using default settings, making sure to provide a globally unique name for the bucket. For the purposes of this tutorial, we have created an S3 bucket named pulumi-import-tutorial-bucket.
Then, login to the Pulumi CLI and ensure it is configured to use your AWS account.
Next, create a new project and stack that will be used to hold the resource definition for your imported resources.
# Example using Pythonmkdir pulumi-tutorial-importcd pulumi-tutorial-importpulumi new pythonThis tutorial will define the S3 bucket resource using the AWS Classic provider, so you will also need to make sure to install the AWS Classic dependency into your project.
Importing a resource#
In Pulumi, there are three paths to take when importing resources:
- the
pulumi importCLI command for individual resources - the
pulumi importCLI command with a special JSON file for bulk import - an import option in your Pulumi program code.
Import using the CLI#
The pulumi import command looks up the resource using the specified type token and resource identifier, adds the resource to the stack’s current state, and emits the code required to manage the resource with Pulumi from that point forward. This option requires the least manual effort, so it is generally recommended and best suited to projects consisting of only one stack.
To import an existing cloud resource with the Pulumi CLI, use the following syntax:
pulumi import <type> <name> <id>The first argument,
type, is the Pulumi type token to use for the imported resource. You can find the type token for a given resource by navigating to the Import section of the resource’s API documentation in the Pulumi Registry. For example, the type token of an Amazon S3 Bucket resource isaws:s3/bucket:Bucket.The second argument,
name, is the resource name to apply to the resource once it’s imported.The third argument,
id, corresponds to the value you would use in Pulumi to lookup the resource in the cloud provider. This value should correspond to the designatedlookup propertyspecified in the Import section of the resource’s API documentation in the Registry. In the case of an AWS S3 bucket, this would be thebucketproperty.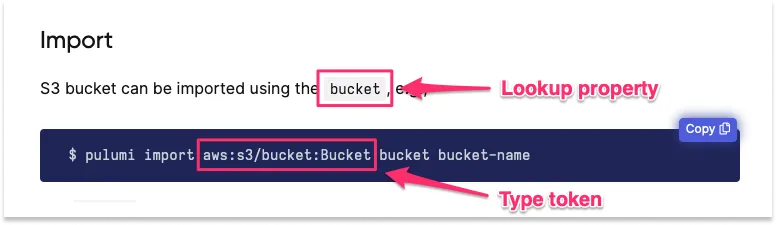
If you scroll to the
bucketproperty section of the API documentation, you will see that this lookup property translates to the name of the bucket.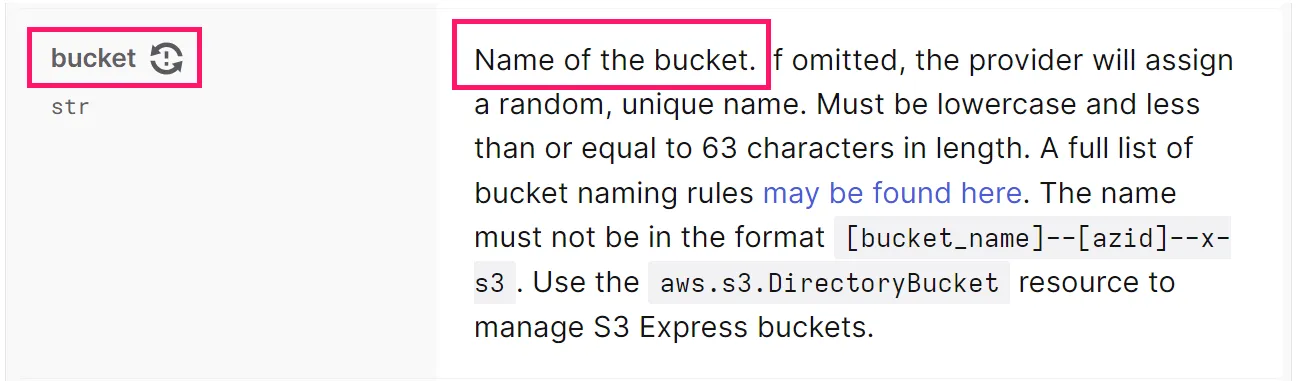
When put all together, the import command should look something like the following example, where imported-s3-bucket is the resource name that will be applied to the S3 bucket once imported, and pulumi-import-tutorial-bucket corresponds to the existing name of the S3 bucket you want to import:
pulumi import aws:s3/bucket:Bucket imported-s3-bucket pulumi-import-tutorial-bucketThe output should look something like the following:
pulumi import aws:s3/bucket:Bucket imported-s3-bucket pulumi-import-tutorial-bucket
Previewing import (dev)
Type Name Plan + pulumi:pulumi:Stack dev create = └─ aws:s3:Bucket my-bucket import
Resources: + 1 to create = 1 to import 2 changes
Do you want to perform this import?> yes no detailsNotice the equals sign (=) instead of our usual plus sign (+) in the resource table and in the details. This is Pulumi’s way of telling you that it’s adding something to the state without modifying it.
Choose yes to complete the import. This will immediately add the resource to the current stack’s state and will emit a block of code to STDOUT to be added to your Pulumi program. If the current program were written in Python, for example, the resulting CLI output would resemble the following:
...Importing (dev)
     Type                 Name                Status +   pulumi:pulumi:Stack  dev                 created =   └─ aws:s3:Bucket     imported-s3-bucket  imported (0.65s)
Resources:    + 1 created    = 1 imported    2 changes
Duration: 4s
Please copy the following code into your Pulumi application. Not doing sowill cause Pulumi to report that an update will happen on the next update command.
Please note that the imported resources are marked as protected. To destroy themyou will need to remove the `protect` option and run `pulumi update` *before*the destroy will take effect.
import pulumiimport pulumi_aws as aws
imported_s3_bucket = aws.s3.Bucket("imported-s3-bucket",    arn="arn:aws:s3:::pulumi-import-tutorial-bucket",    bucket="pulumi-import-tutorial-bucket",    hosted_zone_id="Z21DNDUVLTQW6Q",    request_payer="BucketOwner",    server_side_encryption_configuration={        "rule": {            "apply_server_side_encryption_by_default": {                "sse_algorithm": "AES256",            },            "bucket_key_enabled": True,        },    },    opts = pulumi.ResourceOptions(protect=True))
Next, copy the emitted code snippet and replace the contents of your Pulumi program file with it. Then, save the file and run pulumi up. You should see that the update produces no changes:
pulumi up
Previewing update (dev)
Type Name Plan pulumi:pulumi:Stack dev
Resources: 2 unchanged
Do you want to perform this update? yes
Updating (dev)
Type Name Status pulumi:pulumi:Stack dev
Resources: 2 unchanged
Duration: 2sThe resource is now under management with Pulumi!
Import in bulk#
The pulumi import command also enables you to import resources in bulk for scenarios in which you need to bring multiple resources under management with Pulumi. To do so, you will need to create a JSON file that has all of the required information for each resource: a type, a desired name, and an id.
To start, return to the AWS console and create two additional S3 buckets.
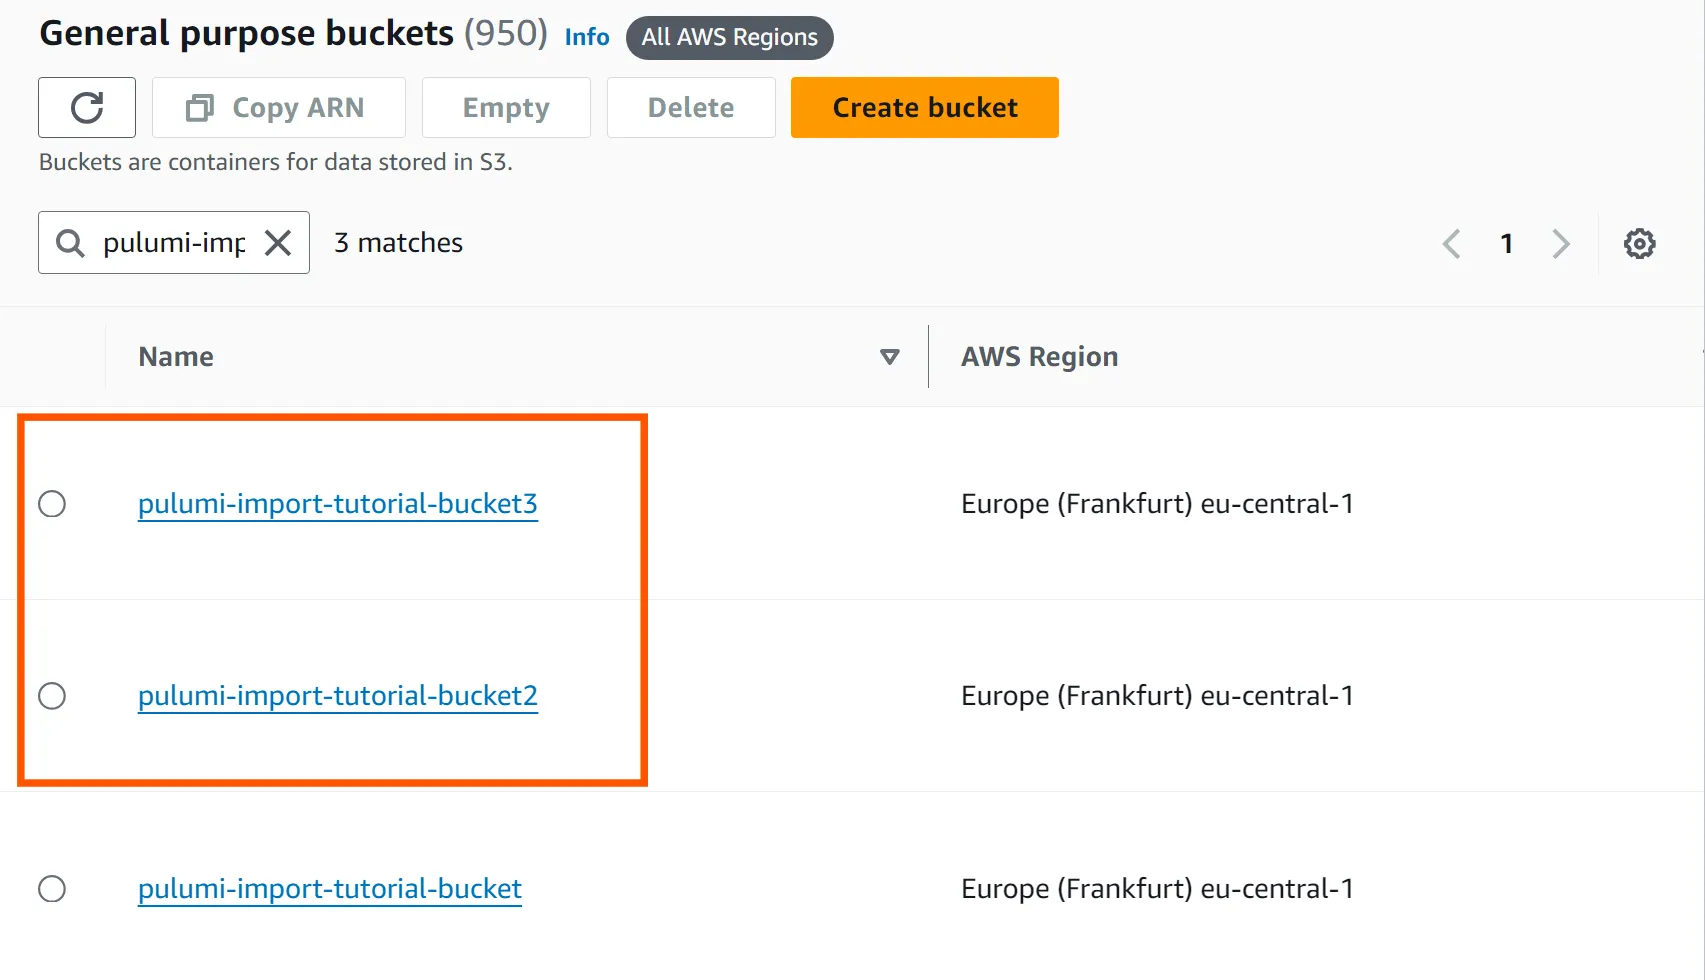
Next, return to your program folder and create a new file called resources.json. Inside of this file, copy and paste the following JSON object, making sure to replace the values of the id parameters with the actual names of your S3 buckets in your environment:
{ "resources": [ { "type": "aws:s3/bucket:Bucket", "name": "second-imported-bucket", "id": "pulumi-import-tutorial-bucket2" # REPLACE }, { "type": "aws:s3/bucket:Bucket", "name": "third-imported-bucket", "id": "pulumi-import-tutorial-bucket3" # REPLACE } ]}To import these resources, save the file and then run the pulumi import command with the -f flag, passing in the path to the resources.json file:
pulumi import -f ./resources.json
Previewing import (dev)
Type Name Plan pulumi:pulumi:Stack dev = ├─ aws:s3:Bucket second-imported-bucket import = └─ aws:s3:Bucket third-imported-bucket import
Resources: = 2 to import 2 unchanged
Do you want to perform this import? yesImporting (dev)
Type Name Status pulumi:pulumi:Stack dev = ├─ aws:s3:Bucket third-imported-bucket imported (0.64s) = └─ aws:s3:Bucket second-imported-bucket imported (1s)
Resources: = 2 imported 2 unchanged
Duration: 4s
Please copy the following code into your Pulumi application. Not doing sowill cause Pulumi to report that an update will happen on the next update command.
Please note that the imported resources are marked as protected. To destroy themyou will need to remove the `protect` option and run `pulumi update` *before*the destroy will take effect.
# Code begins here...Just like when running the command against a single resource, the pulumi import command will import the resources into your stack’s state file and will generate the code snippets for all of the resources in the JSON file. Once again, copy the generated code for the two new resources into your existing program file, save the file, and run the pulumi up command to bring these new resources under the management of Pulumi.
Import using code#
The third method to import existing cloud resources into a Pulumi project is by defining the resource code yourself and configuring the import resource option in the resource’s definition. This approach may be better suited for scenarios that require importing multiple resources of the same type across multiple stacks and/or deployment environments as part of an automation workflow.
To demonstrate, you will start by creating a simple IAM role in the AWS Console. For the purposes of this tutorial, you can follow the steps in AWS’s Creating an execution role in the IAM console guide to create your IAM role resource. When doing so, select the AWSLambdaDynamoDBExecutionRole managed policy on the Add permissions page and enter pulumi-tutorial-iam-role for the role name.
Once that is complete, you will need to identify the lookup property (e.g. the id) of the IAM role resource. To do so, navigate to the Import section of the AWS IAM Role resource page in the Pulumi documentation. You will notice that the lookup property is the name, which corresponds to the name of the IAM role.
Now, navigate to your program code file and update the code with the following resource definition:
 TypeScript
 Python
 Go
Go C#
C#
 YAML
YAMLimport * as pulumi from "@pulumi/pulumi"import * as aws from "@pulumi/aws"
const importedRole = new aws.iam.Role( "imported_role", { name: "pulumi-tutorial-iam-role", description: "Allows Lambda functions to call AWS services on your behalf.", assumeRolePolicy: JSON.stringify({ Version: "2012-10-17", Statement: [ { Action: "sts:AssumeRole", Effect: "Allow", Sid: "", Principal: { Service: "lambda.amazonaws.com", }, }, ], }), }, { import: "pulumi-tutorial-iam-role", })################################################ Note that in the Python SDK, the import option# is named import_ to avoid conflicting with the# reserved import keyword.###############################################import pulumiimport pulumi_aws as awsimport json
# Resource defintion for IAM role using import resource optionimported_role = aws.iam.Role("imported_role", name="pulumi-tutorial-iam-role", description="Allows Lambda functions to call AWS services on your behalf.", assume_role_policy=json.dumps({ "Version": "2012-10-17", "Statement": [{ "Action": "sts:AssumeRole", "Effect": "Allow", "Principal": { "Service": "lambda.amazonaws.com", }, }], }), managed_policy_arns=[ "arn:aws:iam::aws:policy/service-role/AWSLambdaDynamoDBExecutionRole" ], opts = pulumi.ResourceOptions(import_="pulumi-tutorial-iam-role"))package main
import ( "encoding/json"
"github.com/pulumi/pulumi-aws/sdk/v7/go/aws/iam" "github.com/pulumi/pulumi/sdk/v3/go/pulumi")
func main() { pulumi.Run(func(ctx *pulumi.Context) error { tmpJSON0, err := json.Marshal(map[string]interface{}{ "Version": "2012-10-17", "Statement": []map[string]interface{}{ map[string]interface{}{ "Action": "sts:AssumeRole", "Effect": "Allow", "Sid": "", "Principal": map[string]interface{}{ "Service": "lambda.amazonaws.com", }, }, }, }) if err != nil { return err }
json0 := string(tmpJSON0)
_, err = iam.NewRole(ctx, "imported_role", &iam.RoleArgs{ Name: pulumi.String("pulumi-tutorial-iam-role"), AssumeRolePolicy: pulumi.String(json0), Description: pulumi.String("Allows Lambda functions to call AWS services on your behalf."), }, pulumi.Import(pulumi.ID("pulumi-tutorial-iam-role"))) if err != nil { return err } return nil })}using System.Collections.Generic;using System.Linq;using Pulumi;using Aws = Pulumi.Aws;
return await Deployment.RunAsync(() =>{ var imported_iam_role = new Aws.Iam.Role("imported-role", new() { AssumeRolePolicy = "{\"Statement\":[{\"Action\":\"sts:AssumeRole\",\"Effect\":\"Allow\",\"Principal\":{\"Service\":\"lambda.amazonaws.com\"}}],\"Version\":\"2012-10-17\"}", Description = "Allows Lambda functions to call AWS services on your behalf.", ManagedPolicyArns = new[] { "arn:aws:iam::aws:policy/service-role/AWSLambdaDynamoDBExecutionRole", }, Name = "pulumi-tutorial-iam-role", }, new CustomResourceOptions { ImportId = "pulumi-tutorial-iam-role" });
});name: aws-import-iac-iam-role-yamlruntime: yamldescription: An example that deploys the resource definition for an imported IAM role on AWS.resources: importedRole: type: aws:iam:Role name: imported_role properties: name: pulumi-tutorial-iam-role description: Allows Lambda functions to call AWS services on your behalf. assumeRolePolicy: fn::toJSON: Version: 2012-10-17 Statement: - Action: sts:AssumeRole Effect: Allow Sid: Principal: Service: lambda.amazonaws.com options: import: pulumi-tutorial-iam-roleAs you can see, the name of the IAM role, in this case pulumi-tutorial-iam-role, has been provided as the value of the import option in the resource definition.
At this point, the definition for the imported resources has only been written, meaning it has not yet been imported into your project’s state and is therefore not yet under management by Pulumi. To complete the import process using this method, you will need to save your file and run the pulumi up command. You should see output resembling the following example:
pulumi up -yPreviewing update (dev)
Type Name Plan pulumi:pulumi:Stack dev = └─ aws:iam:Role imported_role import
Resources: = 1 to import 4 unchanged
Updating (dev)
Type Name Status pulumi:pulumi:Stack dev = └─ aws:iam:Role imported_role imported (0.93s)
Resources: = 1 imported 4 unchanged
Duration: 8sIt is important to note that when defining resources that you want to import using the import resource option method, the resource definition must match all properties of the existing resource. If you fail to include all of the existing properties, you will run into an error similar to the following:
Previewing update (dev)
     Type                 Name           Plan       Info +   pulumi:pulumi:Stack  dev            create =   └─ aws:iam:Role      imported_role  import     [diff: -description]; 1 warning
Diagnostics:  aws:iam:Role (imported_role):    warning: inputs to import do not match the existing resource; importing this resource will fail
Resources:    + 1 to create    = 1 to import    2 changes
Updating (dev)
     Type                 Name           Status                       Info +   pulumi:pulumi:Stack  dev            **creating failed (5s)**     1 error =   └─ aws:iam:Role      imported_role  **importing failed**         1 error
Diagnostics:  aws:iam:Role (imported_role):    error: inputs to import do not match the existing resource
  pulumi:pulumi:Stack (dev):    error: update failed
Resources:    + 1 created
Duration: 7s
The highlighted line in the preview section of the output indicates which property of the existing resource is missing in the resource definition. You can use this to correct your resource definition before re-deploying. Once a resource is successfully imported, make sure to remove the import option from your code because Pulumi is now managing the resource.
Clean-up#
Before moving on, tear down the resources that are part of your stack to avoid incurring any charges.
- Run
pulumi destroyto tear down all resources. You’ll be prompted to make sure you really want to delete these resources. A destroy operation may take some time, since Pulumi waits for the resources to finish shutting down before it considers the destroy operation to be complete. - To delete the stack itself, run
pulumi stack rm. Note that this command deletes all deployment history from the Pulumi Service.
Next steps#
In this tutorial, you imported existing cloud resources via the CLI and updated the program code to include the definition of those imported resources. You also imported existing cloud resources by manually defining the resource definition using the import resource option method.
To learn more about creating and managing resources in Pulumi, take a look a the following resources:
- Learn more about importing resources in Pulumi in the Adopting Pulumi -> Import resources documentation.
- Learn more about migrating to Pulumi in the Migrating from other solutions to Pulumi documentation.
- Learn more about other useful Pulumi CLI commands in the Pulumi CLI overview documentation.