ChatGPT clone with Pulumi ESC managed secrets
15 minLet's make a ChatGPT clone, using Pulumi! This tutorial will walk you through creating a web app that interacts with the OpenAI API. You'll use the Pulumi CLI to manage the configuration and secrets needed to access the OpenAI API. We'll also show how to use the ESC SDK to dynamically update your configuration and secrets.
- How to build an OpenAI-based ChatGPT clone
- How to create an environment with the Pulumi CLI
- How to manage configuration and secrets with the Pulumi CLI
- How to project your ESC configuration as environment variables
- How to dynamically refresh configuration and secrets without restart
- Familiarity with Python
- Familiarity with OpenAI API (optional)
- Python 3.7 or newer
- A Pulumi Cloud account and an access token
- An OpenAI account w/ some credits
- The Pulumi CLI
- A Bash-like UNIX shell environment
What are we building#
This tutorial will walk you through making an OpenAI-based ChatGPT clone using Python.
The app will be implemented as a Flask web app, which makes calls to the completions endpoint of the OpenAI API.
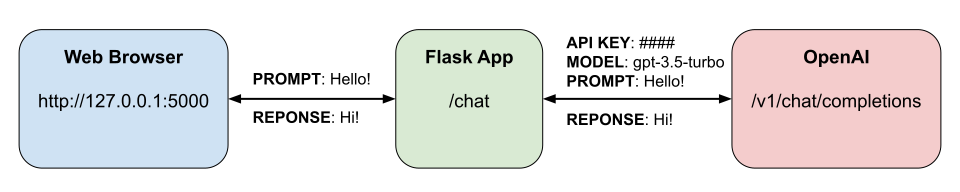
The app has two important variables to manage: the OpenAI API Key, and the choice of model that the OpenAI backend uses.
Three ways of managing secrets and configuration#
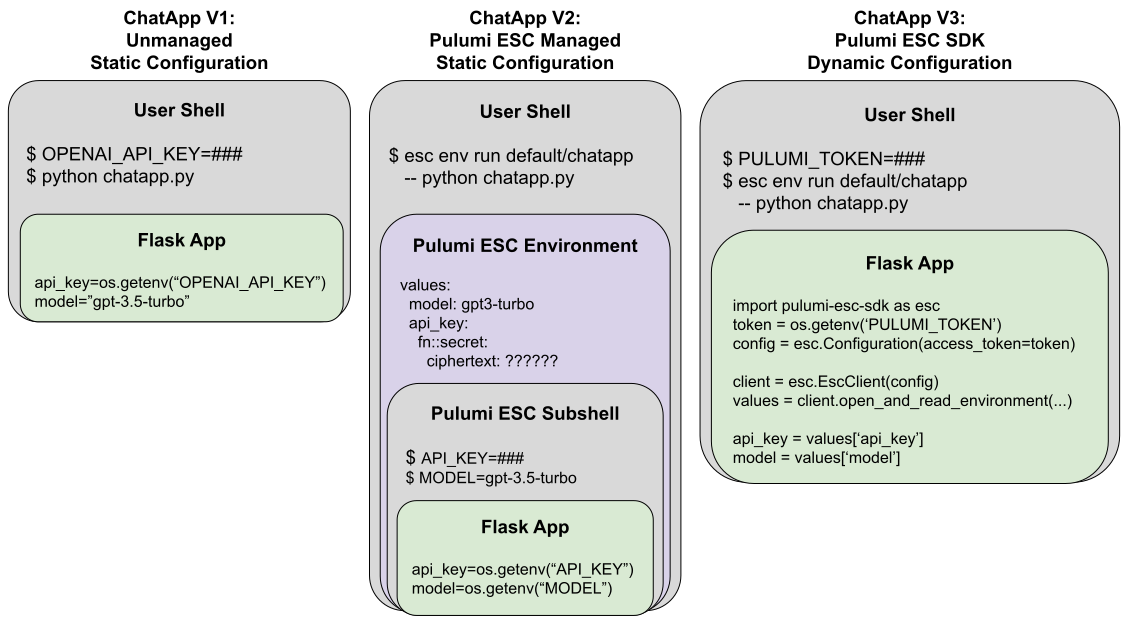
After we get a basic version of the app running, we’ll modify the app two times, to show three different ways of managing our secrets and configurations; unmanaged, managed static configuration, and managed dynamic configuration.
The first version of our app will be unmanaged and will have hardcoded settings for the OpenAI model we’re using, reading it from the default environment variable OPENAI_API_KEY for the API key.
The second version will be statically managed using Pulumi ESC, providing a custom set of environment variables to the app at runtime.
The third version will be dynamically managed via the Pulumi ESC SDK to reload the configuration, so that there’s no downtime required to reconfigure the web app.
Creating the ChatApp#
Step 1: Create a OpenAI project, and service account API key#
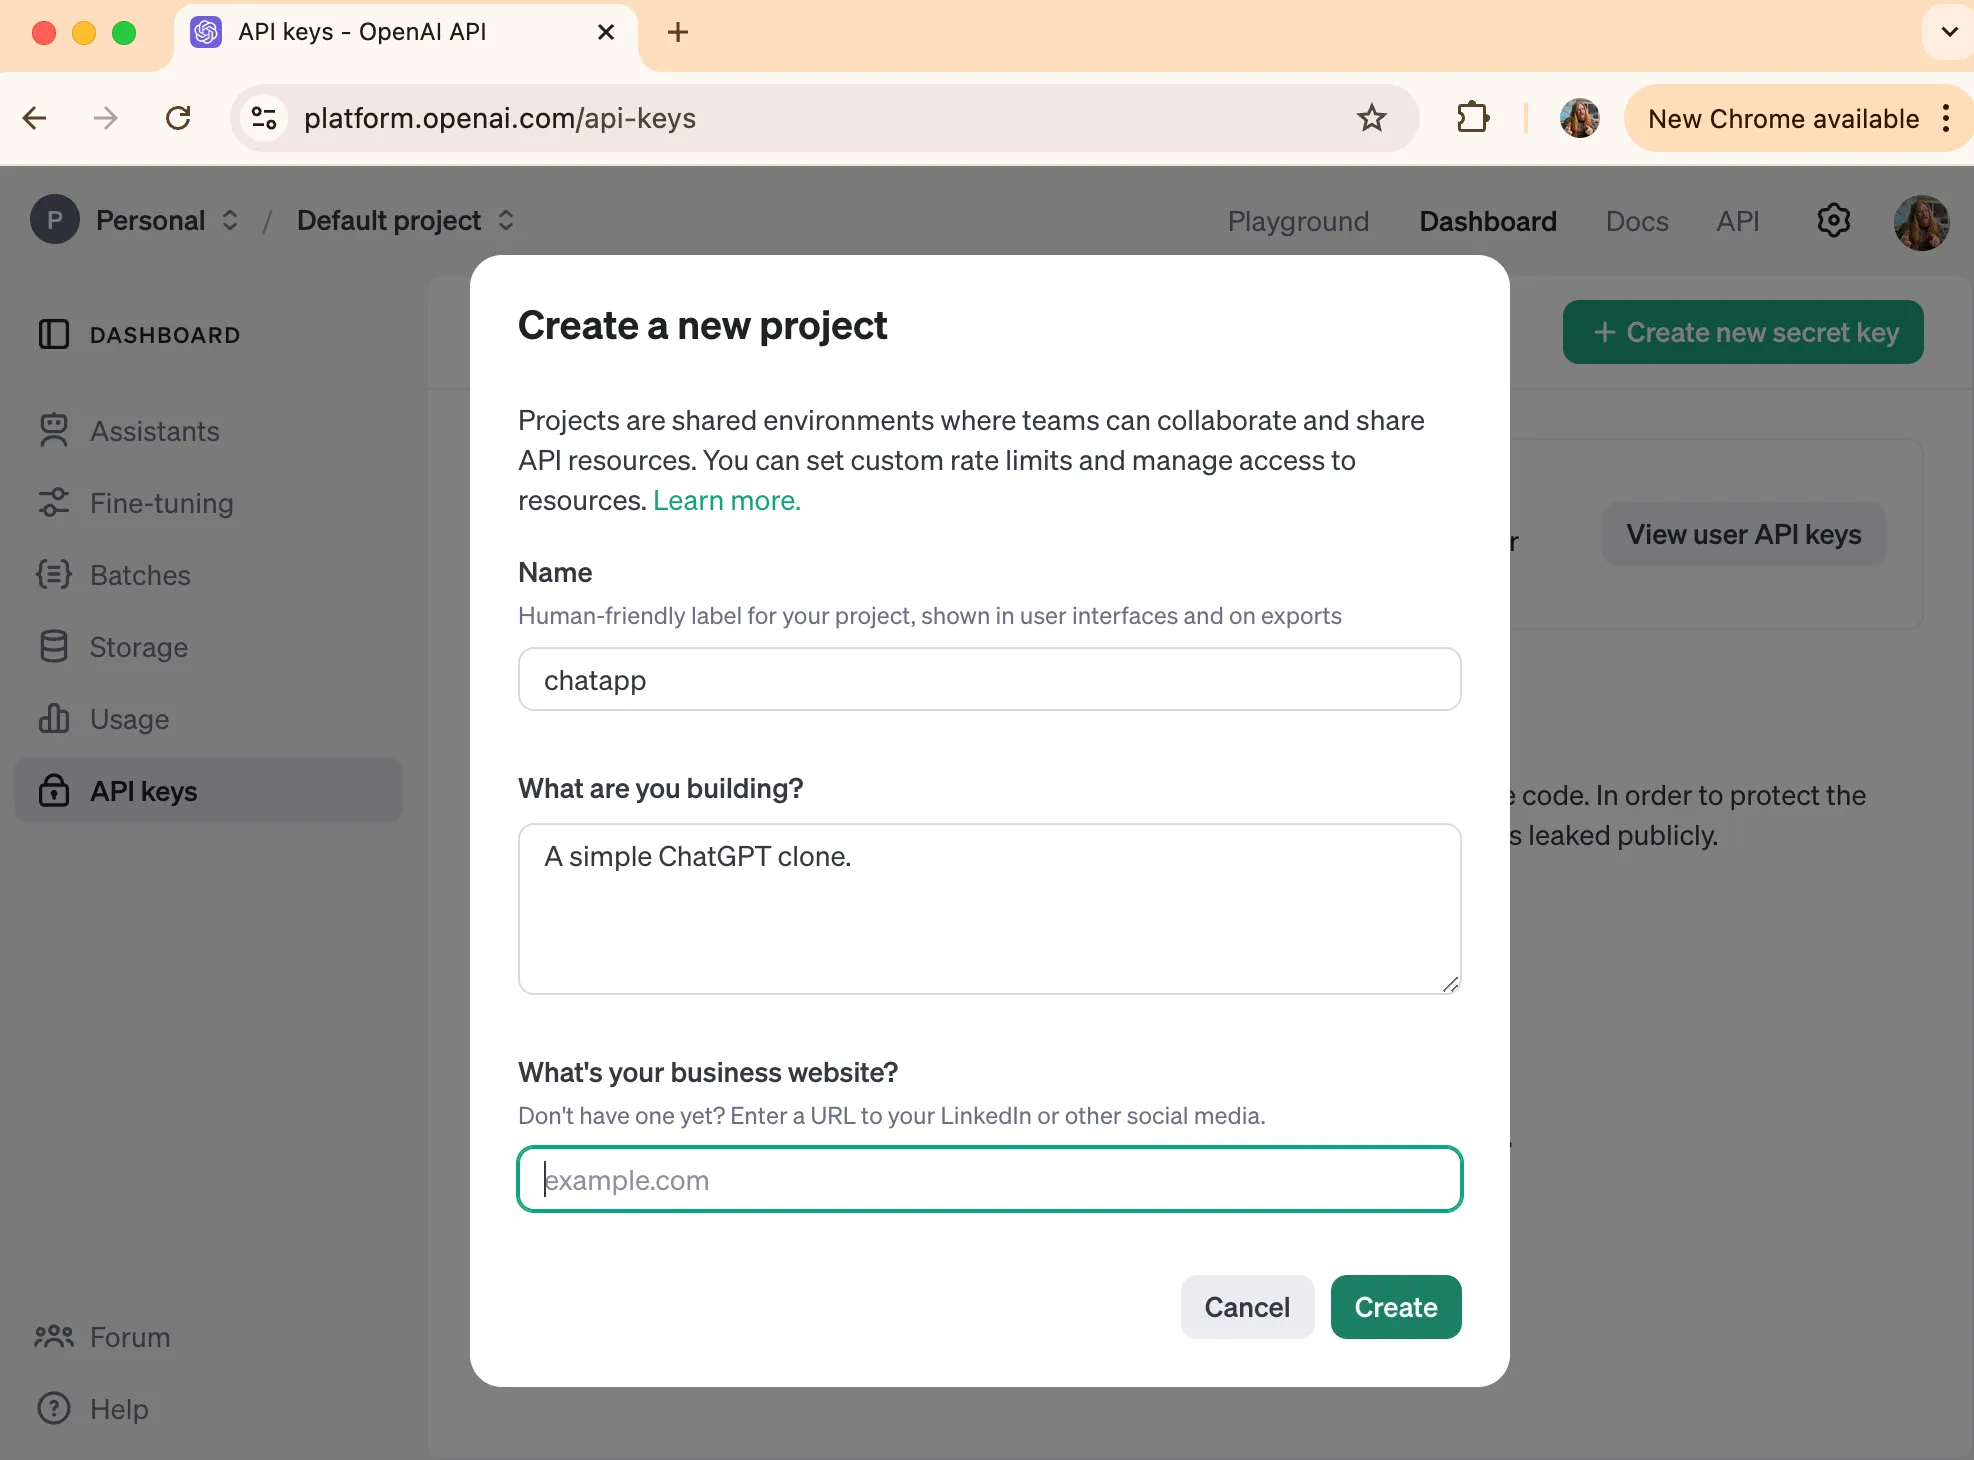
First we’ll need to create an OpenAI project called chatapp.
Next, create a service account API key. You can follow the OpenAI Quickstart docs for details.
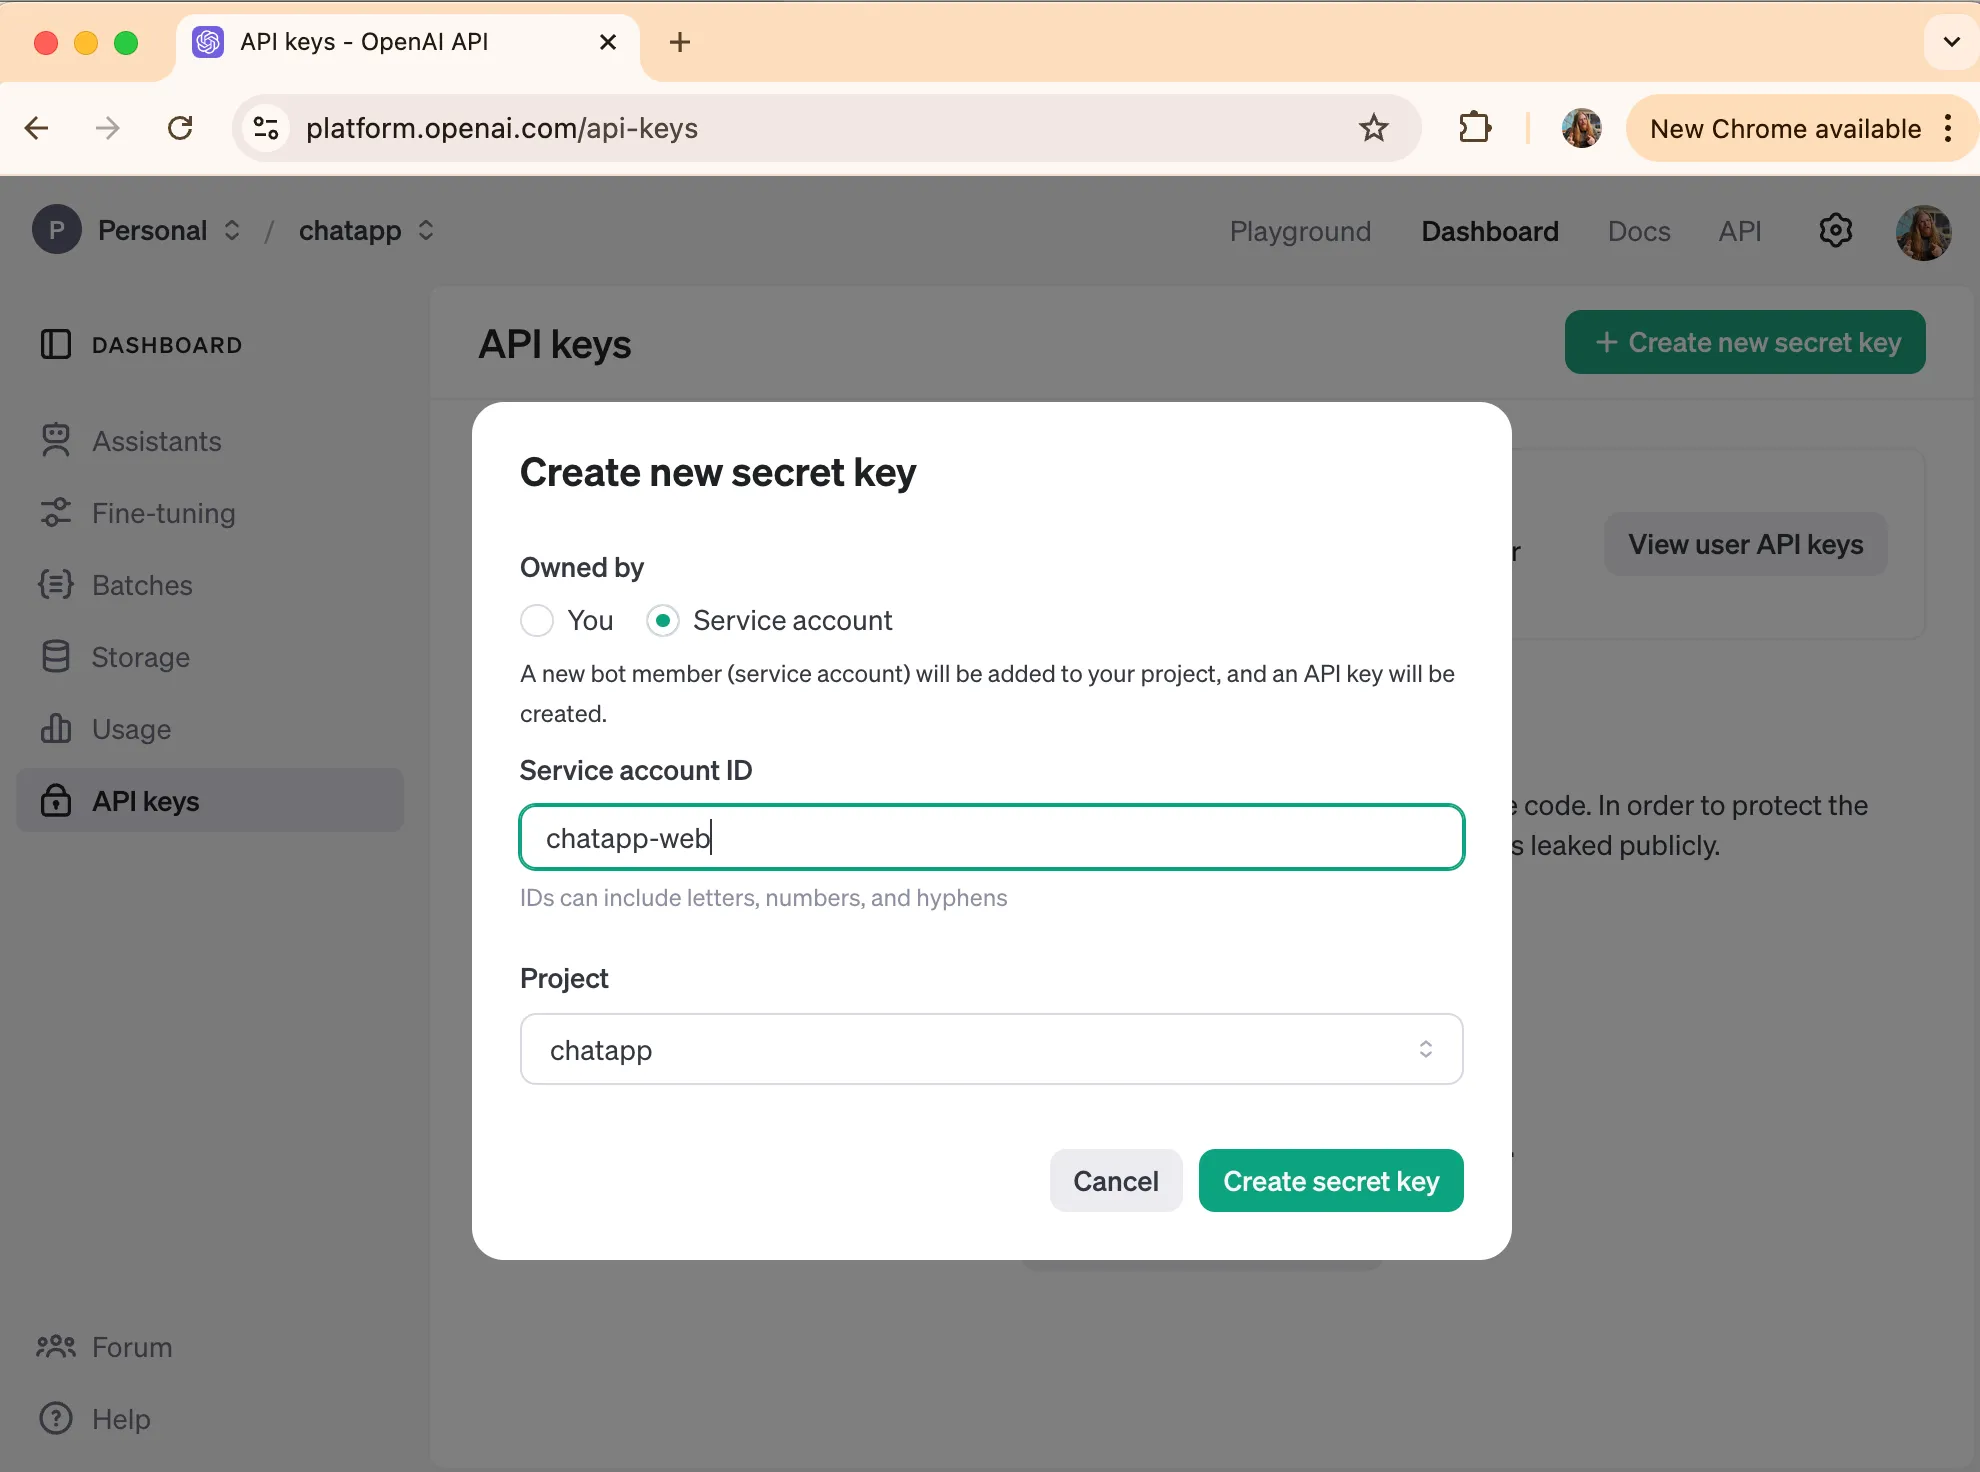
Next, copy the key to your clipboard, and use the following command to set the OPENAI_API_KEY environment variable:
export OPENAI_API_KEY=`pbpaste`Step 2: Install dependencies with pip.#
Now lets setup our working environment. Create a new directory called chatapp.
mkdir chatappcd chatappNext create a Python virtual environment:
python -m venv .venvAnd then install the flask and openai packages
pip install flask openaiStep 3: Create the webapp#
Finally, lets create the code files for our chat app. We’ll need two files chatapp.py, the backend Flask app, and templates/chatapp.html, an HTML template that will render the UI. You can copy and paste these from here, into your favorite code editor and save.
Code Listing: chatapp.py
import osfrom flask import Flask, render_template, request, jsonifyfrom openai import OpenAI
app = Flask(__name__)
def get_openai_response(api_key, model, prompt):    client = OpenAI(api_key=api_key)    try:        response = client.chat.completions.create(            model=model,            messages=[{"role": "user", "content": prompt}]        )        return response.choices[0].message.content    except Exception as e:        return f"An error occurred: {str(e)}"
@app.route('/')def home():    return render_template('chatapp.html')
@app.route('/chat', methods=['POST'])def chat():    model = "gpt-3.5-turbo"    api_key = os.getenv("OPENAI_API_KEY")
    prompt = request.json['message']    response = get_openai_response(api_key, model, prompt)    return jsonify({'response': response, 'model': model})
if __name__ == '__main__':    app.run(debug=True)
Code Listing: templates/chatapp.html
<!DOCTYPE html><html lang="en"><head>    <meta charset="UTF-8">    <meta name="viewport" content="width=device-width, initial-scale=1.0">    <title>OpenAI Chat App</title>    <script src="https://code.jquery.com/jquery-3.6.0.min.js"></script>    <style>        body { font-family: Arial, sans-serif; max-width: 800px; margin: 0 auto; padding: 20px; }        #chat-container { border: 1px solid #ccc; height: 400px; overflow-y: scroll; padding: 10px; margin-bottom: 10px; }        #user-input { width: 70%; padding: 5px; }        #send-button { padding: 5px 10px; }    </style></head><body>    <h1>OpenAI Chat App</h1>    <div id="chat-container"></div>    <input type="text" id="user-input" placeholder="Type your message...">    <button id="send-button">Send</button>
    <script>        $(document).ready(function() {            function sendMessage() {                var userMessage = $('#user-input').val();                if (userMessage.trim() === '') return;
                $('#chat-container').append('<p><strong>You:</strong> ' + userMessage + '</p>');                $('#user-input').val('');
                $.ajax({                    url: '/chat',                    method: 'POST',                    contentType: 'application/json',                    data: JSON.stringify({message: userMessage}),                    success: function(response) {                        $('#chat-container').append('<p><strong>LLM ('+ response.model + '):</strong> ' + response.response + '</p>');                        $('#chat-container').scrollTop($('#chat-container')[0].scrollHeight);                    }                });            }
            $('#send-button').click(sendMessage);            $('#user-input').keypress(function(e) {                if (e.which == 13) sendMessage();            });        });    </script></body></html>
The Flask app sets up two routes:
/: serves the UI template contained intemplates/chatapp.html/chat: uses the functionget_openai_responseto query the OpenAI API
It will read the key from the OPENAI_API_KEY environment variable and chose the OpenAI model based on the hardcoded value gpt-3.5-turbo which is defined in the chat route.
Finally, let’s run the app and make sure it works.
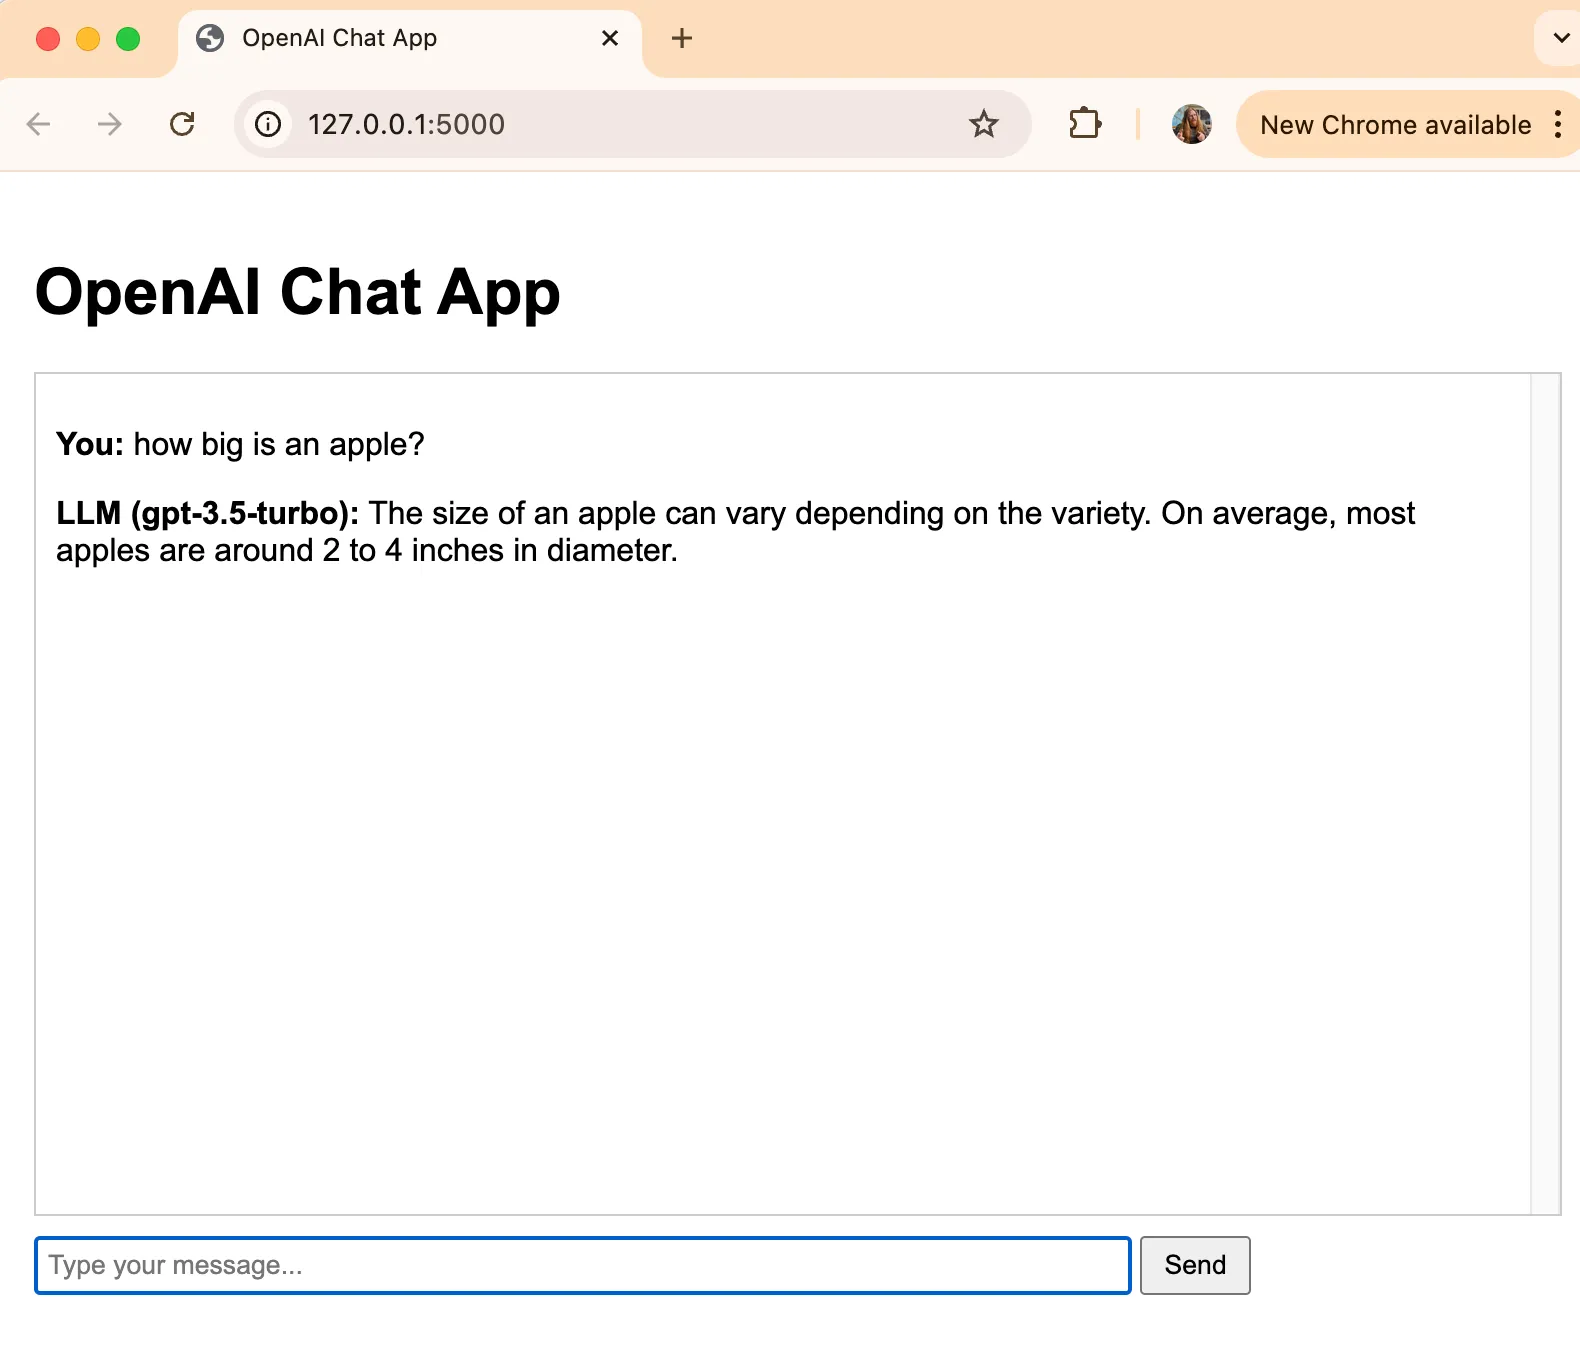
python chatapp.pyYou should see your app running on http://127.0.0.1:5000. Go ahead and try it out:
ChatApp V2: Statically managed configuration and secrets using Pulumi ESC#
Well that was fun! We now have a ChatGPT clone. However, there are some operational issues that we need to address. How do we manage the API key more securely? Right now we’re just copying and pasting into shell environment variables. That’s not great. Since we can only copy it once from OpenAI’s console, if we somehow lose that environment variable (e.g. close the shell window), we will have to go generate an entirely new key.
Also, what if we want to change which model we’re using? We’d have to change the value hardcoded into the app… every time!
What if we want to share the API key with others, or run this in some environment other than our developer’s laptop?
Lets get these settings under management. Pulumi ESC to the rescue!
Step 1: Create an ESC environment for our app#
First, the pulumi CLI needs to be logged in to your Pulumi Cloud account.
pulumi loginNext, lets create an ESC environment called chatapp:
pulumi env init default/chatappYou can verify that the chatapp environment exists by listing your available environments:
pulumi env lsdefault/chatappNow let’s create the configuration settings. First we’ll create a configuration value called model which has the ID of the model we want to use in the OpenAI API:
pulumi env set default/chatapp model gpt-3.5-turboThen we’ll create a secret called api_key that holds the OpenAI API Key. Notice the --secrets flag which indicates that this is a secret that we want to be encrypted, both at rest, and in transit. We’re sourcing the value for this from the existing OPENAI_API_KEY environment variable (to make sure we don’t end up with a plain-text version of this in our shell’s command history).
pulumi env set default/chatapp api_key $OPENAI_API_KEY --secretFinally, let’s verify the ESC environment we just created. We can view the environment using the pulumi env get subcommand.
pulumi env get default/chatappYou should see output that looks something like this:
Value
{    "api_key": "[secret]",    "model": "gpt-4o-mini"}
Definition
values:    model: gpt-4o-mini    api_key:    fn::secret:        ciphertext: ######################        ##################################        ##################################
You can see that api_key is a secret and so it won’t show us the value. In the definition display, it shows us the encrypted version of the key, but not the actual key value. This will be decrypted at runtime, waiting until the last possible moment to pass the actual value to the code that needs it.
Step 2: Update the app to use Pulumi ESC settings#
The next step is to get these ESC environment values accessible to our app. For this we’re going to extract these configuration values and project them as two environment variables named MODEL and API_KEY.
To do this, we will edit the YAML definition of our ESC environment. The pulumi env edit subcommand will load the YAML into your default text editor. Editing and saving the file will update it in Pulumi ESC’s backend storage.
pulumi env edit default/chatappTo this YAML file we’ll add an environmentVariables: section, which defines the names of the environment variables we want to set in our program’s shell environment, and which ESC configuration values those map to.
values: model: gpt-3.5-turbo api_key: fn::secret: ciphertext: ###################### ################################## ################################## environmentVariables: MODEL: ${model} API_KEY: ${api_key}Now we need to modify chatapp.py to use the new ESC-provided environment variables in the /chat route:
Code Listing: Modify Flask /chat route in chatapp.py (version 2)
@app.route('/chat', methods=['POST'])def chat():    # Set configuration from ESC provided environment variables    model = os.getenv('MODEL')    api_key = os.getenv('API_KEY')
    prompt = request.json['message']    response, model = get_openai_response(api_key, model, prompt)    return jsonify({'response': response, 'model': model})
Now let’s run the app, with ESC providing the variables, to make sure it works.
pulumi env run default/chatapp -- python chatapp.pyAs before, check that the app is running at http://127.0.0.1:5000 and able to get responses from the OpenAI API.
This command pulumi env run -- <command> will launch the provided command in a subshell, which will have the environment variables that we defined in the environmentVariables section of our ESC environment’s YAML. Note that we’re no longer relying on the OPENAI_API_KEY variable for our secret, rather, we’re pull that from the Pulumi ESC environment. Similarly, we can now change our model from the ESC environment model setting, which means we can easily update the configuration without having to modify the code.
Dynamically retrieving ESC configuration at runtime#
The last step worked great to get our configuration and secrets under management, but there still some downsides. What happens if the configuration or API key needs to change? Right now the app sets the configuration when it starts and always uses the same values the entire time it’s running. The app would need to be restarted to get new settings. This would cause downtime for our service, just to update the key, or change the model we’re using.
We’d rather not take downtime, so let’s update the app’s code to use the ESC SDK to dynamically fetch settings from ESC every time the /chat endpoint is used.
Step 1: Install the Pulumi ESC SDK#
First we need to add the pulumi-esc-sdk and pyyaml packages:
pip install pulumi-esc-sdk pyyamlStep 2: Update the ESC environment settings#
In order to use the Pulumi ESC SDK from within our Python code, we will need to create an ESC client, and call the open_and_read_environment method. The client will need a Pulumi Cloud access token, and some configuration values defining the organization, project, and environment name to pull our settings from.
First, edit your ESC environment to contain the following YAML code:
pulumi env edit default/chatappCode Listing: YAML representation of default/chatapp environment
values: model: gpt-3.5-turbo api_key: fn::secret: ciphertext: ######################## ################################## ################################## esc_org: ${context.pulumi.organization.login} esc_project: "default" esc_environment: ${context.currentEnvironment.name} environmentVariables: ESC_ORG: ${esc_org} ESC_PROJECT: ${esc_project} ESC_ENVIRONMENT: ${esc_environment}---Here we have added three new ESC values esc_org, esc_project, and esc_environment, with the organization and environment pulled from the ESC execution context directly. These are projected into the ESC_ORG, ESC_PROJECT, and ESC_ENVIRONMENT environment variables respectively.
We’ve also removed the environment variable projections for API_KEY and MODEL since we won’t be accessing them that way anymore.
Next we will need to ensure that the PULUMI_ACCESS_TOKEN variable exists in our shell. If you’re an active Pulumi user or have been going through other tutorials, you may already have this set in your shell. Let’s check for that using Bash’s env command:
env | grep PULUMI_ACCESS_TOKENPULUMI_ACCESS_TOKEN=#########If this returns nothing, you’ll need to create an access token:
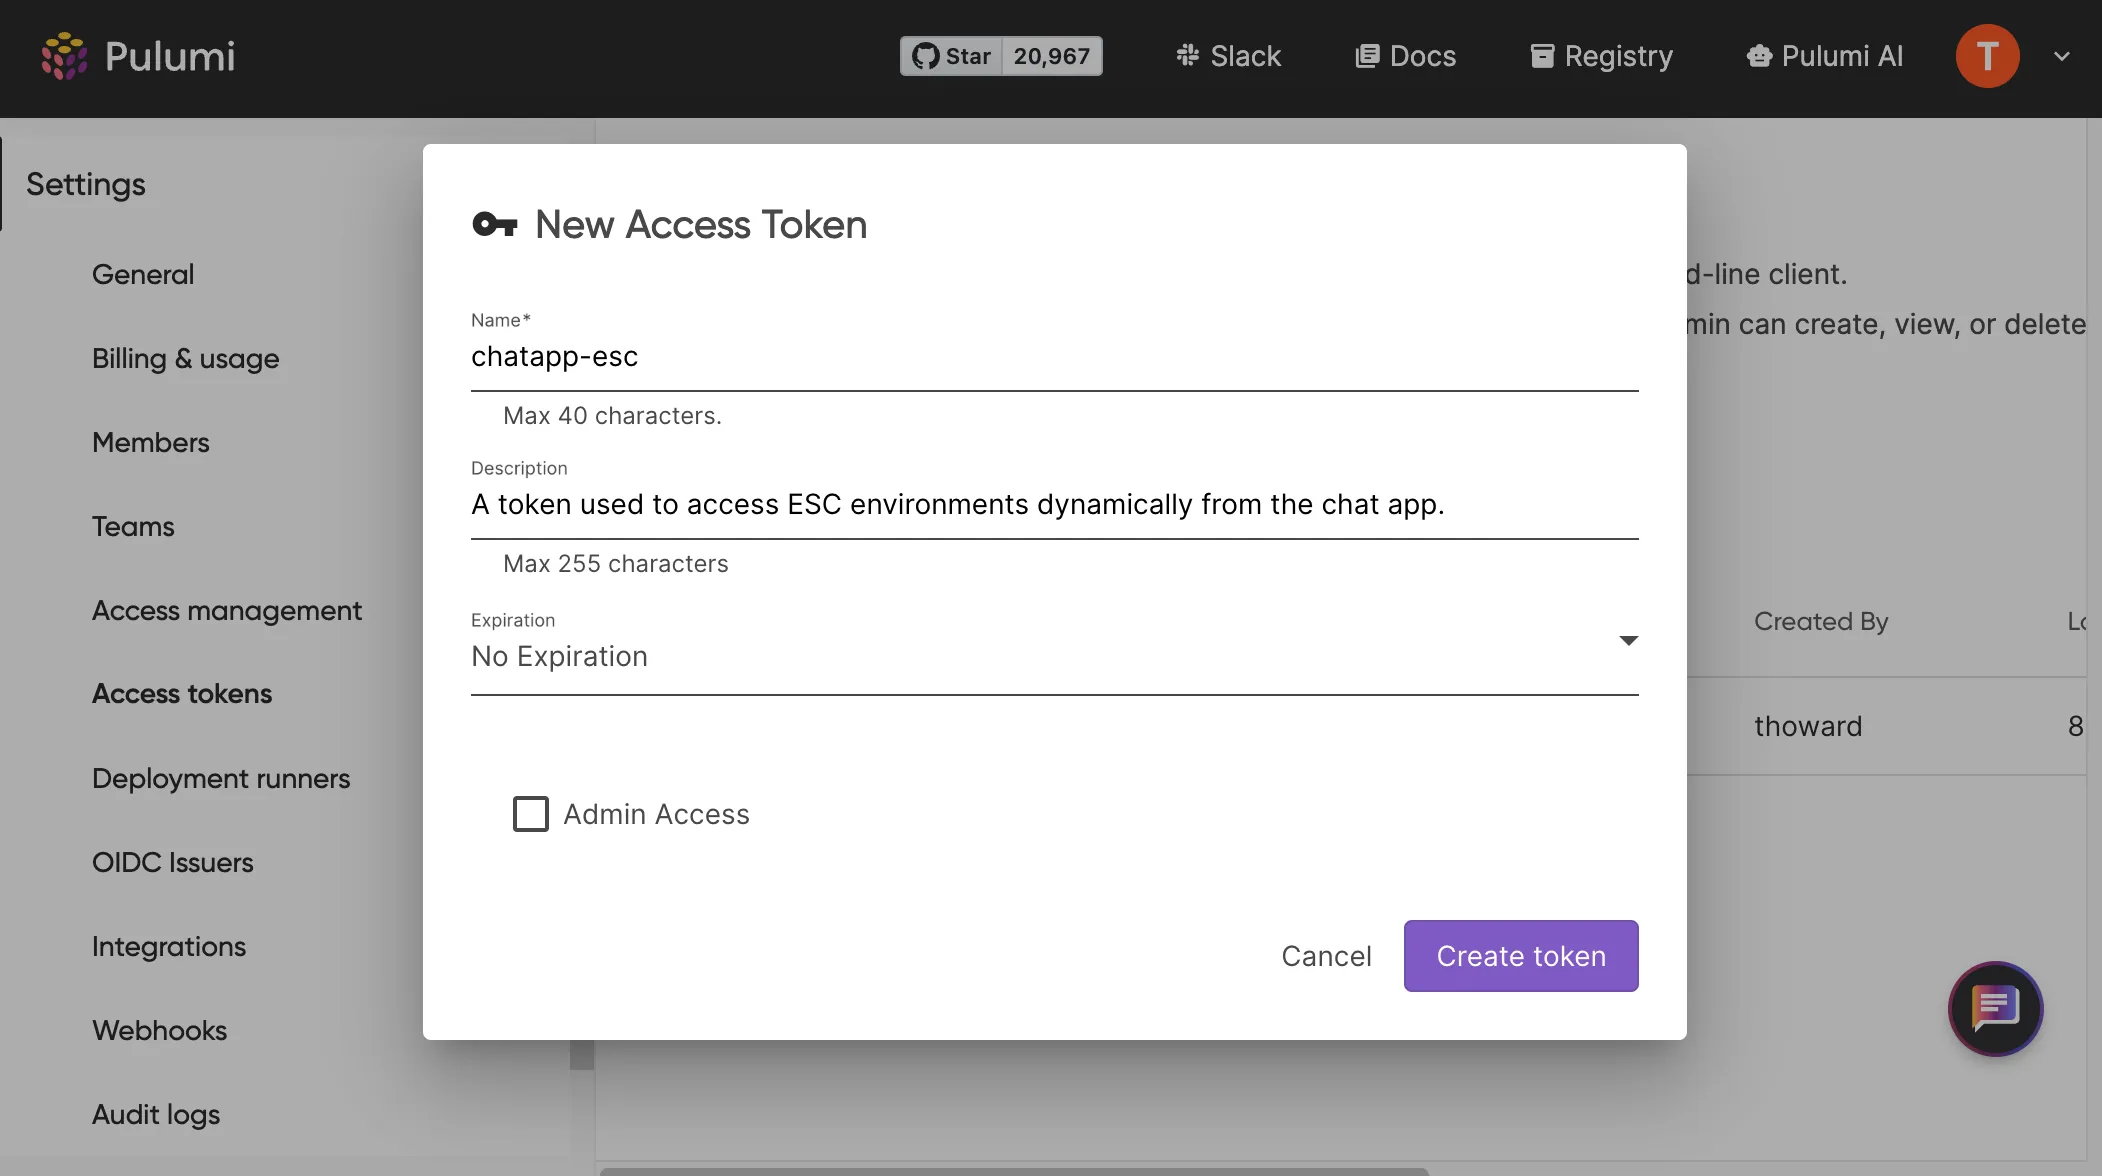
Copy that value to the clipboard, and paste it securely into your shell:
export PULUMI_ACCESS_TOKEN=`pbpaste`Step 3: Modify chatapp.py code to fetch settings dynamically#
Finally, let’s modify the chatapp.py to use these new values and pull the settings dynamically.
import osimport pulumi_esc_sdk as escfrom flask import Flask, render_template, request, jsonifyfrom openai import OpenAI
app = Flask(__name__)
# Set up the ESC client to manage secretsescOrg = os.getenv("ESC_ORG")escProjectName = os.getenv("ESC_PROJECT")escEnvironment = os.getenv("ESC_ENVIRONMENT")
def get_openai_response(api_key, model, prompt):    client = OpenAI(api_key=api_key)    try:        response = client.chat.completions.create(            model=model,            messages=[{"role": "user", "content": prompt}]        )        return response.choices[0].message.content    except Exception as e:        return f"An error occurred: {str(e)}"
@app.route('/')def home():    return render_template('chatapp.html')
@app.route('/chat', methods=['POST'])def chat():    # Fetch most recent configuration from ESC    esc_client = esc.esc_client.default_client()    _, values, _ = esc_client.open_and_read_environment(escOrg, escProjectName, escEnvironment)
    # Access the configuration values and set the local variables    model = values['model']    api_key = values['api_key']
    prompt = request.json['message']    response = get_openai_response(api_key, model, prompt)    return jsonify({'response': response, 'model': model})
if __name__ == '__main__':    app.run(debug=True)
This last set of changes does a few things:
- imports the Pulumi ESC SDK
- pulls the client configuration values from the ESC provided environment variables and sets up the
esc.Configurationobject - creates an ESC client and modifies the
/chatendpoint to read from the ESC environment every time it is called
This will ensure that the app always gets the most recent values, without the need to restart!
With those changes in place, lets run the app and make sure it works:
pulumi env run default/chatapp -- python chatapp.pyAs before, check that the app is running at http://127.0.0.1:5000 and able to get responses from the OpenAI API.
Step 4: Manage the settings while the app is running#
Let’s leave the chat app running and open up another shell window.
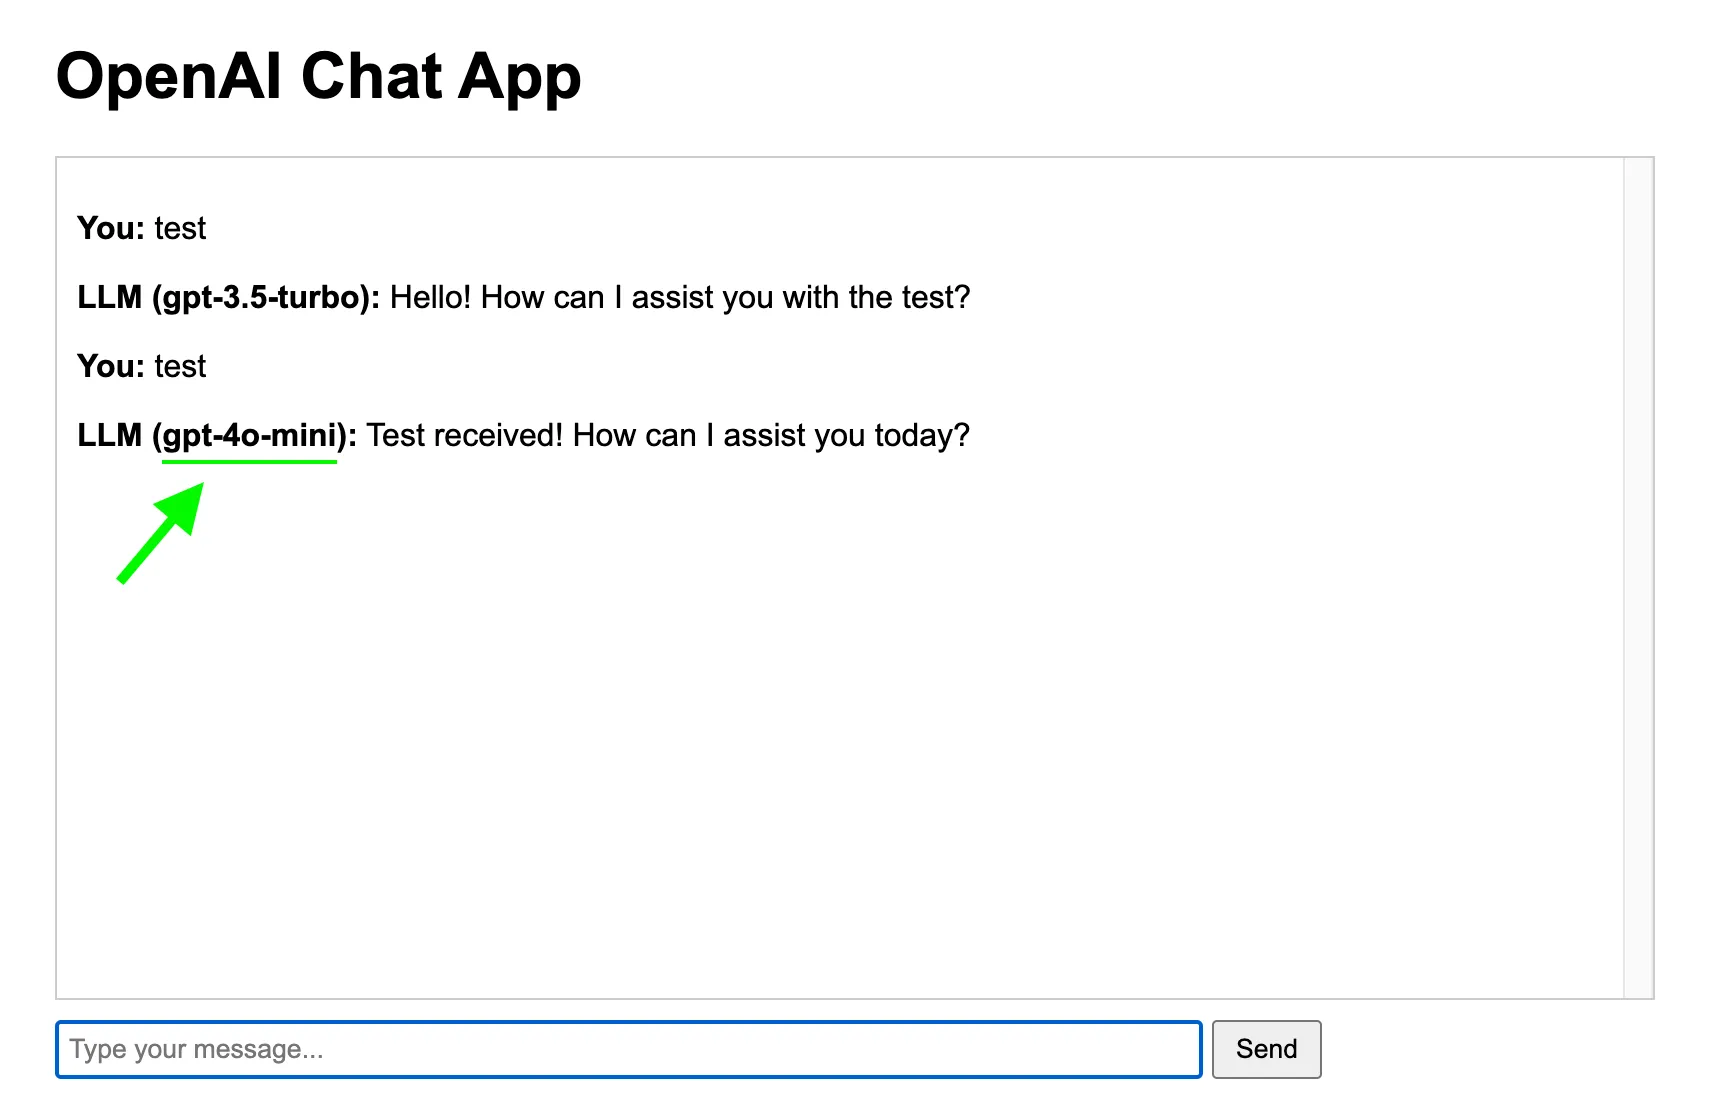
In order to test the dynamic nature of the configuration we’ll modify the ESC environment at runtime and look for the changes to appear in our running app. We’ll change the model setting and use the more efficient and up-to-date model gpt-4o-mini.
pulumi env set default/chatapp model gpt-4o-miniTry querying the chat app and you should see that the model has been updated. This time, no restart required!
Conclusion#
Pulumi ESC and the ESC SDK can be used in many ways to manage your configurations. But this just the tip of the iceberg!
Check out some of our other tutorials to see how you can version your ESC environments and use environment tags to update entire sets of configuration values and secrets with a simple drag and drop interface in the Pulumi Cloud console.
You can also do even more complicated things like manage the configuration of Kubernetes, and apps running within a Kubernetes cluster at the same time, with a single tool.