Create Infrastructure with Pulumi Deployments Click-to-Deploy
10 minIn this tutorial, you'll learn how to create, deploy, and manage cloud infrastructure using Pulumi Deployments with click-to-deploy. You'll start by using the New Project Wizard to set up and launch infrastructure from your browser, selecting a template to get started quickly.
- How to use the New Project Wizard to create and deploy a Pulumi project from your browser
- How to install and configure the Pulumi GitHub App
- How to trigger deployments directly from the Pulumi Cloud console using click-to-deploy
- Completion of the AWS Getting Started guide or familiarity with the basics of the Pulumi workflow
- A Pulumi Cloud account and an access token
- An Amazon Web Services account, access key ID, and secret access key
- A GitHub account with admin rights to a Git repository or organization
What is Pulumi Deployments?#
Pulumi Deployments is a fully managed service designed to automate cloud infrastructure. Pulumi Deployments provides the building blocks designed for scaling your cloud infrastructure, with tools to power public and private cloud platforms, APIs, and self-service infrastructure portals. These options provide flexibility to incorporate Pulumi Deployments into your existing workflows.
Deployments can be triggered through multiple methods: using the REST API, integrating with GitHub via push-to-deploy, or initiating directly from the Pulumi Cloud console.
Set up a new Pulumi Deployment#
First sign in to Pulumi Cloud via the Pulumi sign in page.
Install and configure the GitHub App#
Next, the Pulumi GitHub App is required to enable Pulumi Deployment’s New Project Wizard and push-to-deploy functionality. Follow the GitHub app installation instructions to ensure your Pulumi organization is set up to work seamlessly with Pulumi Deployments.
Create a New Project with the New Project Wizard#
To create a new Pulumi project, commit its code, and deploy it entirely from your browser, you will use the New Project Wizard. The wizard allows you to start from one of Pulumi’s public templates, your Organization Templates, or even generate a custom project using the cloud resources and your preferred language of choice with Pulumi AI.
First, navigate to the New Project tab in the Pulumi Cloud console. Choose your source template from Pulumi, then you can optionally choose your cloud and language to filter the results or search all templates.

Type aws-python or aws-typescript, choose one of the two, and click Next.
Project details#
Provide a name for the project, an optional description, and a name for the project’s first stack. The project name will be written to the project file (Pulumi.yaml) and the stack name will be used to name the stack-configuration file (Pulumi.<stack>.yaml).
Configuration#
Provide any values required for the configuration declared in the template. In this example, you can set the aws:region you would like to deploy into.
These values populate the config section in the Pulumi.<stack>.yaml file, specifying the necessary settings for your project.
Environment#
If you’ve configured environments with your organization, you can specify one to use with the resulting stack. Environments enable teams to define and share collections of configuration and secrets across multiple Pulumi projects and stacks, such as your AWS_SECRET_ACCESS_KEY which will be needed to configure your deployment settings.
Repository#
Configure the repository and optional subdirectory to use when committing your new project code.
Deployment settings#
Configure the behavior of Deployments, including when to trigger new Deployments and any environment variables required for the Pulumi program to run. Unless you have configured this project to use an Environment, you will need to add variables for AWS_ACCESS_KEY_ID and AWS_SECRET_ACCESS_KEY.
A full description of each setting is available on the deployment settings docs page.
Deployment method#
Finally, select Pulumi Deployments as the deployment method and Create project to finish the wizard and trigger an initial deployment. You will see the deployment start in the Deployments tab.
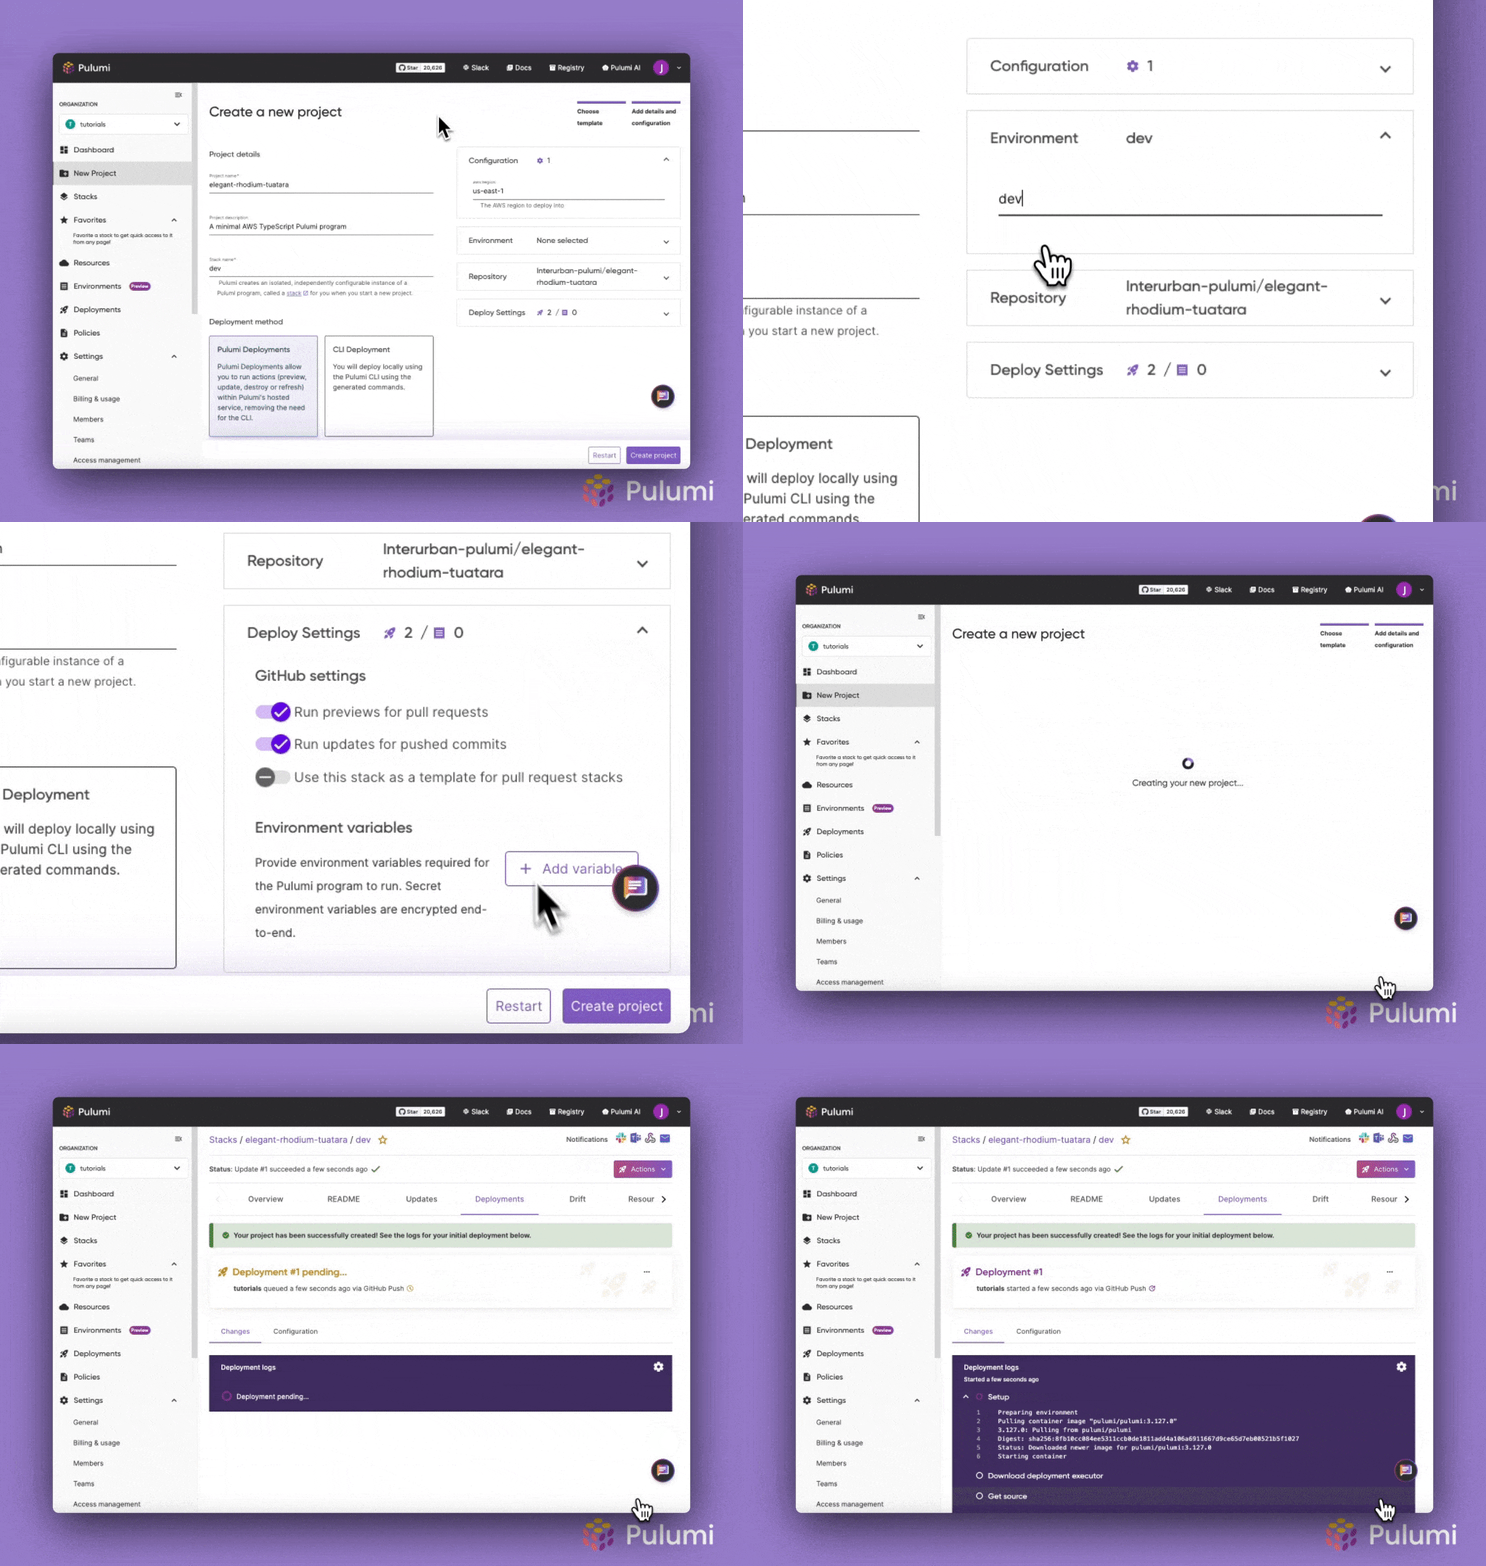
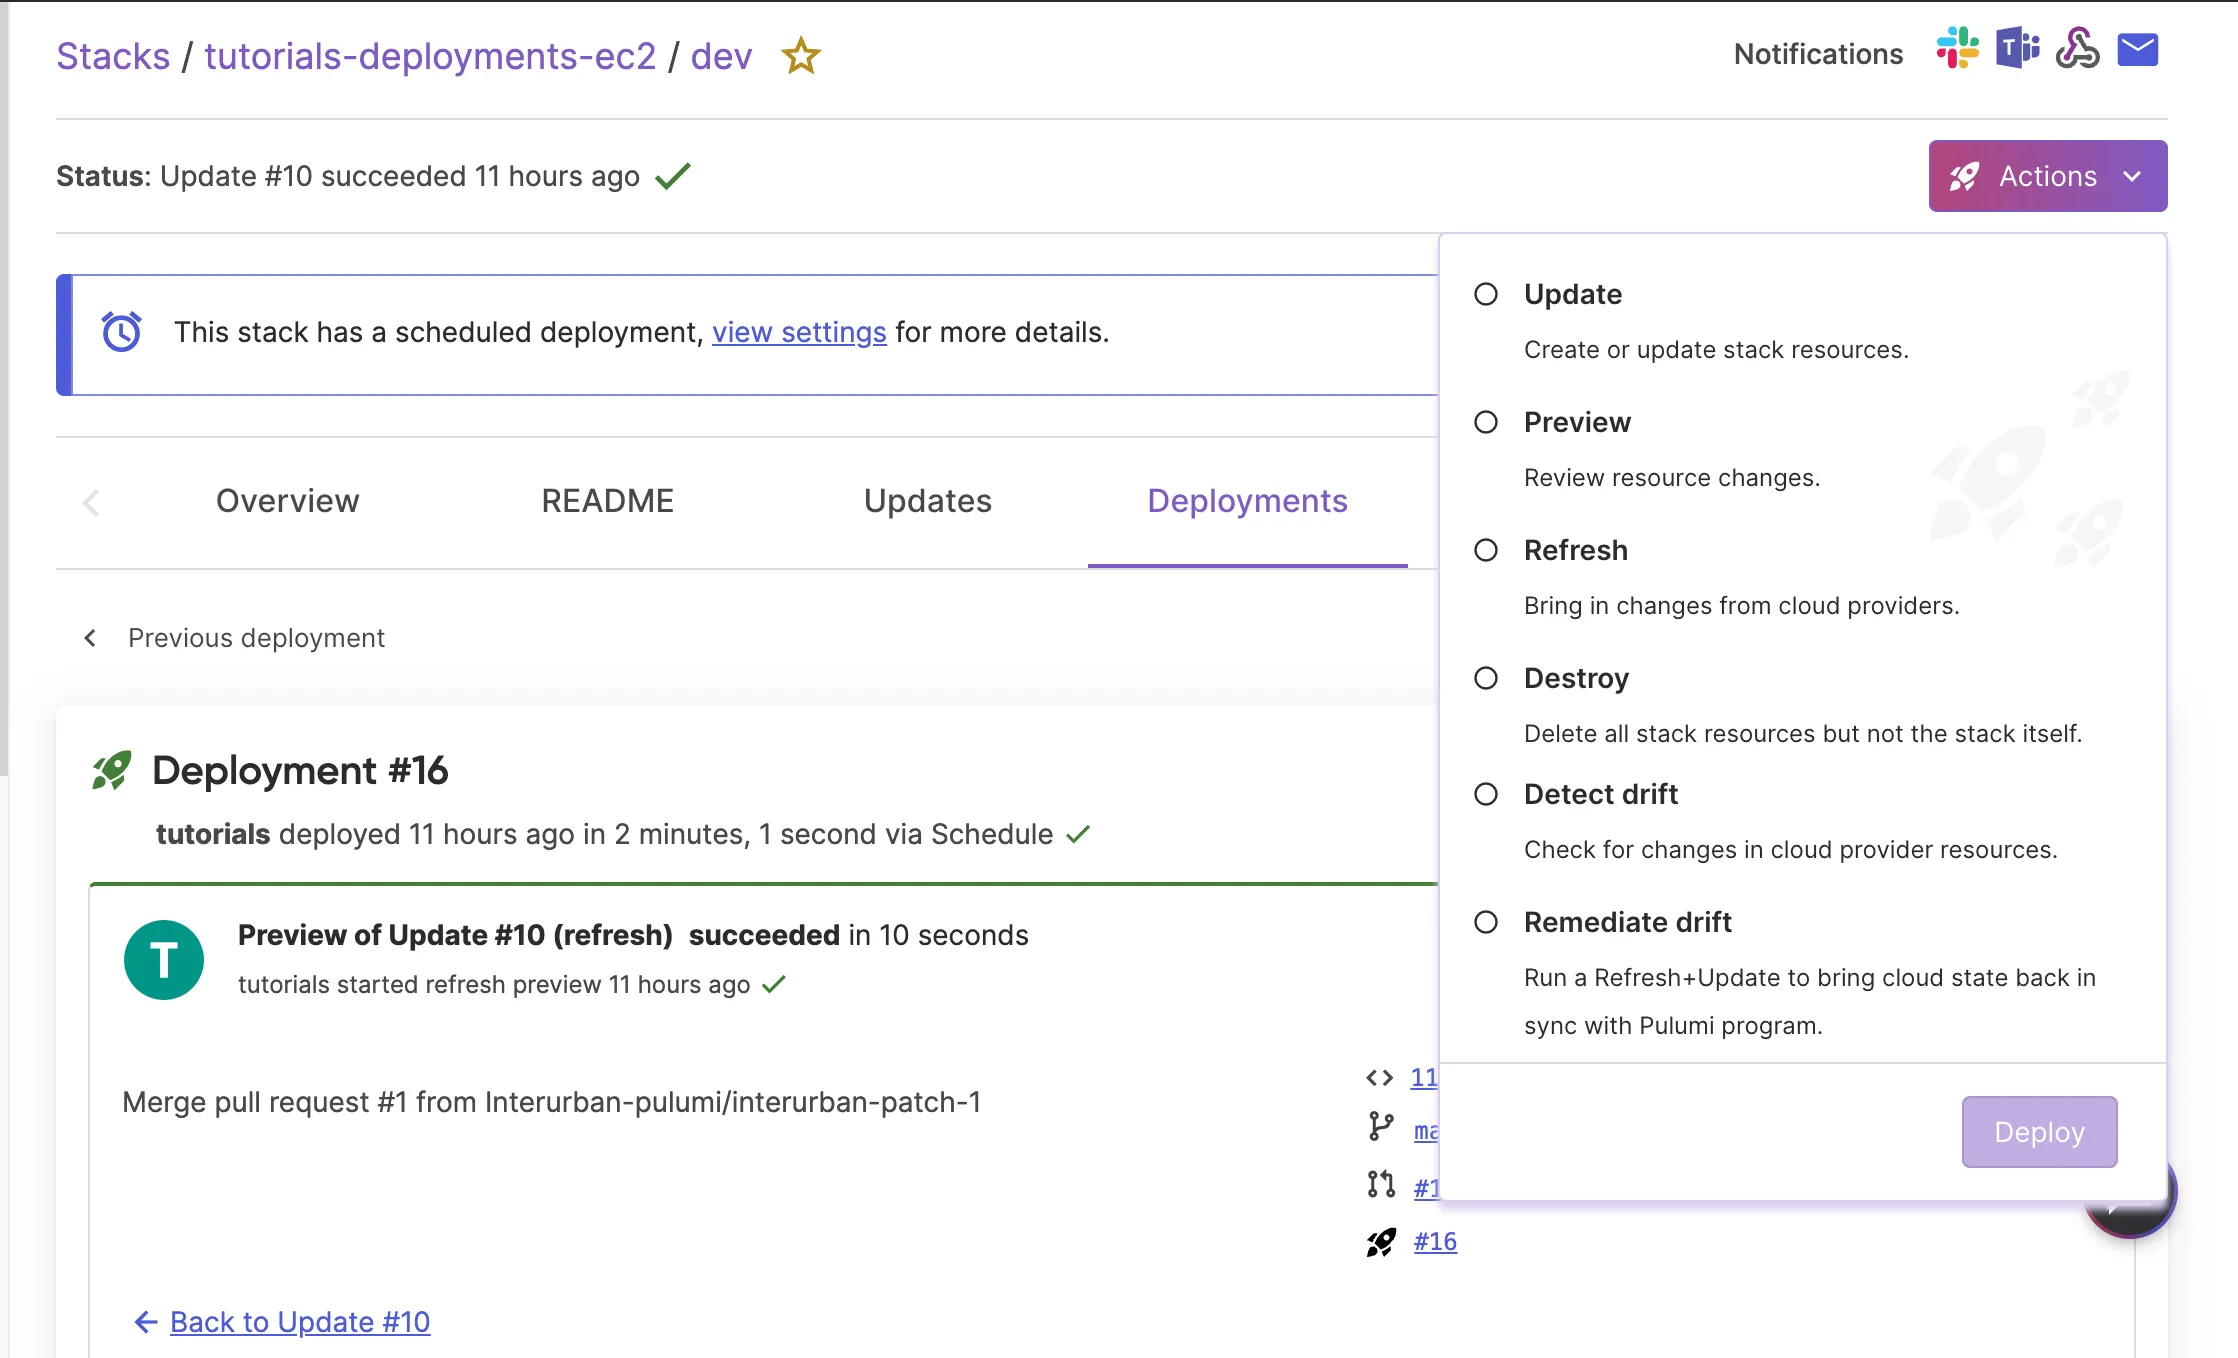
When your deployment is complete, you can manage and deploy your infrastructure from the Pulumi Cloud console. For example, in the stack’s Actions tab, you can use the Click to Deploy button to trigger another deployment.
This feature is useful for day-to-day operational tasks, such as debugging a stuck stack or rectifying drift by performing a refresh. With click to deploy, you can execute these actions without needing to pull the stack and its source code onto your local machine.
Destroy all stack resources#
After you are finished exploring your new stack, you can begin to clean up the resources created. In the Actions tab, select the Destroy option to remove all resources associated with the stack. Confirm by clicking the Delete resources? confirmation box, then click Deploy. Pulumi will begin tearing down the resources, and you can track the progress directly in the console.
If you no longer need the stack itself, you can also delete it. In the Settings tab, choose Delete stack to remove the stack, including all its deployment history and state files from Pulumi Cloud.
Cleanup#
To clean up, delete any additional resources you created:
- Delete the GitHub repository created.
Next steps#
In this tutorial, you set up a basic click to deploy stack using Pulumi’s new project wizard. You configured your stack to use the GitHub app, deployed resources, and explored the fundamental Pulumi Deployment browser workflow.
To learn more about creating and managing deployments with Pulumi Cloud, take a look at the following resources:
Deployment Triggers: Understand the different methods to trigger a deployment, such as using the REST API, clicking a button in the Pulumi Console, or using GitHub push-to-deploy. Check out the Pulumi documentation.
Deployment permissions: Configure and manage deployment permissions to control access and ensure security. Detailed information is available in the Pulumi documentation.
Related
Automatic Diagram Generation for Always-Accurate Diagrams
