




Welcome to the second post in our IDP Best Practices series. In this article, we explore how to build golden paths in practice: pre-architected, reusable infrastructure patterns that help standardize and speed up cloud development.
Golden paths are opinionated routes for infrastructure provisioning that platform teams build for common workflows. Because modern cloud platforms offer so many options — over 200 AWS services, sprawling Azure catalogs, countless DevOps tools — developers can struggle with decision fatigue or produce inconsistent implementations. Golden paths solve this by providing ready-to-use, production-grade infrastructure that encodes your organization’s best practices, security policies, and operational standards.
In this guide, you’ll learn how to build golden paths for your Internal Developer Platform using two core Pulumi constructs: Components, reusable infrastructure building blocks, and Templates, predefined, deployable patterns. You’ll see how to create infrastructure abstractions that are written once, shared across teams, and consumed in any language, turning weeks of setup into minutes of developer-ready infrastructure.
The Platform Engineering Layer Cake: A Model for IDPs
To understand where golden paths fit into an Internal Developer Platform (IDP), think in layers. This three-tier model structures your platform to deliver increasing levels of abstraction, reuse, and developer value, and it maps onto the four factors of a Pulumi IDP: templates, components, environments, and policies.
Layer 1: Infrastructure layer
This is the foundation: raw cloud resources include VMs, databases, networks, and storage, which are the fundamental building blocks from AWS, Azure, GCP, and other providers. Pulumi gives you programmatic access to these resources through native providers, but working at this level requires deep infrastructure knowledge.
Layer 2: Platform layer - components
This is where the magic happens. Pulumi Components take those raw resources and package them into higher-level abstractions. Instead of manually configuring 20+ AWS resources for a secure web application, you create a component that handles all that complexity and exposes just the configuration that matters:
const app = new SecureWebApplication("my-app", {
    instanceType: "t3.medium",
    minReplicas: 2,
    maxReplicas: 10,
    enableWAF: true,
    environment: "production"
});
Layer 3: Golden path layer - templates
Templates are the layer developers actually consume. A template wraps one or more components in opinionated project scaffolding — repo structure, CI/CD wiring, policy guardrails, and sensible defaults — so starting a new service is one command instead of a design exercise. The rest of this guide builds a component first, then shows how a golden path template turns it into that one-command experience.
Part 1: Building Reusable Infrastructure Components
Reusable infrastructure components act as the foundation of your platform. They encapsulate complexity while remaining composable and scalable. Let’s build a real-world example: a component that deploys containerized microservices to AWS Fargate.
The Power of Multi-Language Components
Here’s what makes Pulumi components revolutionary: write once, consume anywhere. Your platform team can author components in TypeScript, but application teams can consume them in Python, Go, .NET, Java, or even YAML. This separation of concerns is crucial for scaling platform engineering across diverse teams.
Building a Microservice Component Step-by-Step
Let’s create a component that encapsulates everything needed to deploy a production-ready microservice:
// microservice-component.ts
import * as pulumi from "@pulumi/pulumi";
import * as aws from "@pulumi/aws";
import * as awsx from "@pulumi/awsx";

export interface MicroserviceArgs {
    appPath: string;      // Path to application code
    cpu?: number;         // CPU units (256, 512, 1024, etc.)
    memory?: number;      // Memory in MB
    port?: number;        // Application port
    desiredCount?: number; // Number of tasks
}

export class MicroserviceComponent extends pulumi.ComponentResource {
    public readonly url: pulumi.Output<string>;
    public readonly serviceName: pulumi.Output<string>;
    public readonly clusterName: pulumi.Output<string>;

    constructor(name: string, args: MicroserviceArgs, opts?: pulumi.ComponentResourceOptions) {
        super("custom:infrastructure:Microservice", name, {}, opts);

        // Set defaults
        const cpu = args.cpu || 256;
        const memory = args.memory || 512;
        const port = args.port || 8080;
        const desiredCount = args.desiredCount || 2;

        // Create ECR repository for Docker images
        const repository = new awsx.ecr.Repository(`${name}-repo`, {
            forceDelete: true
        }, { parent: this });

        // Build and push Docker image
        const image = new awsx.ecr.Image(`${name}-image`, {
            repositoryUrl: repository.url,
            context: args.appPath,
            platform: "linux/amd64",
        }, { parent: this });

        // Create Application Load Balancer
        const loadBalancer = new awsx.lb.ApplicationLoadBalancer(`${name}-lb`, {
            defaultTargetGroup: {
                port: port,
                protocol: "HTTP",
                healthCheck: {
                    path: "/health",
                    interval: 30,
                    timeout: 5,
                    healthyThreshold: 2,
                    unhealthyThreshold: 3,
                }
            }
        }, { parent: this });

        // Create ECS cluster
        const cluster = new aws.ecs.Cluster(`${name}-cluster`, {}, { parent: this });

        // Create Fargate service
        const service = new awsx.ecs.FargateService(`${name}-service`, {
            cluster: cluster.arn,
            taskDefinitionArgs: {
                container: {
                    name: name,
                    image: image.imageUri,
                    cpu: cpu,
                    memory: memory,
                    essential: true,
                    portMappings: [{
                        containerPort: port,
                        targetGroup: loadBalancer.defaultTargetGroup,
                    }],
                },
            },
            desiredCount: desiredCount,
            assignPublicIp: true,
        }, { parent: this });

        // Export outputs
        this.url = pulumi.interpolate`http://${loadBalancer.loadBalancer.dnsName}`;
        this.serviceName = service.service.name;
        this.clusterName = cluster.name;

        // Register outputs
        this.registerOutputs({
            url: this.url,
            serviceName: this.serviceName,
            clusterName: this.clusterName,
        });
    }
}
Documenting for Discoverability and Adoption
To make your component easy to use, add comprehensive documentation and examples to a README.md file:
# MicroserviceComponent

Abstraction for resources needed when using AWS container services.

A component to abstract the details related to:
- Creating a docker image and pushing it to AWS ECR.
- Deploy to ECS Fargate using the docker image.

# Inputs

* appPath: Path to local folder containing the app and Dockerfile.
* port: Port to expose via an ALB.
* cpu (Optional): CPU capacity. Defaults to 256 (i.e. 0.25 vCPU).
* memory (Optional): Memory capacity. Defaults to 512 (i.e. 0.5GB).
* containerName (Optional): Name of the container. Defaults to "my-app".

# Outputs

* publicUrl: The DNS name for the loadbalancer fronting the app.

# Usage
## Specify Package in `Pulumi.yaml`

Add the following to your `Pulumi.yaml` file:
Note: If no version is specified, the latest version will be used.

... omit for brevity ...
This documentation will help developers understand how to use your component effectively, including required inputs, outputs, and example usage.
Publishing Your Component via Private Registry
Once your component is ready, publish it to your Pulumi Private Registry. This assumes your component’s source already lives in a Git repository — the example below publishes from github.com/myorg/microservice-component, so swap in your own repository’s path:
# Tag your component version
git tag v1.0.1
git push origin v1.0.1

# Publish to your organization's private registry
pulumi package publish github.com/myorg/microservice-component@1.0.1
The argument is the component’s source, not a registry URL: pulumi package publish takes a Git repository, a plugin reference, or a local schema file, and publishes it to the private registry of your default organization. If you belong to more than one org, pass --publisher ORG_NAME.
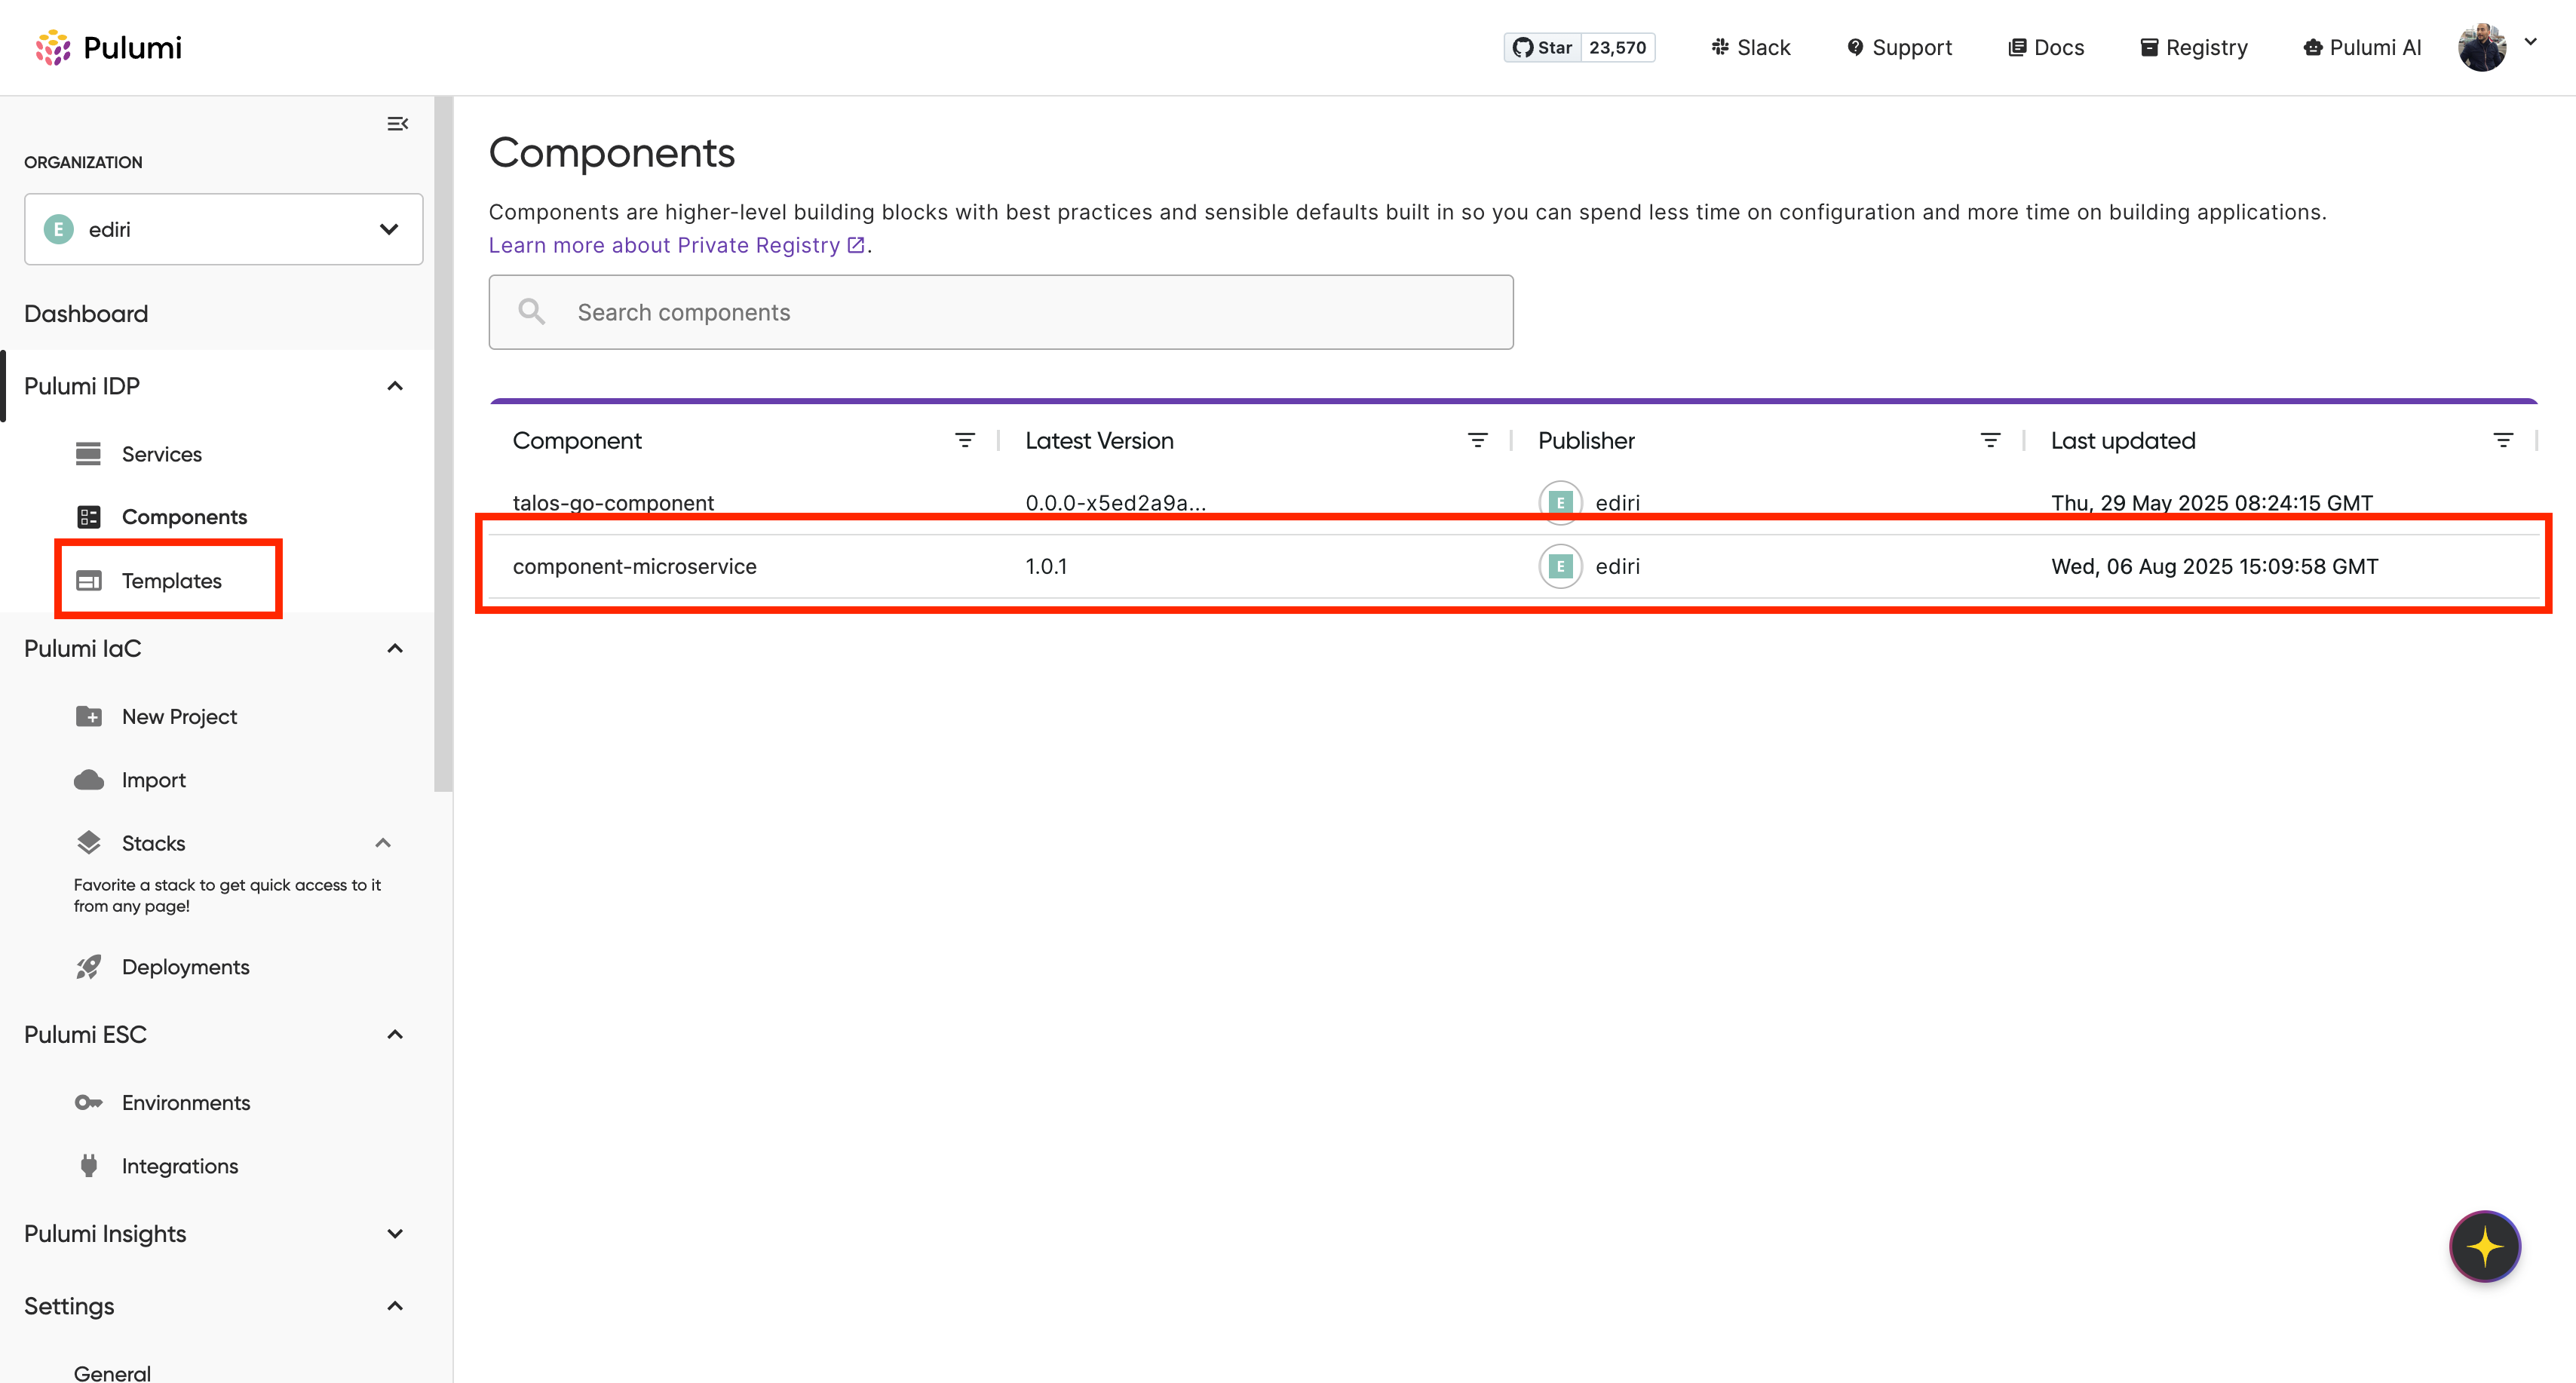
Now any team in your organization can discover and use your component, regardless of their language preference. All they need is to navigate to the Components section in the Pulumi IDP and search for microservice-component.
Part 2: From Building Blocks to Golden Paths
While components are powerful, they’re just the starting point. Golden path templates layer on opinionated scaffolding, workflows, and compliance best practices that guide developers to production.
Golden path maturity: from zero to product-grade platforms
Teams evolve from ad hoc deployments to mature, productized templates with versioning, metrics, and governance. These maturity levels reflect how deeply your platform enables safe, consistent delivery.
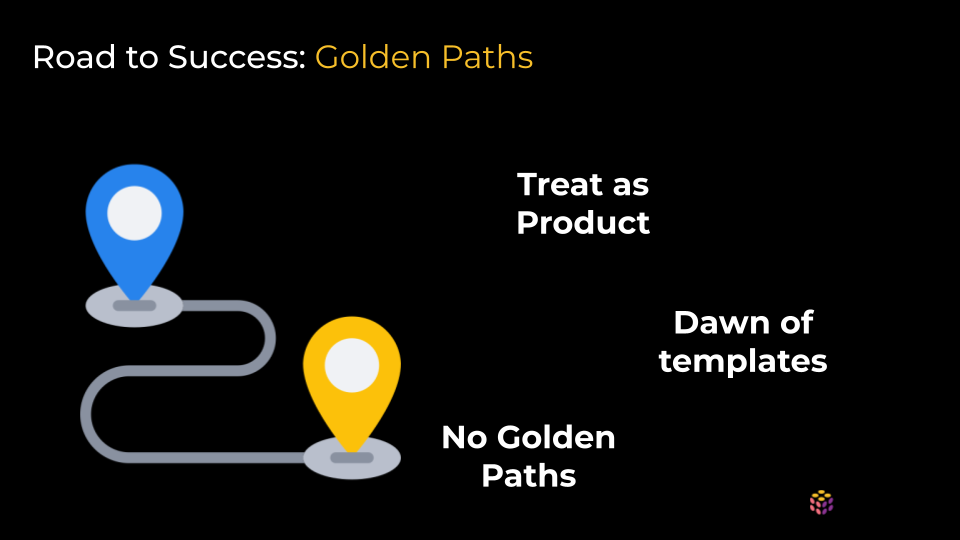
Organizations typically progress through three stages of golden path maturity:
Stage 1: No Golden Paths
- Every team reinvents the wheel
- Inconsistent practices across projects
- High cognitive load on developers
- Security and compliance gaps
Stage 2: Dawn of Templates
- Basic cookie-cutter templates emerge
- Some standardization begins
- Manual processes still dominate
- Limited support and evolution
Stage 3: Templates as Products
- Golden paths have dedicated owners
- Regular release cycles and versioning
- Migration guides for updates
- Metrics track adoption and success
- Continuous improvement based on feedback
The characteristics of a golden path
Drawing from Spotify’s pioneering work, golden paths share these characteristics:
- Pre-architected and Supported: The platform team owns and supports the path
- Optional but Recommended: Developers can deviate, but staying on the path ensures support
- Transparent Abstractions: The implementation is visible, not a black box
- Extensible: Teams can add project-specific resources without breaking the pattern
- Evolutionary: Templates improve based on feedback and new requirements
Building a Go microservice golden path
Let’s create a complete golden path for Go microservices that includes:
- Application scaffolding with best practices
- Infrastructure deployment using our component
- CI/CD pipeline configuration
- Observability setup
- Security controls
Step 1: Template Structure
go-microservice-boilerplate/
├── Pulumi.yaml           # Infrastructure definition
├── src/                  # Application code
│   ├── main.go           # Go microservice
│   ├── Dockerfile        # Container definition
│   └── go.mod            # Dependencies
└── README.md            # Documentation
Step 2: Application Scaffolding
The src/main.go file contains a minimal Go microservice with all the best practices and compliance guardrails baked in. This helps developers to quickly get started and extend the application without worrying too much about selecting the right libraries or frameworks.
// source/main.go
package main

import (
	"context"
	"flag"
	"net/http"
	"os"
	"os/signal"
	"time"

	"github.com/labstack/echo/v4"
	"github.com/labstack/echo/v4/middleware"
	"go.opentelemetry.io/contrib/instrumentation/github.com/labstack/echo/otelecho"
	"go.opentelemetry.io/otel"
	"go.opentelemetry.io/otel/exporters/otlp/otlptrace/otlptracehttp"
	"go.opentelemetry.io/otel/sdk/resource"
	sdktrace "go.opentelemetry.io/otel/sdk/trace"
	semconv "go.opentelemetry.io/otel/semconv/v1.34.0"
)

func initTracer() (*sdktrace.TracerProvider, error) {
	exporter, err := otlptracehttp.New(context.Background())
	if err != nil {
		return nil, err
	}

	resource, err := resource.Merge(
		resource.Default(),
		resource.NewWithAttributes(
			semconv.SchemaURL,
			semconv.ServiceNameKey.String("${PROJECT}"),
			semconv.ServiceVersionKey.String("1.0.0"),
		),
	)
	if err != nil {
		return nil, err
	}

	tp := sdktrace.NewTracerProvider(
		sdktrace.WithBatcher(exporter),
		sdktrace.WithResource(resource),
		sdktrace.WithSampler(sdktrace.AlwaysSample()),
	)

	otel.SetTracerProvider(tp)
	return tp, nil
}

func echoHandler(c echo.Context) error {
	message := c.QueryParam("message")
	if message == "" {
		message = "Hello from Go microservice!"
	}

	return c.JSON(http.StatusOK, map[string]string{
		"echo":      message,
		"service":   "${PROJECT}",
		"timestamp": time.Now().UTC().Format(time.RFC3339),
	})
}

func healthHandler(c echo.Context) error {
	return c.JSON(http.StatusOK, map[string]string{
		"status":  "healthy",
		"service": "${PROJECT}",
	})
}

func main() {
	healthCheck := flag.Bool("health-check", false, "Run health check and exit")
	flag.Parse()

	if *healthCheck {
		resp, err := http.Get("http://localhost:8080/health")
		if err != nil || resp.StatusCode != http.StatusOK {
			os.Exit(1)
		}
		os.Exit(0)
	}

	tp, err := initTracer()
	if err != nil {
		panic(err)
	}
	defer func() {
		if err := tp.Shutdown(context.Background()); err != nil {
			panic(err)
		}
	}()

	e := echo.New()

	e.Use(middleware.Logger())
	e.Use(middleware.Recover())
	e.Use(middleware.CORS())
	e.Use(otelecho.Middleware("${PROJECT}"))

	e.GET("/echo", echoHandler)
	e.GET("/health", healthHandler)

	go func() {
		if err := e.Start(":8080"); err != nil && err != http.ErrServerClosed {
			e.Logger.Fatal("shutting down the server")
		}
	}()

	quit := make(chan os.Signal, 1)
	signal.Notify(quit, os.Interrupt)
	<-quit
	ctx, cancel := context.WithTimeout(context.Background(), 10*time.Second)
	defer cancel()
	if err := e.Shutdown(ctx); err != nil {
		e.Logger.Fatal(err)
	}
}
Step 3: Infrastructure Template with YAML
Here’s how you define the infrastructure using Pulumi YAML. You can instantly spot one of the features of Pulumi Components. We consume the micorservice-component in YAML without knowing that it was authored in a different language. This is the power of Pulumi Components: write once, consume anywhere.
And we see another feature of Pulumi Components: As it is a first-class citizen, we can embed the component and add additional resources like auto-scaling policies, alarms, and more directly in the YAML file. This allows us to create a complete golden path for deploying Go microservices on AWS ECS with auto-scaling capabilities.
# Pulumi.yaml
name: ${PROJECT}
description: ${DESCRIPTION}
runtime: yaml
packages:
  component-microservice: https://github.com/smithrobs/component-microservice@v1.0.1
template:
  description: A template for deploying a Go microservice on AWS ECS with auto-scaling capabilities.
resources:
  microserviceComponent:
    type: component-microservice:MicroserviceComponent
    properties:
      appPath: ./src
      port: 8080
      containerName: ${PROJECT}
  ecsTarget:
    type: aws:appautoscaling:Target
    name: ecs_target
    properties:
      maxCapacity: 4
      minCapacity: 1
      resourceId: service/${microserviceComponent.clusterName}/${microserviceComponent.serviceName}
      scalableDimension: ecs:service:DesiredCount
      serviceNamespace: ecs
  ecsPolicyUP:
    type: aws:appautoscaling:Policy
    name: ecs_policy_up
    properties:
      name: ecs_policy_up
      policyType: StepScaling
      resourceId: ${ecsTarget.resourceId}
      scalableDimension: ${ecsTarget.scalableDimension}
      serviceNamespace: ${ecsTarget.serviceNamespace}
      stepScalingPolicyConfiguration:
        adjustmentType: ChangeInCapacity
        cooldown: 60
        metricAggregationType: Maximum
        stepAdjustments:
        - metricIntervalUpperBound: 0
          scalingAdjustment: 1
  ecsPolicyDown:
    type: aws:appautoscaling:Policy
    name: ecs_policy_down
    properties:
      name: ecs_policy_down
      policyType: StepScaling
      resourceId: ${ecsTarget.resourceId}
      scalableDimension: ${ecsTarget.scalableDimension}
      serviceNamespace: ${ecsTarget.serviceNamespace}
      stepScalingPolicyConfiguration:
        adjustmentType: ChangeInCapacity
        cooldown: 60
        metricAggregationType: Maximum
        stepAdjustments:
        - metricIntervalLowerBound: 0
          scalingAdjustment: -1
  serviceCPUHighUtilization:
    type: aws:cloudwatch:MetricAlarm
    name: service_cpu_high_utilization
    properties:
      name: service_cpu_high_utilization
      comparisonOperator: GreaterThanOrEqualToThreshold
      evaluationPeriods: 2
      metricName: CPUUtilization
      namespace: AWS/ECS
      period: 60
      statistic: Average
      threshold: 80
      alarmActions:
      - ${ecsPolicyUP.arn}
      dimensions:
        ClusterName: ${microserviceComponent.clusterName}
        ServiceName: ${microserviceComponent.serviceName}
  serviceCPULowUtilization:
    type: aws:cloudwatch:MetricAlarm
    name: service_cpu_low_utilization
    properties:
      name: service_cpu_low_utilization
      comparisonOperator: LessThanOrEqualToThreshold
      evaluationPeriods: 2
      metricName: CPUUtilization
      namespace: AWS/ECS
      period: 60
      statistic: Average
      threshold: 10
      alarmActions:
      - ${ecsPolicyDown.arn}
      dimensions:
        ClusterName: ${microserviceComponent.clusterName}
        ServiceName: ${microserviceComponent.serviceName}

outputs:
  publicUrl: ${microserviceComponent.publicUrl}
Step 4: Documentation and Examples
Add a README.md file to your template directory to provide clear instructions on how to use the template, including prerequisites, configuration options, and example commands:
# Go Microservice Golden Path

A **golden path** template that gets your Go microservice from code to production on AWS in minutes, not weeks.

## What You Get

This golden path provides everything your development team needs to deploy production-ready Go microservices:

✅ **Production-ready Go microservice** with Echo framework and OpenTelemetry tracing
✅ **AWS infrastructure that scales** - ECS with auto-scaling from 1-4 instances
✅ **Security by default** - Hardened containers, IAM roles, security groups
✅ **Monitoring built-in** - Health checks, load balancer monitoring, CloudWatch alarms
✅ **One-command deployment** - `pulumi up` handles everything
✅ **No AWS expertise required** - Complex ECS setup abstracted away

## For Development Teams: What to Expect

### Your Experience

**Day 1: Getting Started**

- Clone this repo, run `pulumi up`
- Your service is live on AWS in 5-10 minutes
- Public URL provided automatically - no manual setup needed

**Day 2-N: Development Workflow**

- Write your Go code in `microservice/main.go`
- Test locally with `go run main.go`
- Deploy changes with `pulumi up`
- AWS automatically rebuilds and redeploys your container

**Production Operations**

- Service automatically scales with CPU load (80% up, 10% down)
- Health checks ensure unhealthy containers are replaced
- Load balancer distributes traffic across healthy instances
- Distributed tracing helps debug issues across services

### What's Handled For You

You **don't** need to learn or configure:

- ECS clusters, services, and task definitions
- Application Load Balancers and target groups
- Auto-scaling policies and CloudWatch alarms
- Security groups and IAM roles
- Container registries and image building
- Health check configuration

You **do** focus on:

- Writing your Go application logic
- Adding your business endpoints
- Testing your service locally
- Deploying with confidence
Making Templates Available in Pulumi IDP
Publishing your template to Pulumi IDP enables true self-service. Head to Settings → Integrations → Organization Template Sources and add your template repository.
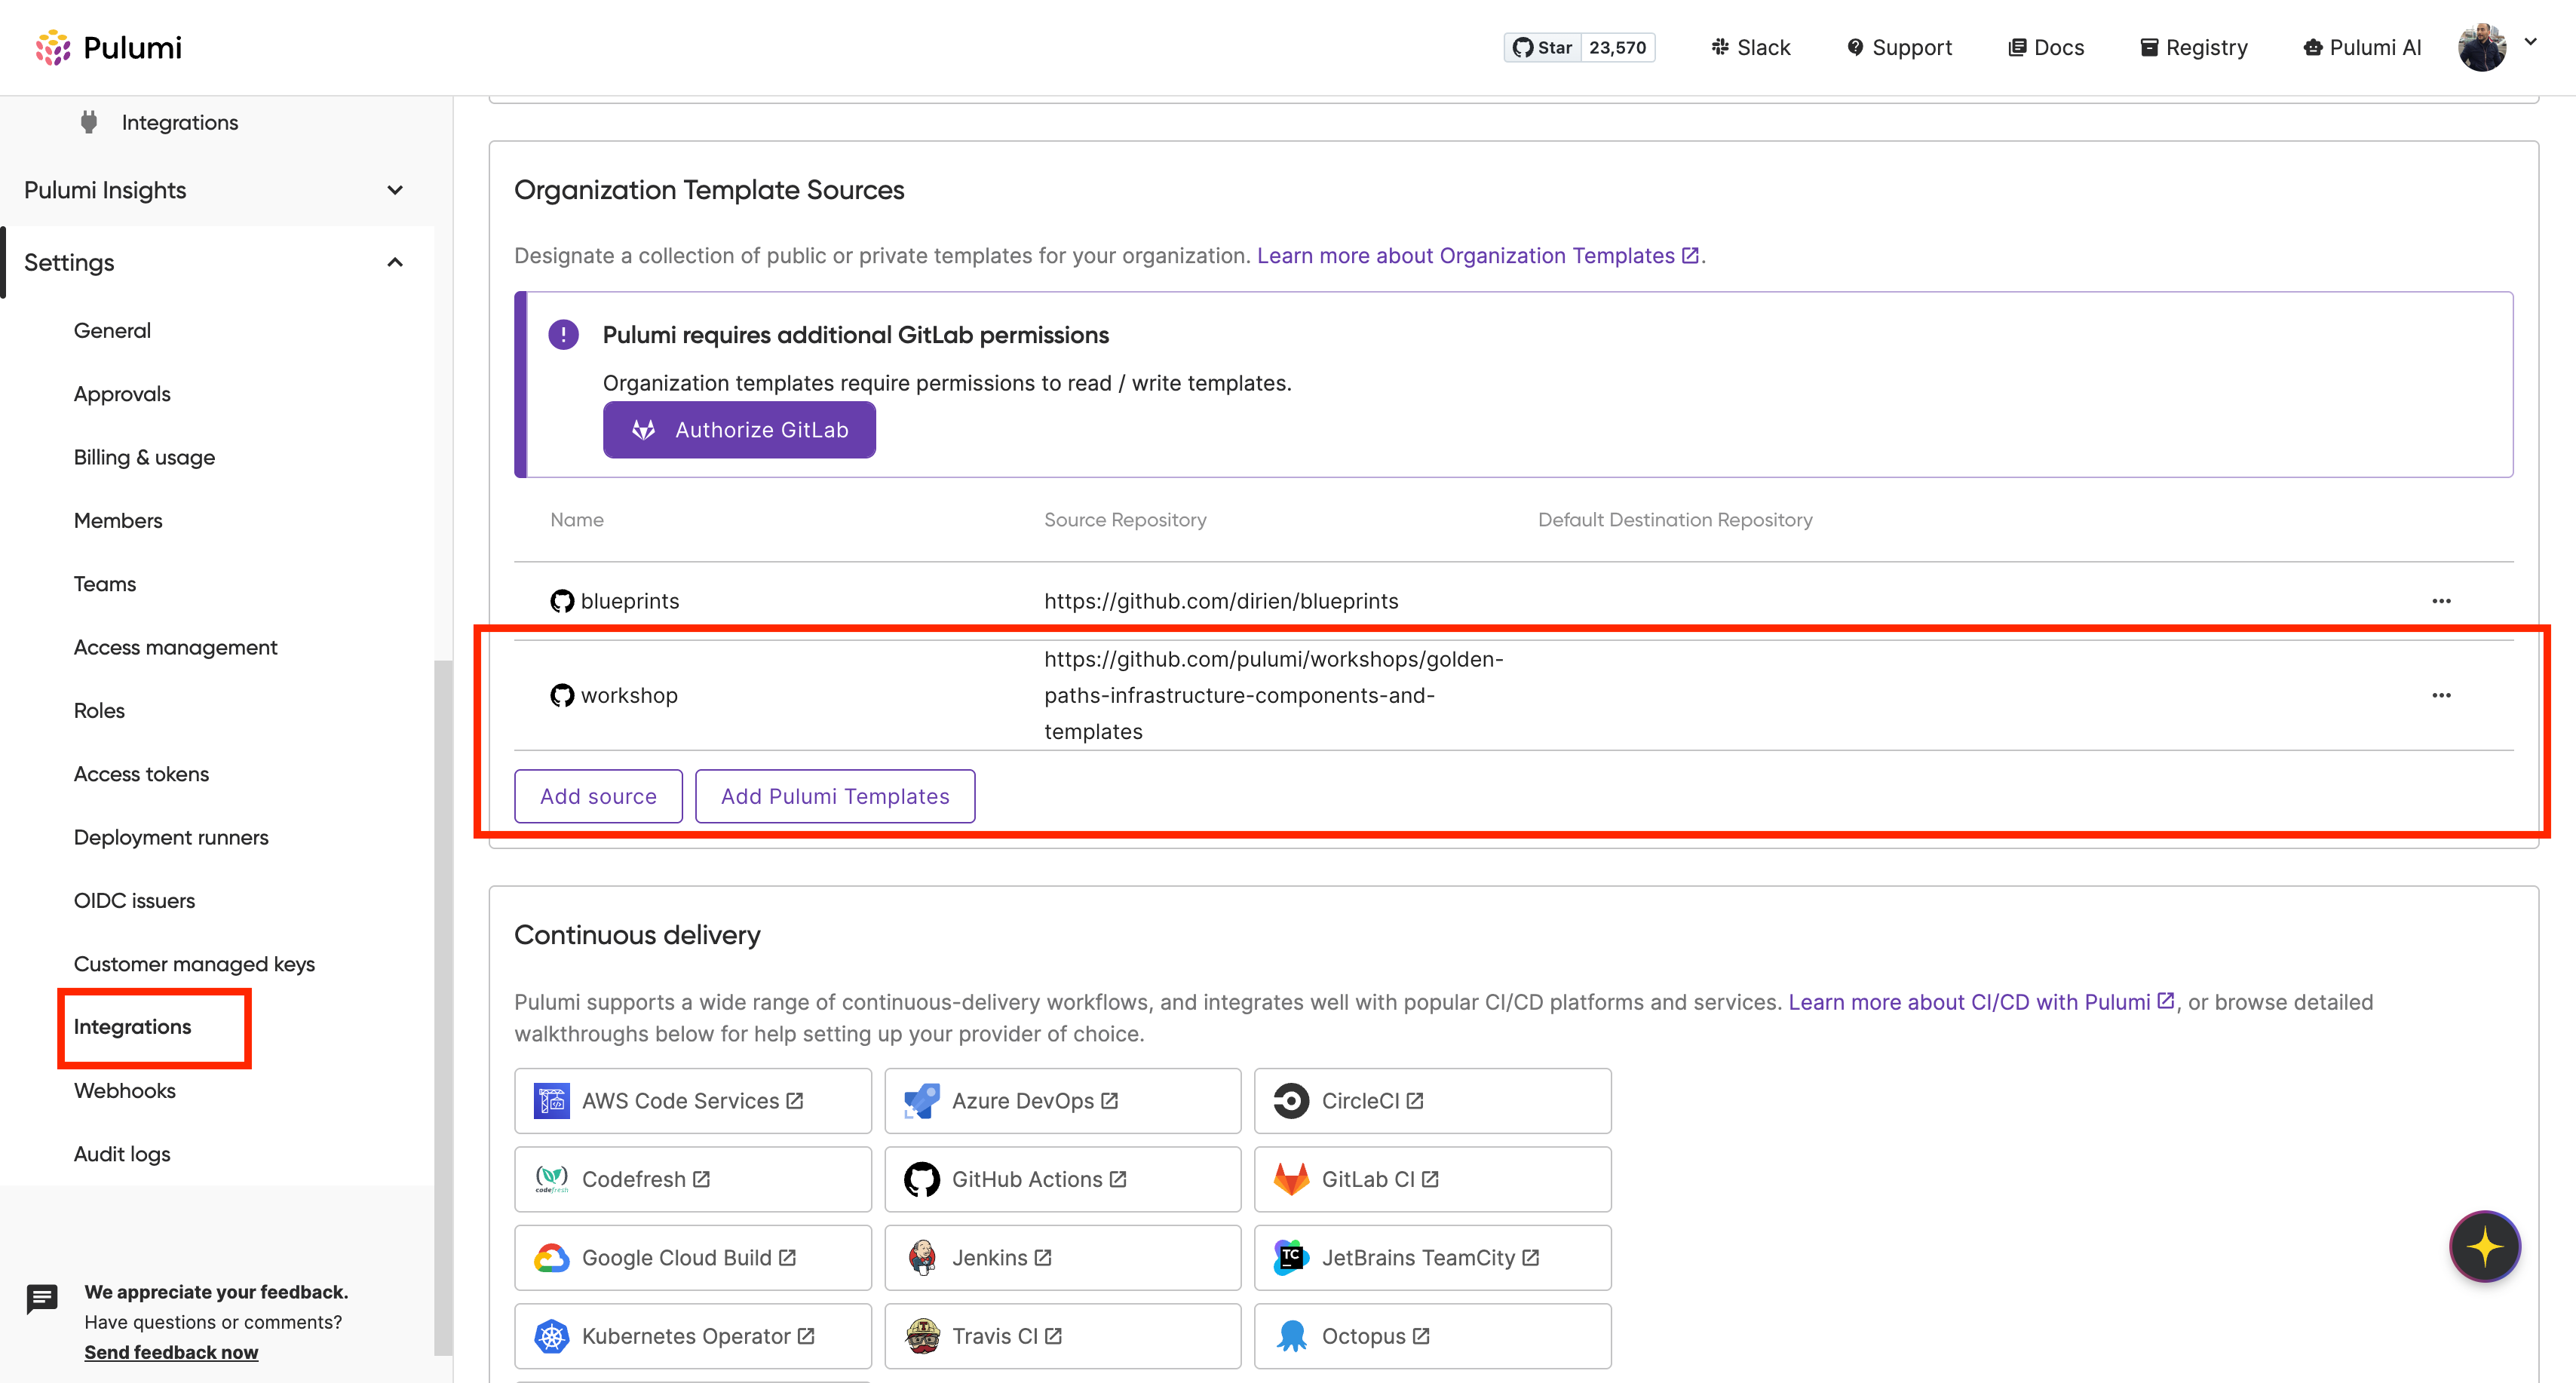
Once published, developers can discover and deploy it directly from the IDP interface.
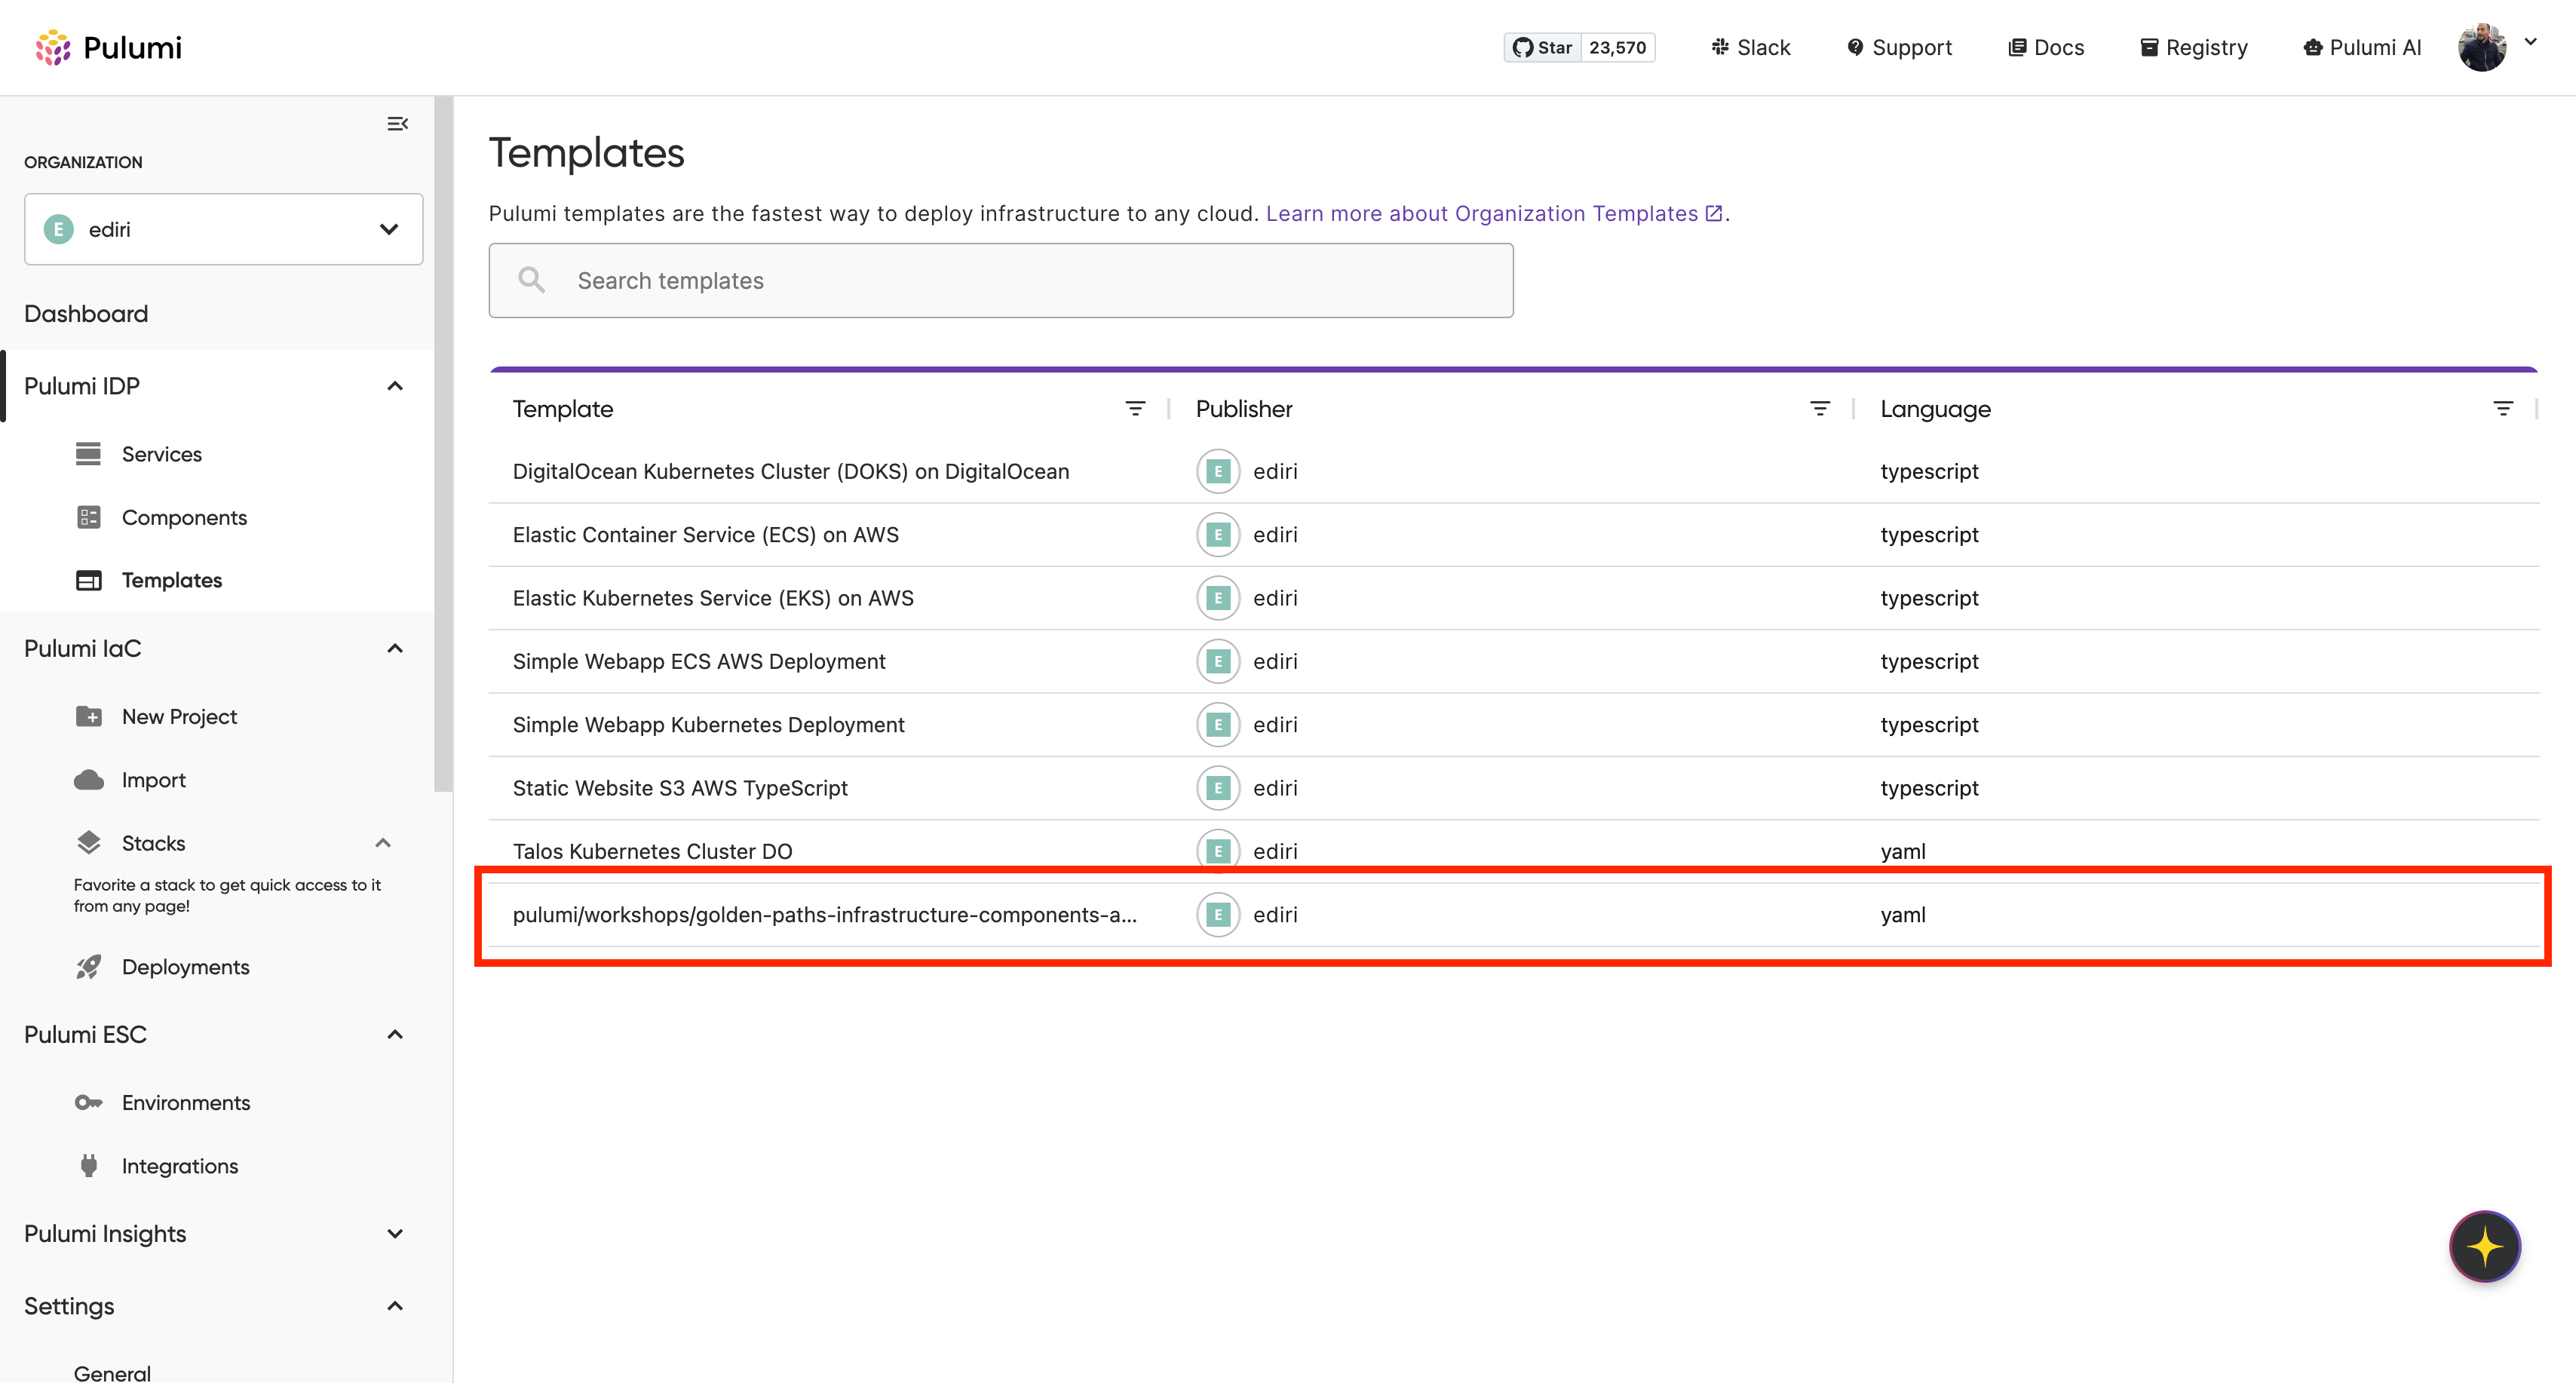
Now developers can deploy through multiple interfaces:
CLI Deployment:
pulumi new https://github.com/myorg/go-microservice-boilerplate
You reach the New Project Wizard two ways: navigate to Stacks → Create Project → select a template from the card view → Use this Template, or navigate to Platform → Templates → select a template → Deploy with Pulumi. Both entry points open the same wizard and let you either fork the template into a new project or add a no-code stack that references it directly, without forking.
From there, the wizard offers a deployment method for the new stack:
- Pulumi Deployments (VCS-backed): writes the stack’s configuration to a Git repository (GitHub, Azure DevOps, GitLab, or Bitbucket). Your organization needs an integration for that provider, and you need to authorize your account with it.
- Pulumi Deployments (no-code): stores the stack’s configuration in a Pulumi ESC environment instead of a repository. See no-code stacks for requirements; any configured VCS provider works.
- Local deployment: deploy the stack from your machine with the Pulumi CLI, no VCS integration required.
Build golden paths with Pulumi
Best Practices for Reusable Infrastructure Components and Templates
Well-designed components and templates are the foundation of scalable, self-service infrastructure. These best practices ensure your abstractions are maintainable, discoverable, and production-ready.
1. Design for day 2 operations from day 1
Think beyond deployment. A golden path must also support ongoing operations:
- How will teams safely update their infrastructure?
- What happens during scaling events?
- How do you handle disaster recovery?
- What metrics and logs are needed for troubleshooting?
2. Expose complexity progressively
Provide sensible defaults that work, while enabling customization for advanced use cases:
interface ComponentArgs {
    // Required - what users must provide
    appName: string;

    // Common customizations with good defaults
    instanceType?: string;  // default: "t3.micro"
    replicas?: number;       // default: 2

    // Advanced options for power users
    networkConfig?: NetworkConfig;
    securityPolicies?: SecurityPolicy[];
    customMetrics?: MetricDefinition[];
}
3. Use semantic versioning everywhere
Clear versioning for both components and templates indicates stability and reliability:
- Major versions (1.0.0 → 2.0.0): Breaking changes
- Minor versions (1.0.0 → 1.1.0): New features, backward compatible
- Patch versions (1.0.0 → 1.0.1): Bug fixes
This lets teams adopt updates with confidence and control.
4. Test your abstractions
Don’t ship black boxes. Create automated tests to validate key functionality and resource creation. Focus on:
- Smoke tests that validate resource existence
- Output validation to ensure correctness
- Integration tests to confirm end-to-end behavior
import { expect } from "chai";
import * as pulumi from "@pulumi/pulumi";

describe("MicroserviceComponent", () => {
    it("should create required resources", async () => {
        const component = new MicroserviceComponent("test", {
            appPath: "./test-app",
            port: 3000
        });

        const resources = await pulumi.runtime.allResources();
        expect(resources).to.include("aws:ecs/cluster:Cluster");
        expect(resources).to.include("aws:ecs/service:Service");
        expect(resources).to.include("aws:lb/loadBalancer:LoadBalancer");
    });
});
5. Enforce guardrails with policy as code
Self-service only works if the platform team can trust what gets deployed without reviewing every change by hand. Pulumi Policies close that gap by attaching automated guardrails directly to the golden paths you publish, so a stack that violates a security or cost standard fails at pulumi preview instead of in production.
A policy pack is ordinary code, written in the same language as the golden path it governs:
import { PolicyPack, validateResourceOfType } from "@pulumi/policy";
import * as aws from "@pulumi/aws";

new PolicyPack("golden-path-guardrails", {
    policies: [
        {
            name: "s3-bucket-must-not-be-public",
            description: "S3 buckets deployed through a golden path may not allow public read access.",
            enforcementLevel: "mandatory",
            validateResource: validateResourceOfType(aws.s3.BucketAcl, (bucketAcl, args, reportViolation) => {
                if (bucketAcl.acl === "public-read" || bucketAcl.acl === "public-read-write") {
                    reportViolation("S3 buckets must not be publicly readable.");
                }
            }),
        },
    ],
});
Run it locally against a stack with pulumi preview --policy-pack ./golden-path-guardrails, or publish it with pulumi policy publish and enable it organization-wide so every team consuming the golden path inherits the guardrail automatically, with no extra step on their part. That is the model covered in depth in the next post in this series, How to Implement Robust Security Guardrails Using Policy as Code: start there for policy groups, remediation policies, and enforcement levels across an entire organization.
How to Measure Golden Path Success
Golden paths aren’t complete until they deliver measurable value. Use these KPIs to assess performance and drive iteration:
Adoption Metrics
- Template usage rate: Percentage of new projects using golden paths
- Component reuse: Number of stacks consuming shared components
- Time to first deployment: Deployment time and frequency from code to production
Quality Metrics
- Security compliance rate: Percentage of deployments passing security policies
- Stability: Deployment incident frequency
- Mean time to recovery (MTTR): Time to recover from production issues
Developer Experience Metrics
- Developer satisfaction: Survey teams about their platform experience
- Support ticket volume: Ticket volume related to infrastructure
- Contribution: Number of PRs or issues submitted to platform templates
Real-World Results: Success Stories
Organizations using golden paths report significant improvements in speed and consistency:
- Snowflake reduced deployment time from 1.5 weeks to less than a day
- Starburst Data cut deployment time from 2 weeks to 3 hours, a 112x improvement
- Mercedes-Benz R&D North America moved hundreds of microservices to the cloud on one toolset shared by its application and infrastructure teams
Golden paths give developers a faster route to production and give platform teams a consistent one to maintain. To learn more, download the whitepaper: The Golden Path to Cloud Success: Your IDP Roadmap.
Common Pitfalls and How to Avoid Them
Pitfall 1: Over-Abstraction
Problem: Creating components so abstract they’re unusable Solution: Start with concrete use cases, then generalize based on actual patterns
Pitfall 2: Insufficient Escape Hatches
Problem: Golden paths become golden cages Solution: Always provide ways to extend or override default behavior
Pitfall 3: Poor Versioning Strategy
Problem: Breaking changes without migration paths Solution: Maintain backward compatibility and provide clear upgrade guides
Pitfall 4: Lack of Ownership
Problem: Templates become orphaned and outdated Solution: Assign clear ownership and establish maintenance schedules
The Future of Golden Paths: AI and Beyond
The future of golden paths is intelligent, cross-cloud, and fully integrated with modern workflows.
AI-Enhanced Templates
Imagine templates that adapt based on your application’s actual behavior, automatically tuning resources and configurations for optimal performance and cost.
Cross-Cloud Portability
Components that abstract not just resources but entire cloud providers, enabling true multi-cloud golden paths.
GitOps-Native Workflows
Templates that include not just infrastructure but complete GitOps pipelines, from code commit to production deployment.
Your First Steps to Golden Paths
Ready to get started? Here’s your action plan:
- Audit Current Patterns: Document the infrastructure patterns your teams use most frequently
- Build one reusable component: Pick your most common pattern and build a reusable component
- Create Your First Template: Build a complete golden path for one project type
- Gather Feedback: Deploy with a pilot team and iterate based on their experience
- Scale Gradually: Expand your component library and template catalog based on demand
- Measure and Iterate: Track adoption and continuously improve based on metrics
Frequently asked questions
What is a golden path in platform engineering?
A golden path is the opinionated, well-supported route a platform team builds for a common infrastructure workflow, such as spinning up a new service. It packages best practices into reusable components and templates so following the path is faster than building from scratch, while the underlying implementation stays visible and extensible.
What is the difference between a golden path and a paved road?
The terms describe the same idea from two engineering cultures: Spotify popularized “golden path” and Netflix popularized “paved road.” Both describe a supported, opinionated default that a platform team maintains, with the freedom for teams to leave the path for a genuine edge case.
What makes a golden path different from a service catalog?
A service catalog gives developers a menu; a golden path gives them a paved road. The distinction matters once you start comparing platform-engineering tools, because popular catalog and portal tools often solve discovery problems without ever provisioning anything themselves.
Backstage, for example, is a software catalog and a scaffolder: its Software Templates generate a new repository and open a pull request, then hand off to whatever CI and IaC tooling that repository is wired to. Port and Cortex follow a similar shape, orchestrating external webhooks, GitHub Actions, or Terraform runs to carry out the actions a developer requests through the portal. In each case, the golden path is defined in one system and executed by another, so keeping the two in sync is an integration problem the platform team owns.
Pulumi collapses that hand-off. A golden path built with Pulumi components and templates is defined in the same general-purpose language and the same IaC engine that provisions the infrastructure, published to your private registry and secured with Pulumi Policies. No second system has to stay in sync, because the catalog entry and the thing that runs are the same artifact. For a deeper comparison of the two approaches, see Backstage vs. Pulumi IDP: Why Infrastructure-First Platform Engineering Matters.
Do golden paths stop teams from going off-path?
No, and a golden path that forbids deviation stops being a path and becomes a golden cage, one of the pitfalls covered above. The platform team’s job is to make the paved road so much easier than the alternative that most teams choose it without being told to, not to remove the choice. Teams that opt out own the operational and security work the platform team would otherwise have handled for them.
How does policy as code keep self-service safe?
Self-service only works if the platform team can trust what gets deployed without reviewing every change by hand. Pulumi Policies close that gap by attaching automated guardrails directly to the golden paths you publish, written as ordinary code in the same language as the golden path itself, so a stack that violates a security or cost standard fails at pulumi preview instead of in production. See Enforce guardrails with policy as code above for a working policy pack example, and How to Implement Robust Security Guardrails Using Policy as Code for the full model across an organization.
How do you measure golden path adoption?
Track adoption, quality, and developer-experience metrics together: the percentage of new services created from a template, security-compliance rate, mean time to recovery, developer-satisfaction survey results, and support-ticket volume tied to infrastructure. See How to Measure Golden Path Success above for the full breakdown.
How long does it take to build a first golden path?
Most teams can ship a first golden path, one component plus one template covering a single common workflow, in a few days to a couple of weeks, since the goal is a narrow, real use case rather than a fully general platform. The golden path maturity stages above describe how it grows from there.
Conclusion: From Fragmentation to Flow
Golden paths remove friction from the development process, encode expertise into reusable patterns, and empower developers to move at the speed of business, without restricting creativity or forcing rigid standards.
By building a library of components and templates, you transform your Internal Developer Platform from a collection of tools into a force multiplier for your entire engineering organization. You give developers the gift of not having to solve solved problems, while maintaining the flexibility to innovate where it matters.
Start small. Solve one problem well. Expand from there. With the right foundation, your developer platform will evolve into a system of self-service, speed, and stability.
Ready to build your golden paths
- Code examples: Explore golden path examples on GitHub
- Build with Components: Pulumi Components documentation
- Enable Self-Service: Pulumi IDP documentation
- Join the Community: Connect with platform engineers in our Pulumi Slack
Next in our series: How to Implement Robust Security Guardrails Using Policy as Code. You will learn how to add automated guardrails that make sure every deployment meets your security and compliance standards without slowing down development.