SCIM: Configuring OneLogin
This document outlines the steps required to help you configure automatic provisioning/deprovisioning of your users and groups in Pulumi using SCIM 2.0.
Please note that some advanced SCIM features aren’t supported yet. For more information, see Known Limitations.
Prerequisites
- You must be an admin of your Pulumi organization.
- (Optional, but highly recommended) You should have more than one admin for your Pulumi organization.
Configuring the OneLogin Application
The first step is to create a new OneLogin Application for Pulumi SCIM:
From the OneLogin Administration portal, go to the Applications page and select the Add App button.
Search for
SCIM Provisioner with SAML (SCIM v2 Core)and select it.Enter a Display Name and optionally a logo. See Pulumi Logos.
Select Save.
Configuration Settings
Select the Configuration view for the application and enter/confirm the values in the following table.
The values you need to use are dependent upon your Pulumi organization name. Be sure to replace acmecorp with your actual organization name.
| Configuration Settings | Value |
|---|---|
| SAML Audience URL | https://api.pulumi.com/login/acmecorp/sso/saml/metadata |
| SAML Consumer URL | https://api.pulumi.com/login/acmecorp/sso/saml/acs |
| SCIM Base URL | https://api.pulumi.com/scim/v2/acmecorp |
| API Connection | Enabled |
SSO Settings
Select the SSO view for the application and confirm/update the values in the following table.
| SSO Settings | Value |
|---|---|
| SAML Signature Algorithm | SHA-512 |
Provisioning Settings
Select the Provisioning view for the application and confirm/update the following settings:
| Provisioning Settings | Value |
|---|---|
| Enable provisioning | box is checked |
| Require admin approval … | Create user, Delete user, Update user boxes are all unchecked. |
| When users are deleted in OneLogin … | Suspend (DO NOT set to Delete) |
| When user accounts are suspended in OneLogin … | Suspend |
Parameters Settings
Select the Parameters view for the application and add the fields as per the following table.
| SCIM Provisioning Field Name | Value |
|---|---|
| firstName | First Name |
| lastName | Last Name |
Email |
Be sure to check the Include in SAML assertion checkbox for each of the added fields.
Optionally, you can override the default value for scimusername and use the Macro setting. For example, {firstname}{lastname} as per OneLogin Macros
Select Save to save the application settings.
Configuring Communications Between Pulumi and OneLogin
These next steps configure the Pulumi Cloud with details on your new OneLogin-based application and configure OneLogin to be able to authenticate to the Pulumi Cloud.
For the first step, you need to obtain the IDP metadata document from OneLogin and then provide it to Pulumi.
- Navigate to the OneLogin Application you created above and select the More Actions drop down menu button and select SAML Metadata to download the metadata XML file.
- Open the file and copy the entire block of XML text in your clipboard.
- Open the Pulumi Cloud and navigate to the organization for which you are enabling SAML/SCIM.
- Select the Settings tab, and then select Access Management.
- In the Membership Requirements section, select the Change requirements button.
- Select SAML SSO and then select Next.
- Paste the IDP metadata XML into the bottom card titled SAML SSO Settings
- Select Apply changes at the bottom of the card.
- Refresh the browser to see that SAML is configured.
At this point Pulumi is able to accept communications from OneLogin. The next step is to provide OneLogin a token to allow Pulumi to authenticate the communications from OneLogin.
- Navigate to the Pulumi Cloud, then Settings, then Access management.
- Scroll to the SCIM block at the bottom of the page.
- Select Generate new token
- Copy the token
- Navigate back to the OneLogin Application you created.
- Select the Configuration view.
- Paste the SCIM token copied from Pulumi above into the SCIM Bearer Token field.
- Save the application.
At this point, SCIM provisioning of users into the Pulumi organization will work as you add the OneLogin Pulumi application created above to your OneLogin users.
Configuring Group Provisioning
Beyond managing users, Pulumi’s SCIM support enables you to manage Pulumi Teams and team membership. To set this up, Pulumi supports using OneLogin’s Role-Group mapping to manage Pulumi teams membership.
Set up OneLogin Application to Manage Groups in Pulumi
Navigate to the SCIM application in OneLogin.
Select the Parameters view for the application and select the
Groupsparameter.Check the Include in User Provisioning checkbox.
Select the Rules view for the application.
For each Pulumi Team you want to manage in OneLogin do the following:
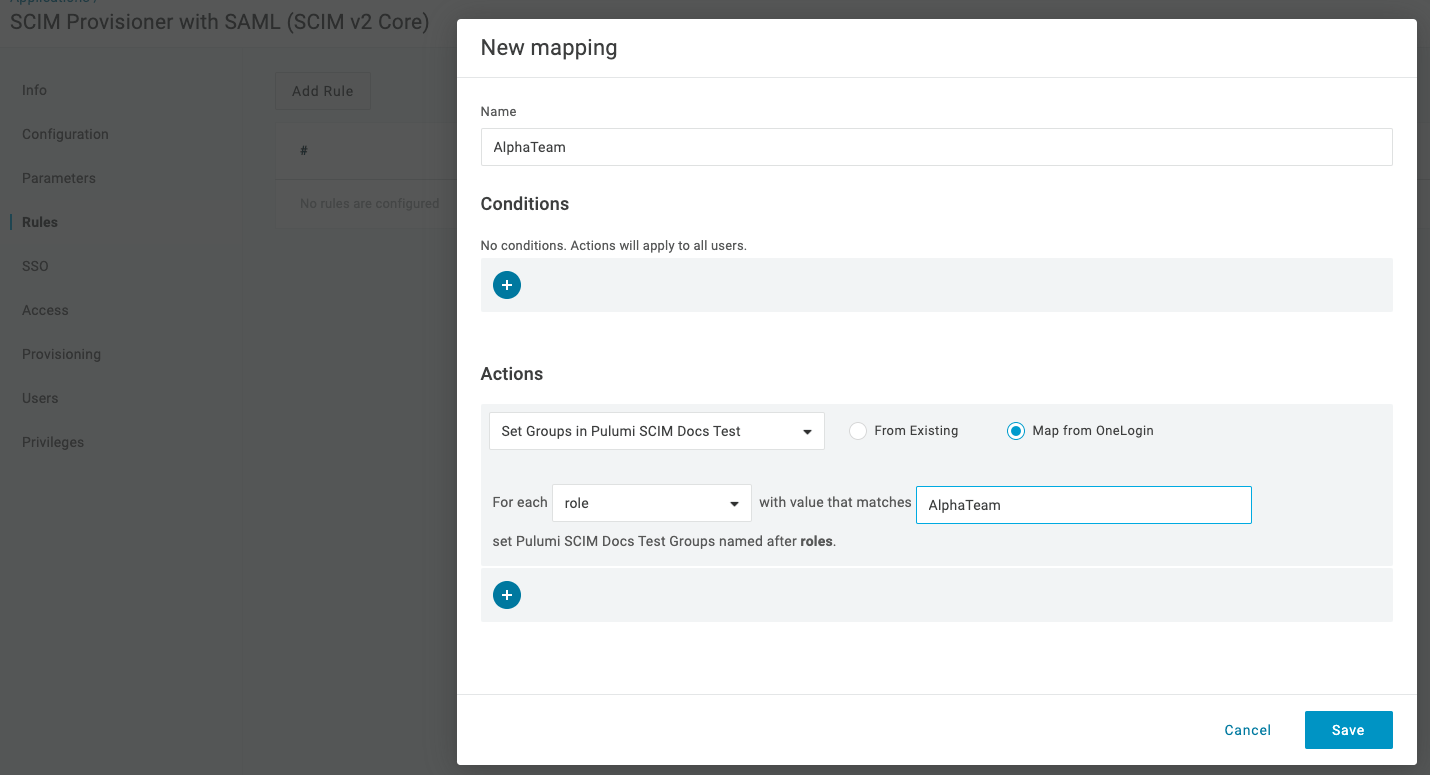
- Select Add Rule
- Name the rule using the Pulumi Team name you are managing (e.g.
AlphaTeamorDevEngineers, etc.) - Conditions: leave blank so that the rule applies to all users.
- Actions: Set Groups … Map from OneLogin … For each role … with value that matches your team name (e.g.
AlphaTeam) - Save the rule.
Save the Application updates.
Configure Roles in OneLogin to Map to Groups
These next steps create the Roles that are used to map users to Groups in OneLogin and, by extension, Teams in Pulumi.
- Navigate to the Users->Roles view in OneLogin.
- For each Group rule you created above for the Application, do the following:
- Select New Role
- Give it a name that matches the Group/Team name you are managing. (e.g.
AlphaTeam) - Associate the role with the OneLogin SCIM application you created above.
- Select Save
Configure Users with Applicable Roles
These next steps associate users with given roles and, by extension, the Pulumi Team they should be added to.
- Navigate to the Users->Users view in OneLogin.
- For each user, select the user and then select the Applications view and select the applicable Role(s).
- Select Save User.
Removing Users from Group Provisioning
When ready to delete or suspend a user, execute the following steps to ensure the user is removed from the applicable Pulumi Team as well as the Pulumi Organization:
- In OneLogin navigate to the user being deleted or suspended.
- Select the Applications view.
- Deselect the Role(s) that represent Pulumi Team(s) for the given user.
- Select Save User. This will remove the user from the applicable Pulumi Team(s).
- Now you can suspend or delete the user from OneLogin.
Thank you for your feedback!
If you have a question about how to use Pulumi, reach out in Community Slack.
Open an issue on GitHub to report a problem or suggest an improvement.