Evaluate Compliance of Terraform Resources

In this tutorial, you'll learn:
- How to scan your cloud environment for resources
- How to evaluate resources for policy violations
Prerequisites:
- The Pulumi CLI
- A Pulumi Cloud Team, Enterprise, or Business Critical account
- An ESC environment and AWS credentials created and configured
- A Pulumi Insights account
- An Amazon Web Services account
- The AWS CLI configured for use with your AWS account
- The Terraform CLI
Deploy Terraform resources
This step is optional if you already have Terraform resources deployed in your AWS account. Otherwise, you can start by creating a new project folder and Terraform file:
$ mkdir pulumi-insights-terraform-resources && cd pulumi-insights-terraform-resources
$ touch main.tf
Open the main.tf file, paste in the following configuration, and save the file.
terraform {
  required_providers {
    aws = {
      source  = "hashicorp/aws"
      version = "~> 4.16"
    }
  }

  required_version = ">= 1.2.0"
}

provider "aws" {
  region = "us-west-2"
}

resource "aws_instance" "app_server" {
  ami           = "ami-830c94e3"
  instance_type = "t2.micro"

  tags = {
    Name = "ExampleAppServerInstance"
  }
}

resource "aws_security_group" "http_access" {
  name        = "http_access"
  description = "SG module Achintha Bandaranaike"

  ingress {
    from_port   = "22"
    to_port     = "22"
    protocol    = "tcp"
    cidr_blocks = ["0.0.0.0/0"]
  }

  ingress {
    from_port   = 80
    to_port     = 80
    protocol    = "tcp"
    cidr_blocks = ["0.0.0.0/0"]
  }

  egress {
    from_port   = 0
    to_port     = 0
    protocol    = "-1"
    cidr_blocks = ["0.0.0.0/0"]
  }
}

resource "aws_s3_bucket" "tf-tutorial-test-s3-bucket" {
  bucket = "tf-tutorial-test-s3-bucket"
}
Then run the terraform apply command to have the following resources deployed into your account:
- An EC2 instance
- A Security Group configured for public access
- An S3 bucket
Scan Terraform resources
Now that you have deployed your resources, you will run a Pulumi Insights scan to retrieve a list of the resources in your account. To do so, navigate to the Accounts page in the Pulumi Console and click on your Pulumi Insights account. For the purposes of this tutorial, we have created an account named pulumi-tutorials-insights.
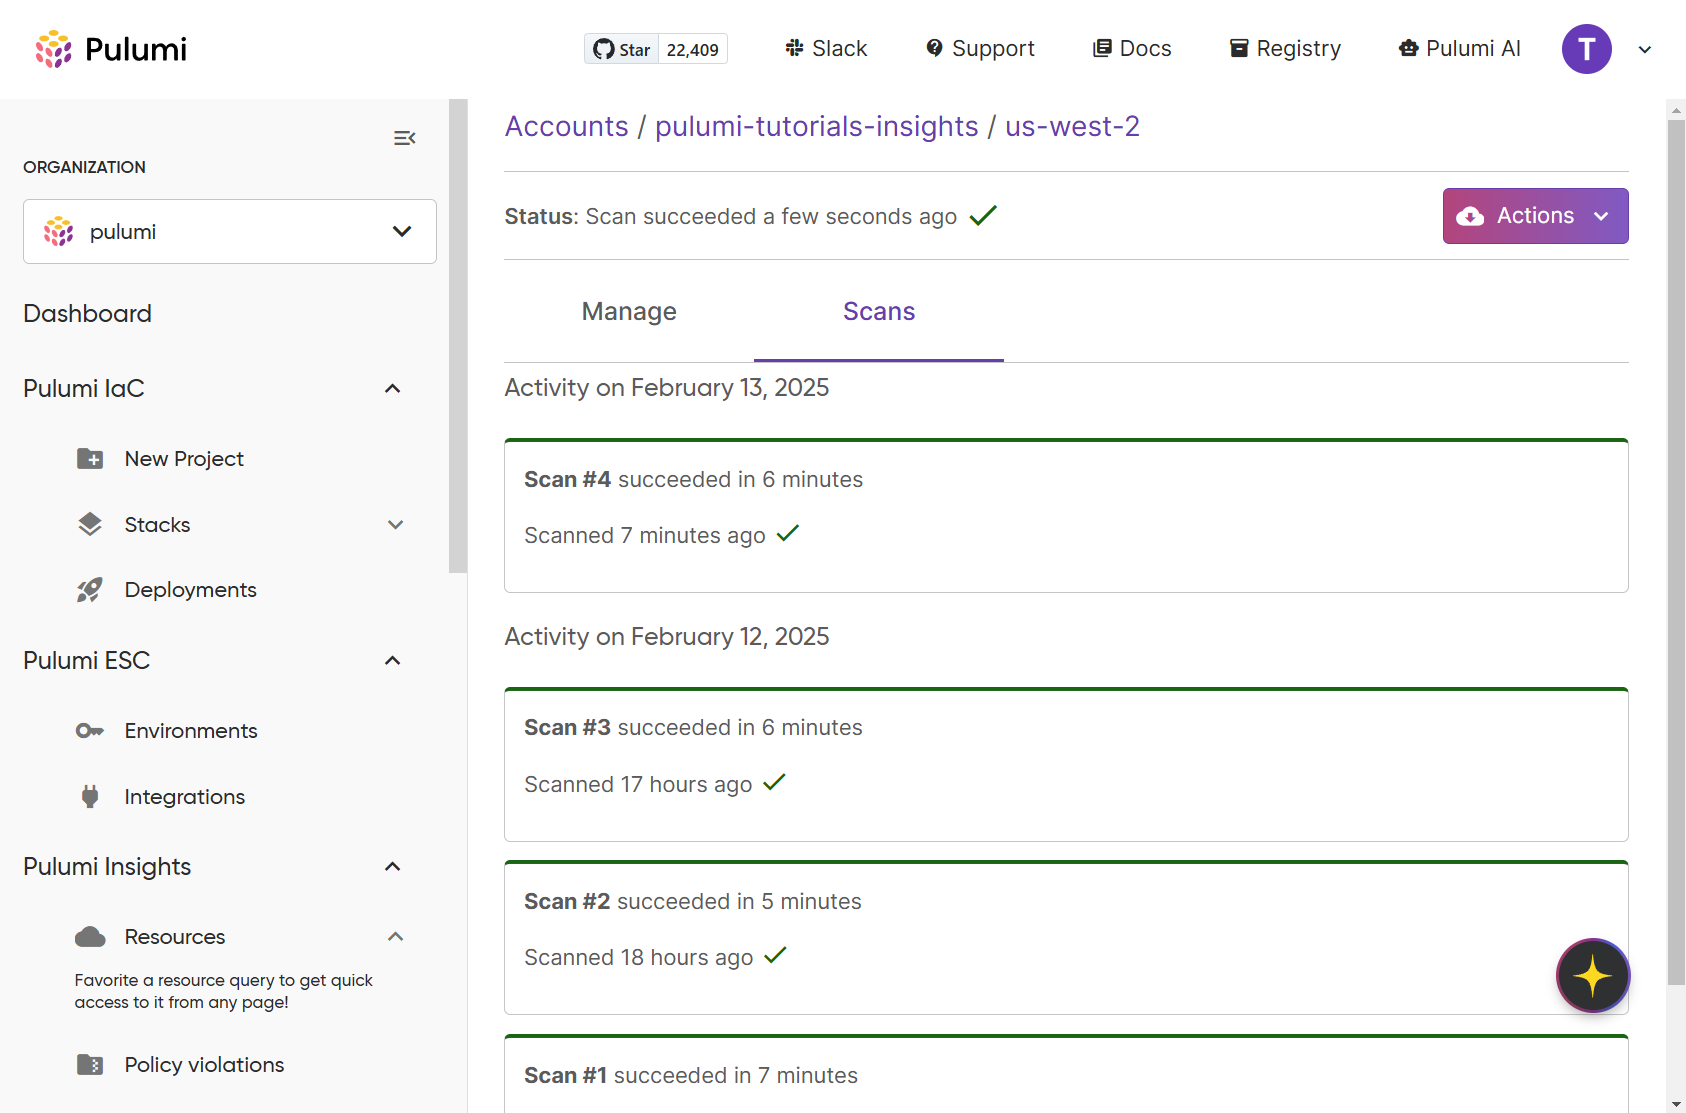
Once there, click on the Actions dropdown and select the Scan radio button, then click Scan. You will see a status message that says “Scan started a few seconds ago” once the scan has started.
To check on the status of the scan, you will need to navigate to the individual sub-accounts of your Pulumi insights account and click the Scans tab.
Once the scan has completed, the outline color of the scan will change to green, and the status will change to say “Scan #X succeeded in X minutes”.
Now you can view a list of your account resources by navigating to the Resources page in the console.
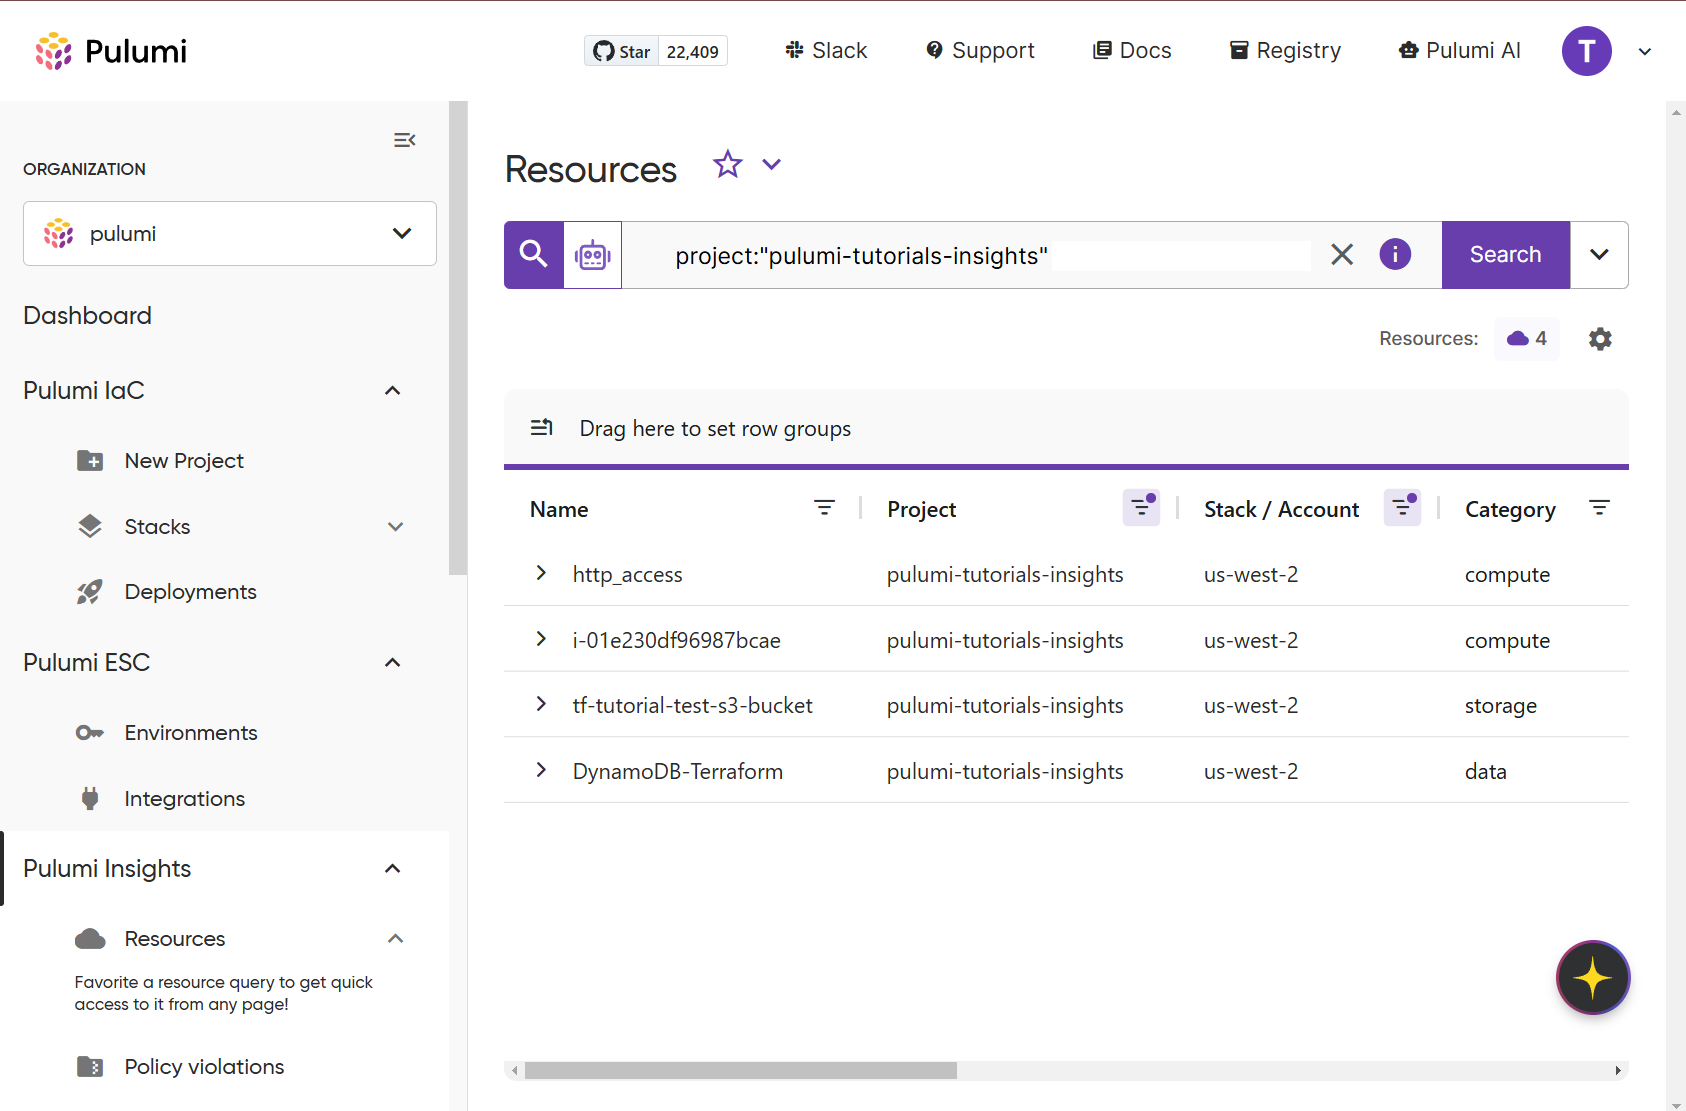
If you have multiple Insights accounts, you can filter by your account name using the Project column filter. You can learn more about querying and filtering your resources by reviewing the Pulumi Insights: Using Resources Explorer documentation.
Configure compliance policies
Before you can evaluate your Terraform resources for policy violations, you must first create and deploy a Pulumi Insights Policy Pack. In this section, you will create a policy that enforces specific compliance for one of your AWS resources, more specifically for Security Groups.
Create and publish a policy pack
To start, open your terminal and run the following command:
pulumi policy new aws-python
This will initialize your project, creating the necessary files for policy creation. Next, open the main.py file, paste in the following configuration, and save the file.
from pulumi_policy import (
    EnforcementLevel,
    PolicyPack,
    ReportViolation,
    ResourceValidationArgs,
    ResourceValidationPolicy,
)

def security_group_no_public_ingress_validator(args: ResourceValidationArgs, report_violation: ReportViolation):
    if args.resource_type == "aws:ec2/securityGroup:SecurityGroup":
        ingress_rules = args.props.get("ingress", [])
        for rule in ingress_rules:
            cidr_blocks = rule.get("cidrBlocks", [])
            if "0.0.0.0/0" in cidr_blocks:
                report_violation(
                    "Ingress rule allows public access from 0.0.0.0/0, which is prohibited. "
                    "Please restrict the CIDR blocks to specific IP ranges."
                )

security_group_no_public_ingress = ResourceValidationPolicy(
    name="security-group-no-public-ingress",
    description="Prohibits security group ingress rules that allow public access.",
    validate=security_group_no_public_ingress_validator,
)

PolicyPack(
    name="aws-security",
    enforcement_level=EnforcementLevel.MANDATORY,
    policies=[
        security_group_no_public_ingress,
    ],
)
This template sets up an example resource policy that prevents Security Groups from allowing public access, and it names the Policy Pack aws-security. To publish this template to your Pulumi organization, run the following command:
pulumi policy publish
Add policy pack to an Insights Account
With your policy pack published, you’ll need to create a Policy Group that associates your Insights account with a policy pack. In the Pulumi Cloud console, navigate to Policies under the Pulumi Insights section.
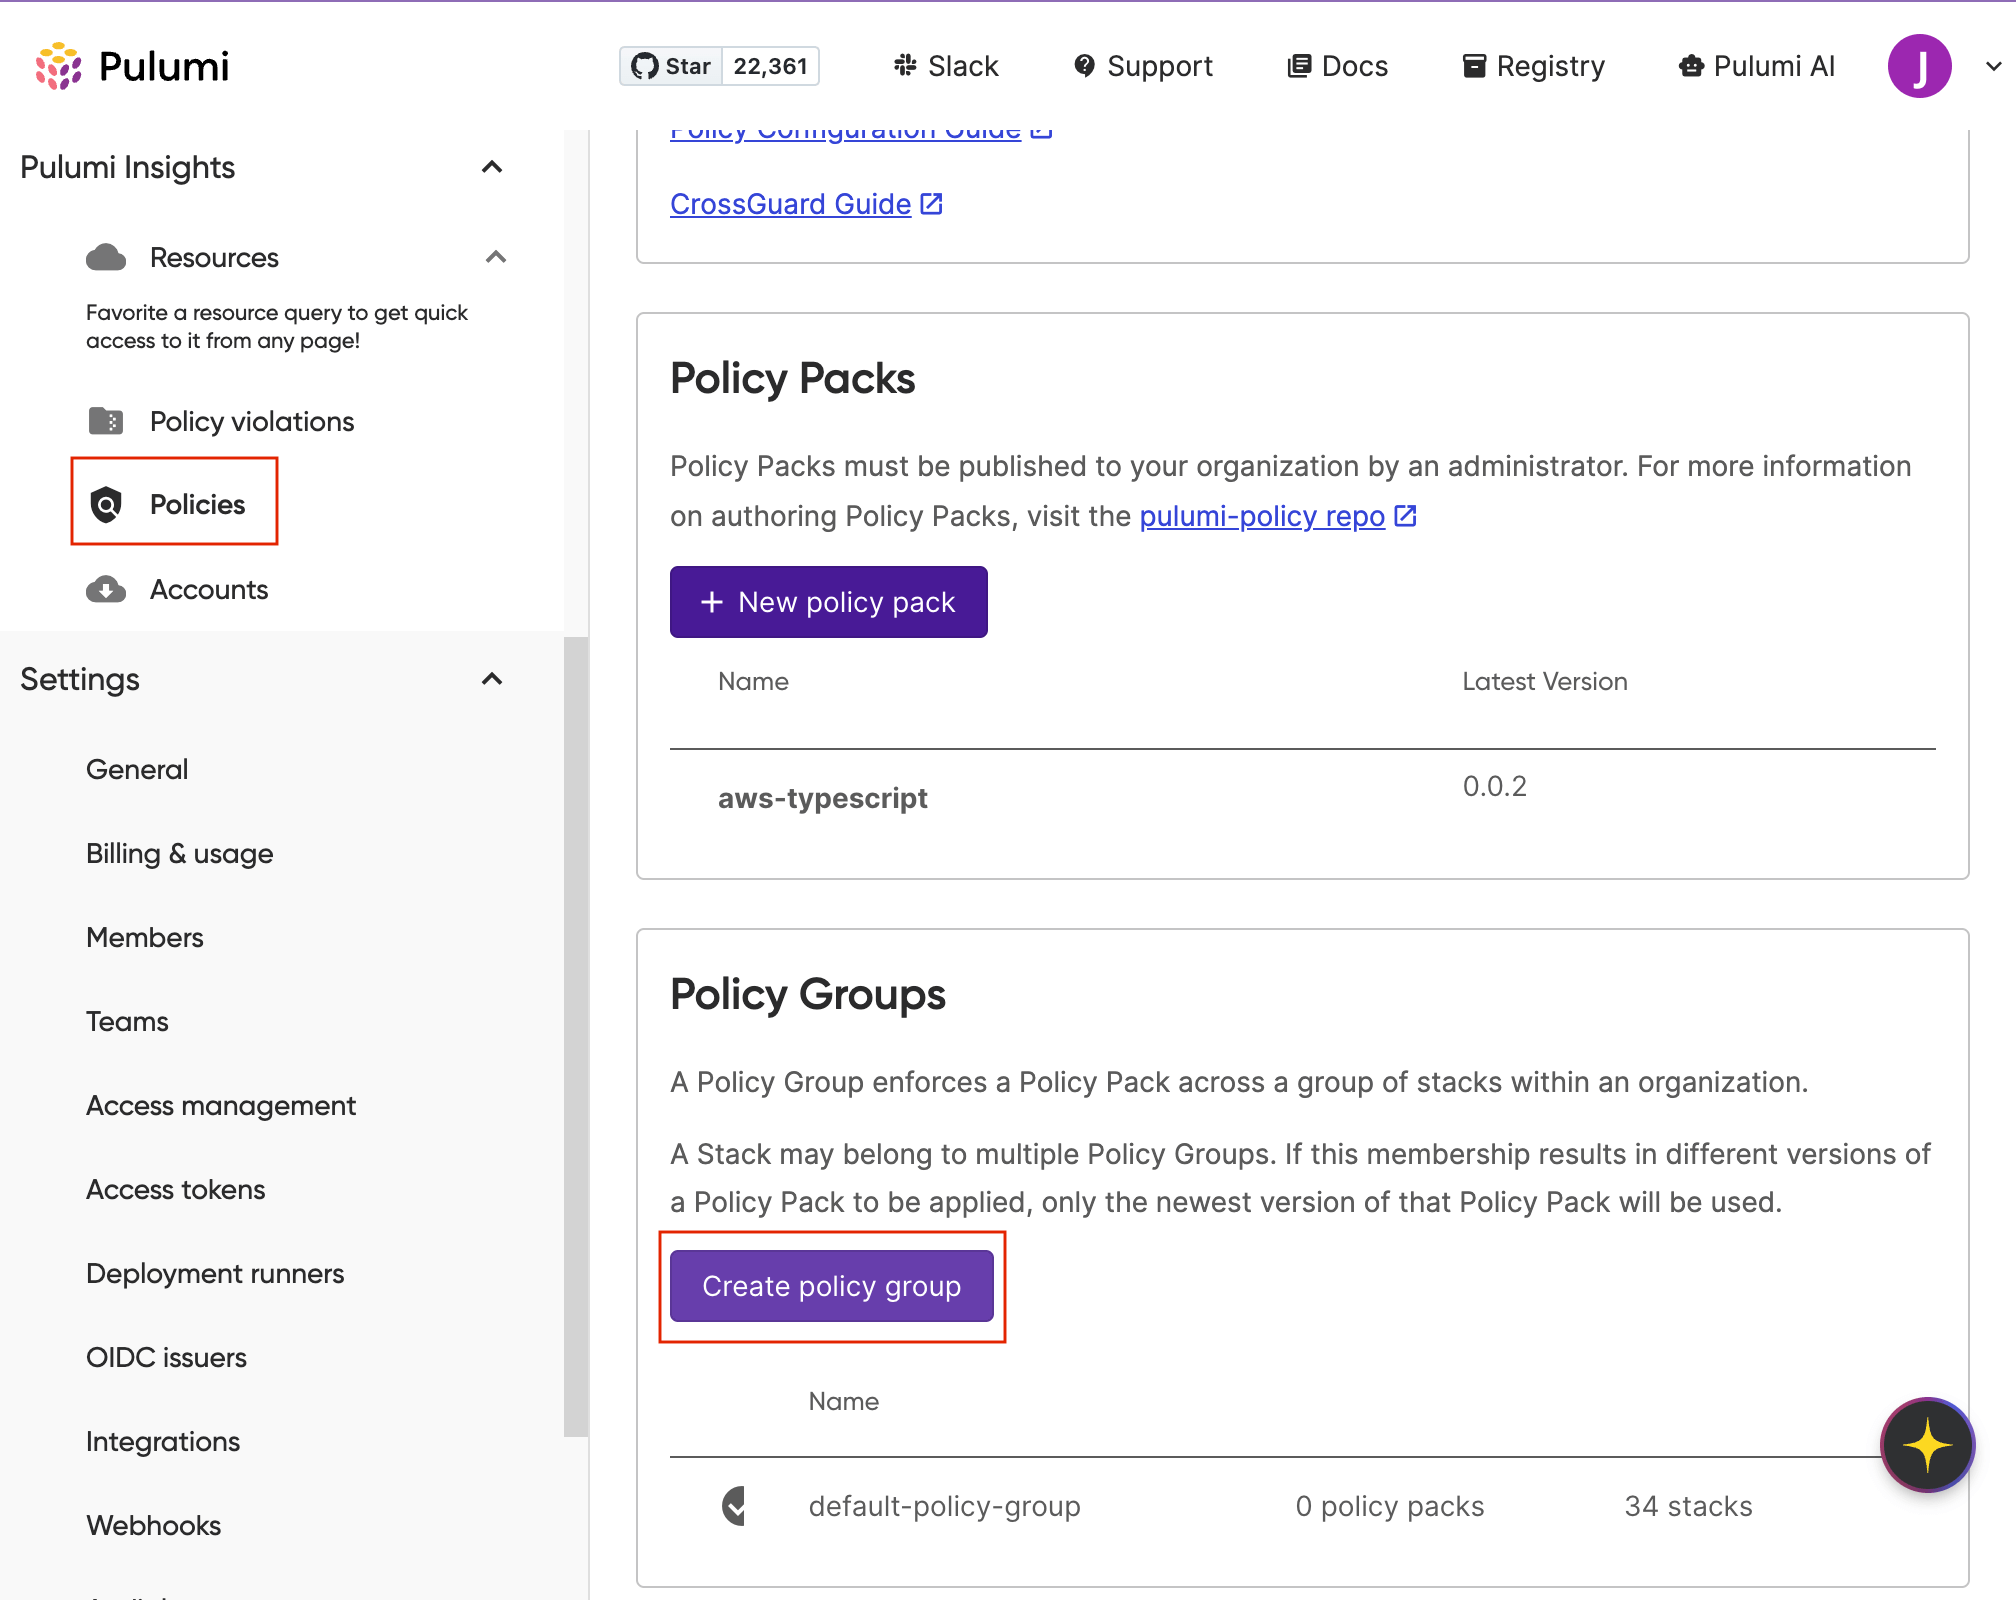
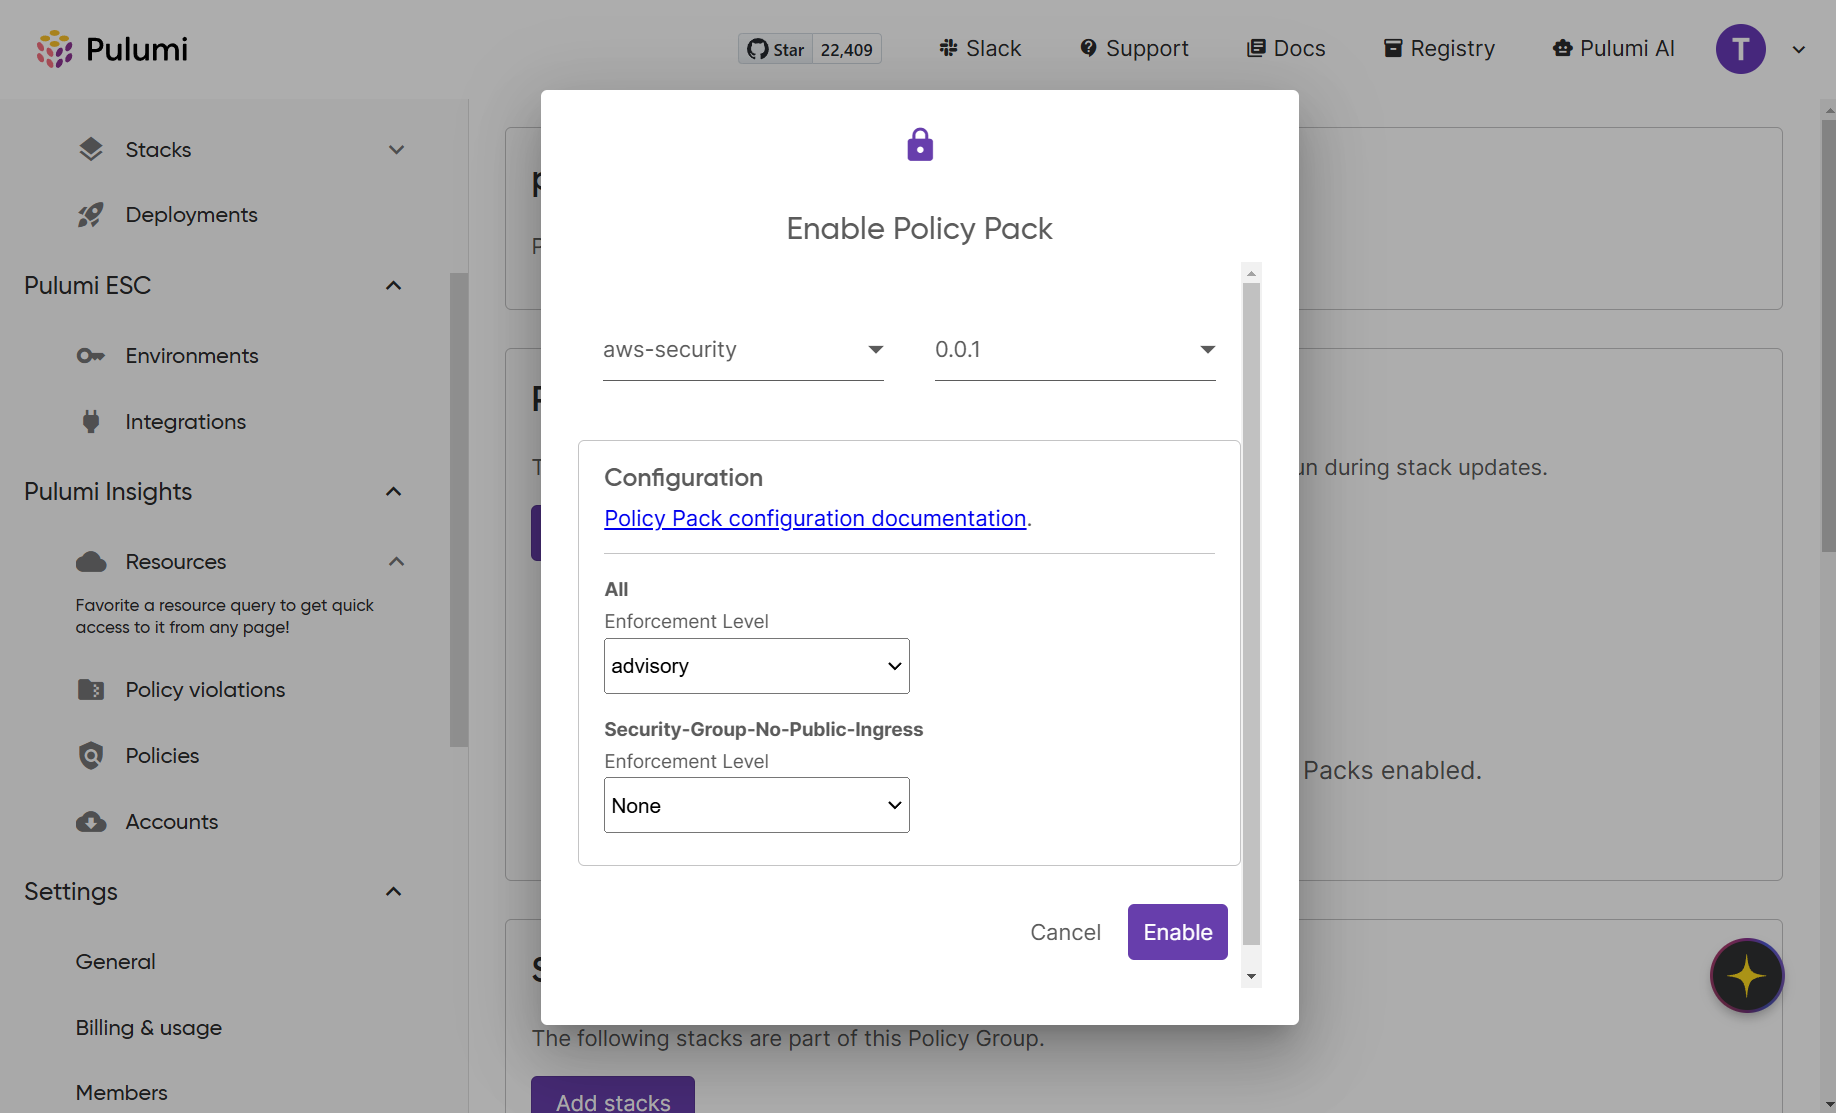
Next, click Create policy group and provide a descriptive name, such as “sg-security-policy-group” Then click Add policy group. Once your policy group has been created, click on the name of the policy group to open its configuration page, and then click Add policy pack.
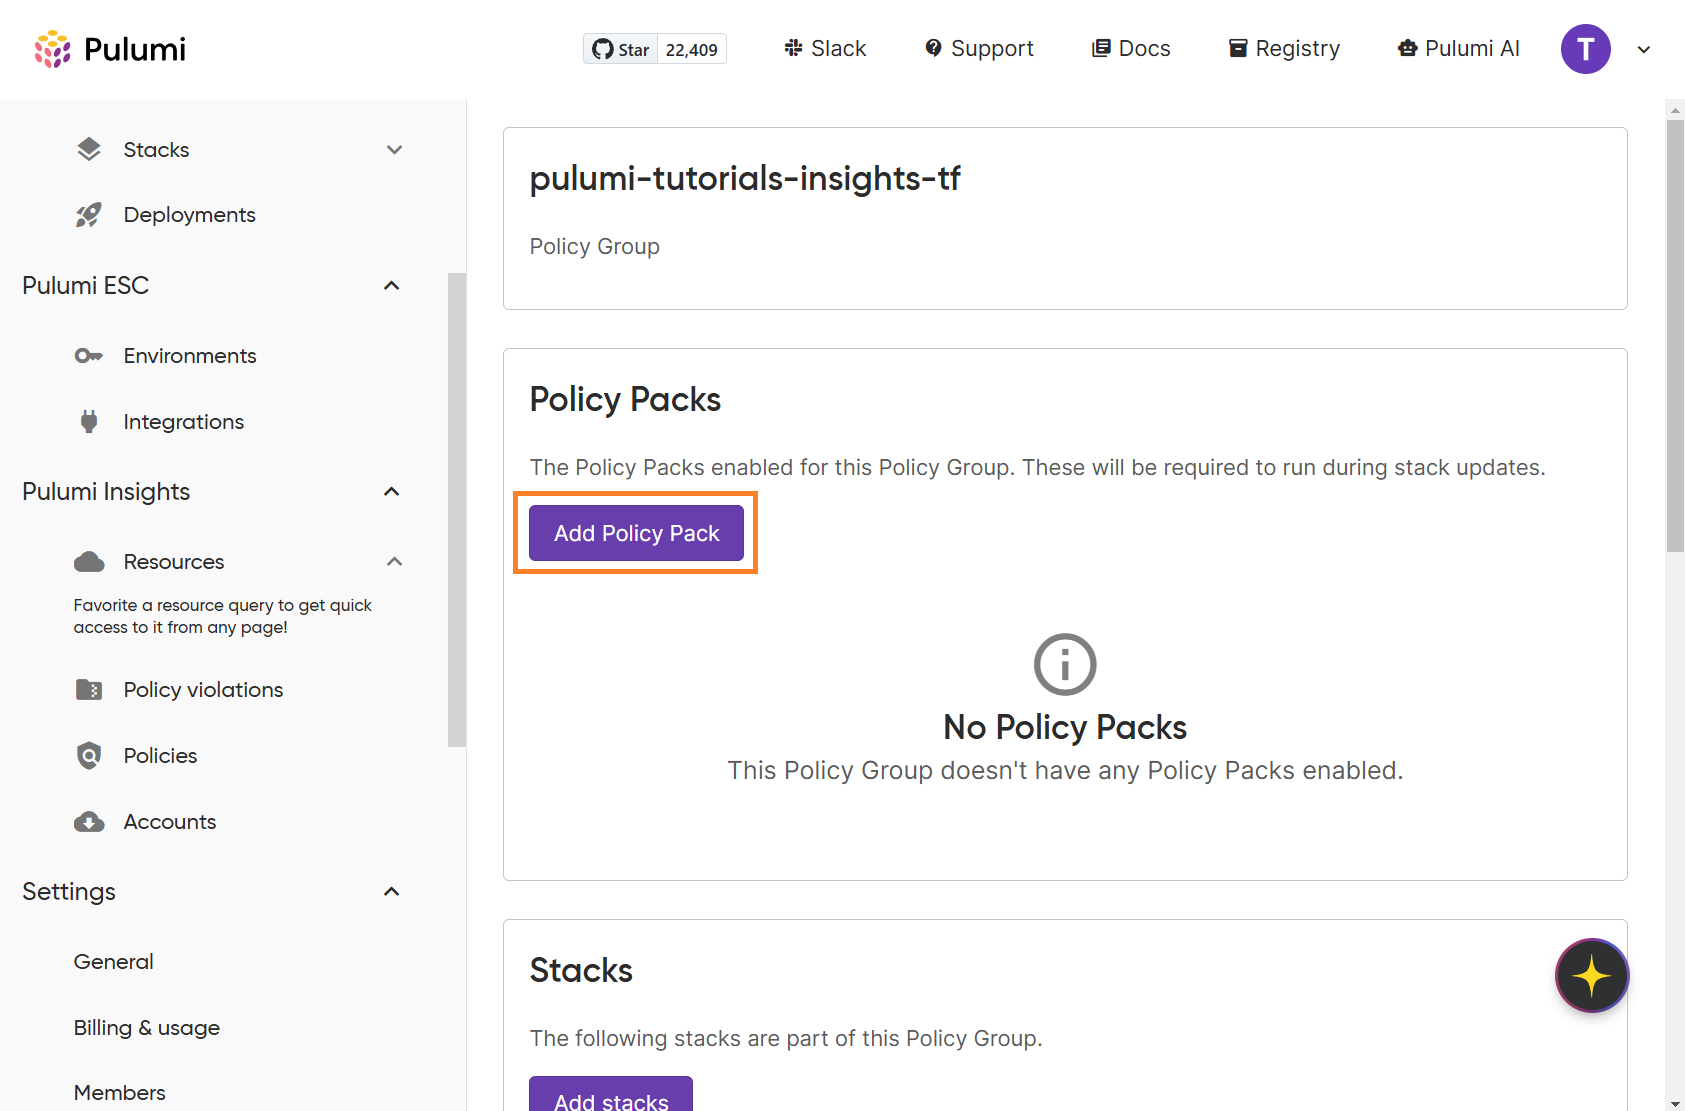
Select your newly published policy pack from the dropdown and choose the version you want to enforce. Here you can configure the enforcement level at either a global level for all policies in your policy pack, or a granular level for each individual policy check. For the purposes of this tutorial, select the enforcement level of advisory under All, then click Enable to confirm your settings.
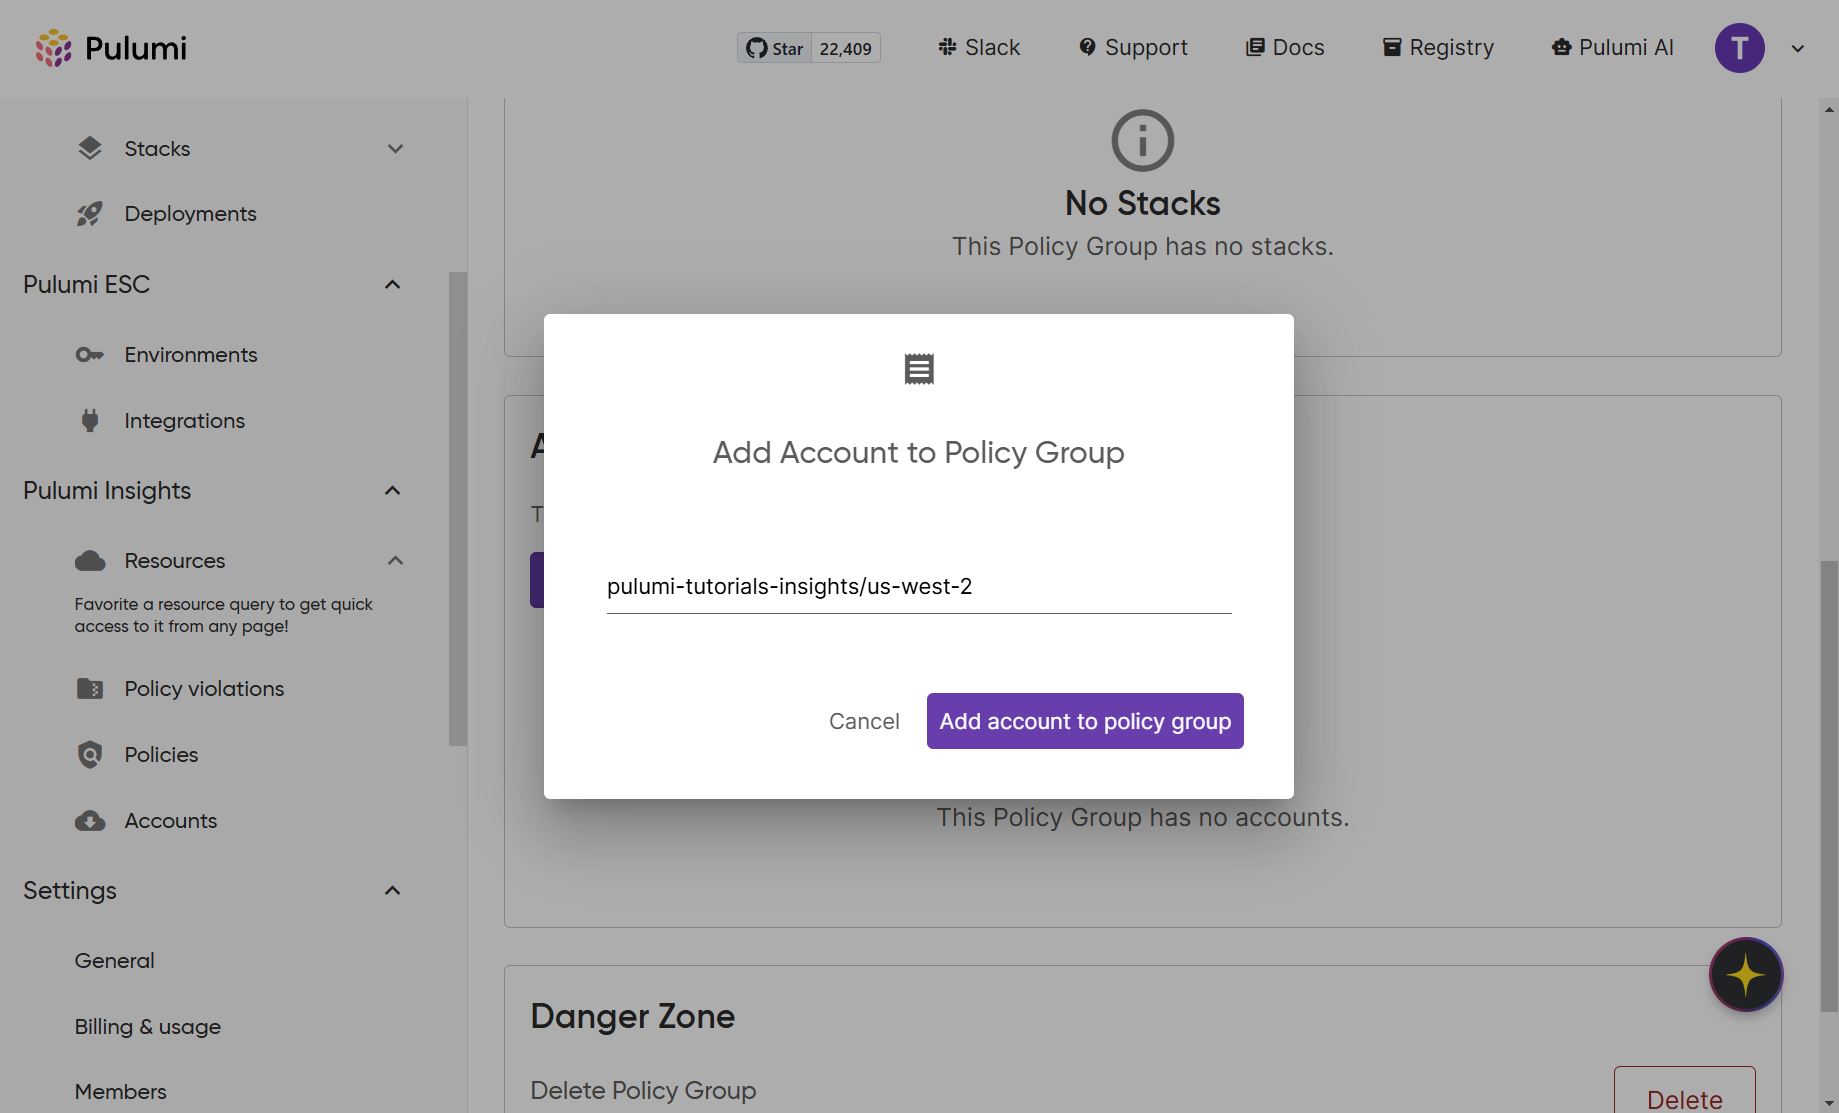
The last thing you need to do in this section is add your insights account to the policy group. On your Policy Group configuration page, click Add accounts, and type the name of the account you want to include for Insights policies (e.g. pulumi-tutorials-insights/us-west-2). Then click Add account to policy group.
If you want to learn more about creating custom Policy Packs in Pulumi, you can refer to our Creating a Custom Policy Pack tutorial series.
Evaluate Terraform resources
Now that your policy pack has been deployed and your account has been associated with it, you can evaluate your Terraform-managed AWS resources against the policy. To do so, navigate back to the Accounts section and select your account. Click the Actions dropdown button, select the Scan radio button, and then click Scan.
As the scan progresses, you can monitor policy compliance in real-time through the Policy Violations page in the Pulumi Cloud Console.
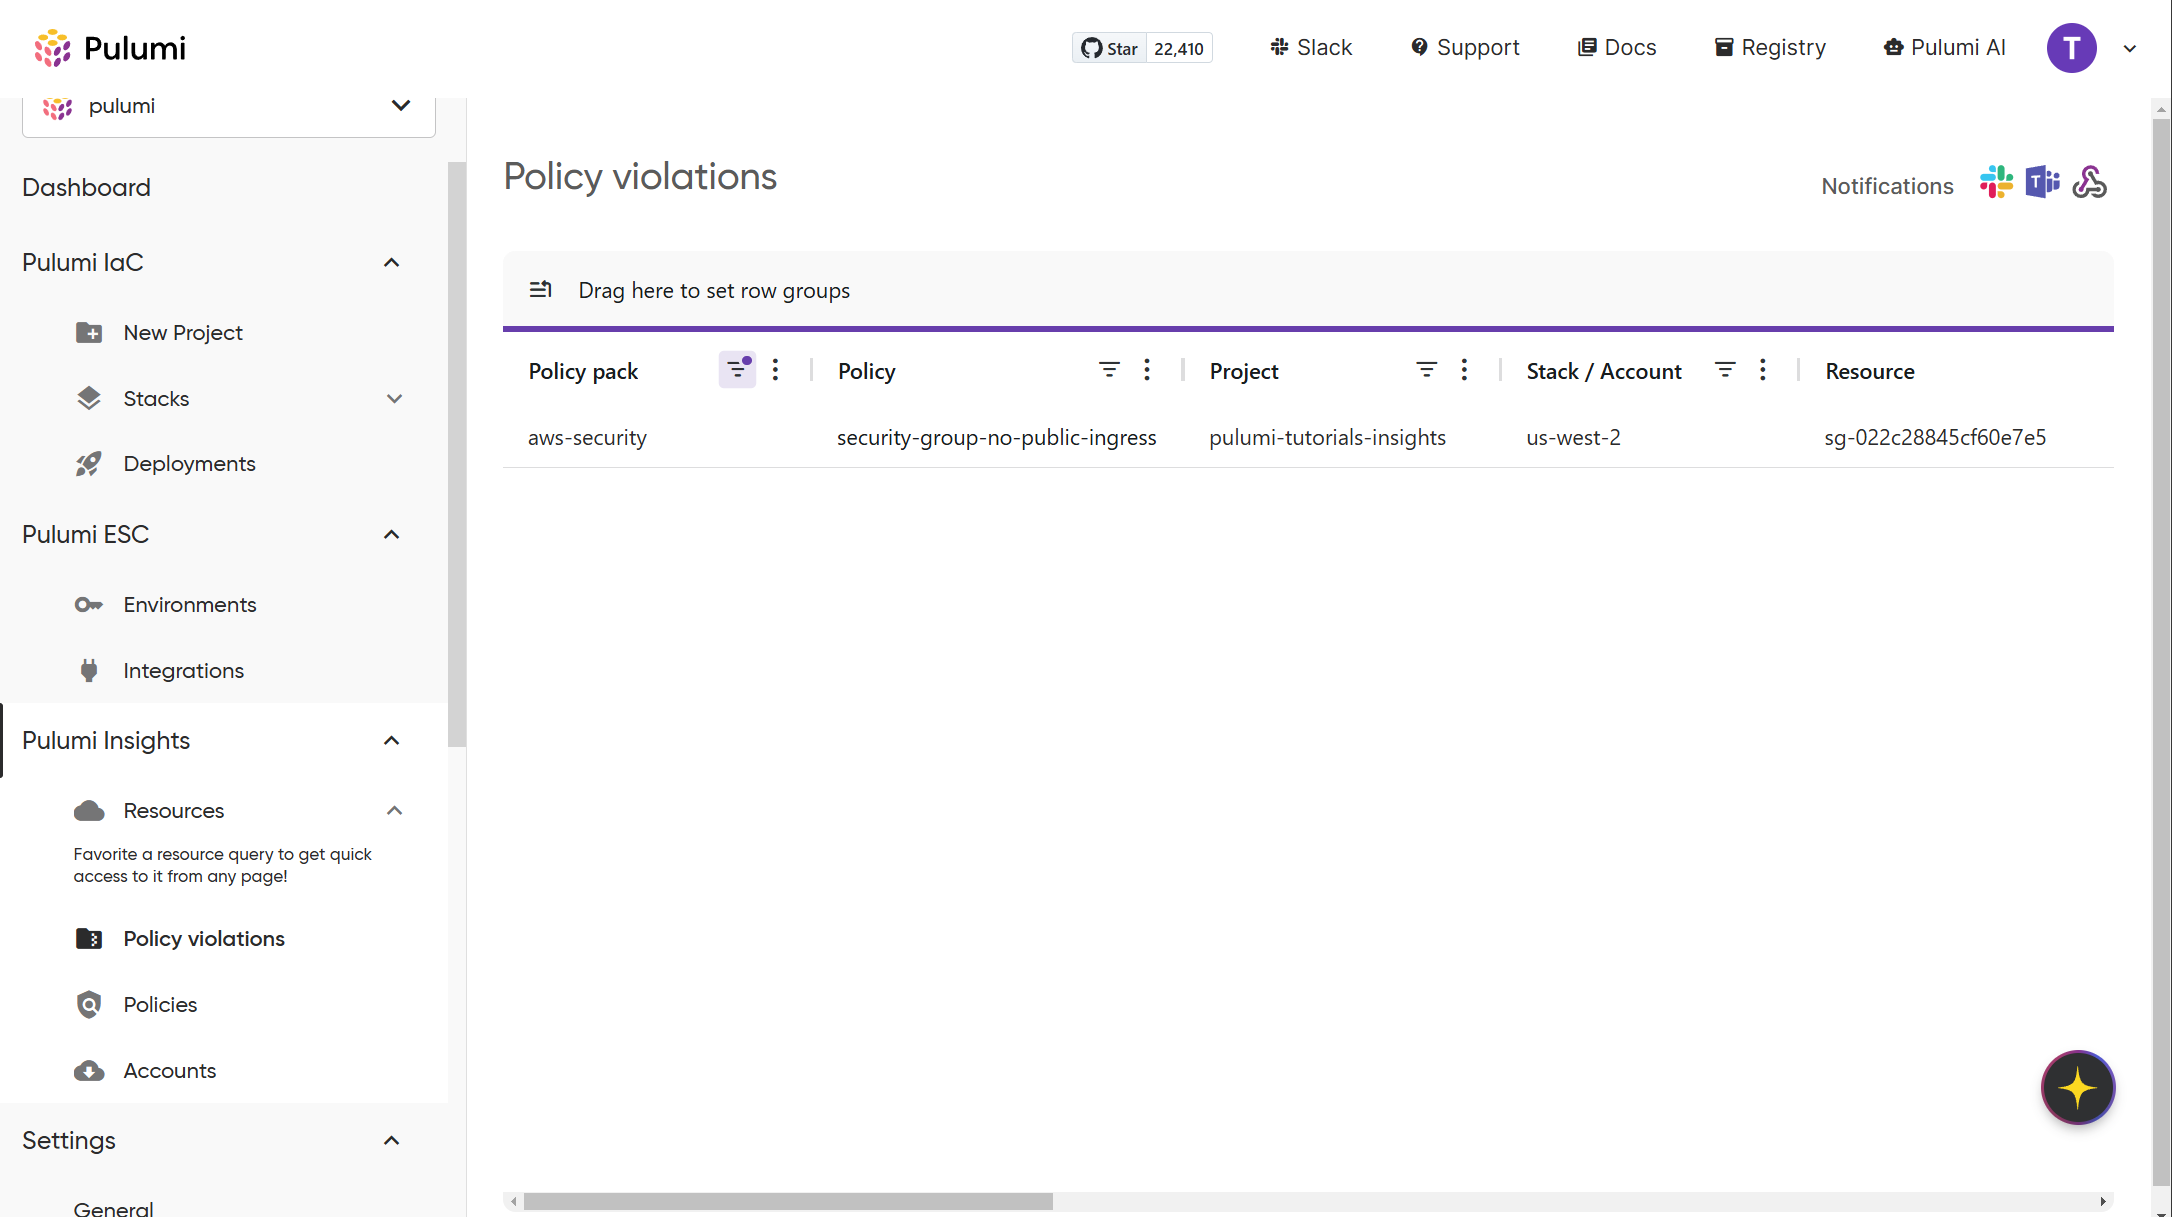
You should see a violation entry for the publically accessible security group in the list. Each violation entry provides detailed information about:
- The specific resource that triggered the violation
- Which policy rule was violated
- Contextual information to help understand why the resource is non-compliant
Clean up
If needed, you can tear down the example Terraform resources by running the terraform destroy command.
Next steps
In this tutorial, you used Pulumi Insights to scan your AWS account for resources that were deployed using Terraform. You also created and deployed a policy pack and evaluated your resources against the defined policy.
To learn more about Pulumi services, take a look at the following resources:
- Learn more about the Pulumi Cloud in the Pulumi Cloud documentation.
- Learn more about how you can use Pulumi to centrally manage configuration and secrets in the Pulumi ESC documentation.
- Learn how you can deploy cloud resources uses modern programming languages in the Pulumi IaC documentation.
Thank you for your feedback!
If you have a question about how to use Pulumi, reach out in Community Slack.
Open an issue on GitHub to report a problem or suggest an improvement.