Configure applications dynamically with ESC version tagging
In this tutorial, you'll learn:
- How to store and retrieve configuration values with Pulumi ESC
- How to use environment versions to pin applications to specific config values
- How to use version tagging to make configuring applications safer and more flexible
- How to embed and use Pulumi ESC in your applications with the ESC SDK for Node.js
Prerequisites:
- The Pulumi CLI
- A Pulumi Cloud account and access token
- A Pulumi Cloud organization with a subscription to the Enterprise edition (or above)
- Familiarity with Bash scripting, JavaScript, and Node.js
Log into Pulumi Cloud
Before you begin, make sure you’ve signed into Pulumi Cloud with an account that has access to a Pulumi organization with an Enterprise edition subscription. Once you’ve done so, you can log in with the Pulumi CLI and be prompted to :
$ pulumi login

Manage your Pulumi stacks by logging in.
Run `pulumi login --help` for alternative login options.
Enter your access token from https://app.pulumi.com/account/tokens
    or hit <ENTER> to log in using your browser
Obtain a personal access token
To complete the application-configuration portion of the tutorial, you’ll also need a Pulumi Cloud personal access token. Create a short-lived access token for this tutorial, copy it into your current shell, an apply it as an environment variable as follows:
export PULUMI_ACCESS_TOKEN="${YOUR_TOKEN_VALUE}"
Create a new ESC project and environment
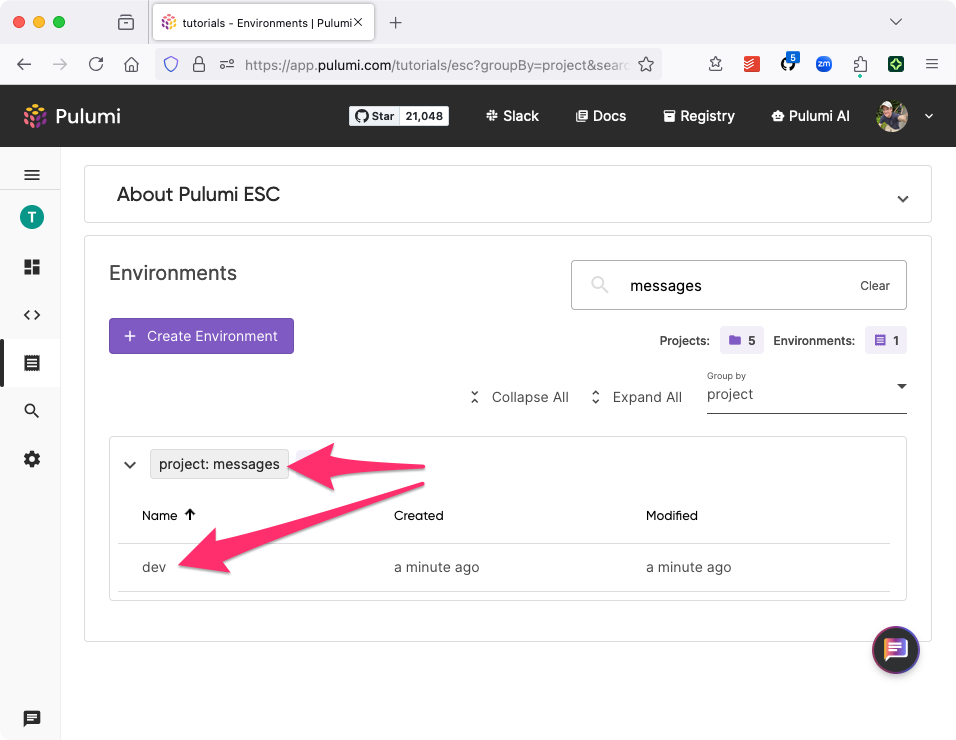
The application you’re building is a Node.js web service designed to return a dynamically configurable message of the day (MOTD). In ESC, configuration settings belong to collections called environments, and environments in turn belong to projects. Projects and environments may be created either with the Pulumi Cloud console or with the Pulumi CLI.
To get started, use the Pulumi CLI to create a new project and environment in the organization of your choice. We’ll use the tutorials organization in this tutorial as an example. Name the new project messages and the environment dev:
$ pulumi env init tutorials/messages/dev

Environment created: tutorials/messages/dev
Once it’s created, you’ll be able to see the new project in Pulumi Cloud as well by navigating to Pulumi ESC > Environments:
Create a new configuration setting
Use pulumi env set to create a new setting for the message of the day and add it to the dev environment. Name the setting motd:
$ pulumi env set tutorials/messages/dev motd 'Hello, world!'
You’re now able to use this setting in any way you like. Try using pulumi env get, for example, in combination with echo to fetch the message and print it to the terminal:
$ echo "$(pulumi env get tutorials/messages/dev motd --value json)"

"Hello, world!"
Change the setting’s value, produce a new version
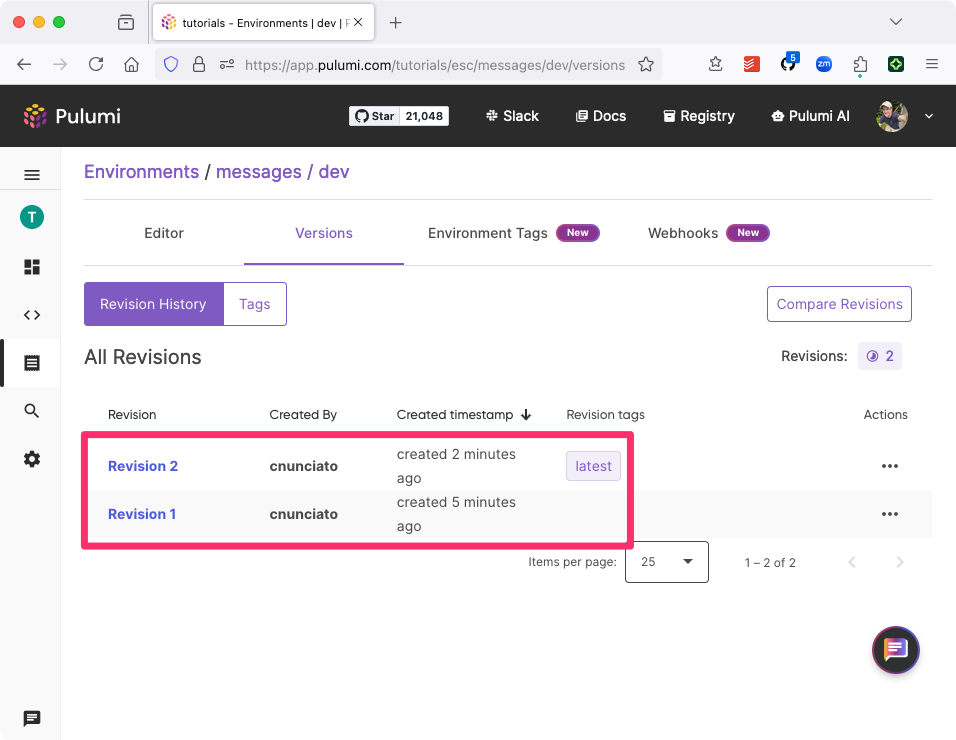
Every change to a configuration value in an ESC environment produces a new, immutable snapshot of the environment. These snapshots are called versions and are indexed numerically.
As of now, your dev environment has two versions: version 1, the empty starting point, and version 2, which contains a single setting (for motd). You can see this in the Pulumi Cloud console by clicking into the dev environment and navigating to the Versions tab:
Now let’s produce a third version by setting the value of motd again:
$ pulumi env set tutorials/messages/dev motd 'Good day, world!'

$ echo "$(pulumi env get tutorials/messages/dev motd --value json)"

"Good day, world!"
With pulumi env version history, you can confirm that version 3 now exists:
$ pulumi env version history tutorials/messages/dev

revision 3 (tag: latest)
Author: Christian Nunciato <cnunciato>
Date:   2024-09-18 15:23:58.997 -0700 PDT

revision 2
Author: Christian Nunciato <cnunciato>
Date:   2024-09-18 15:06:54.347 -0700 PDT

revision 1
Author: Christian Nunciato <cnunciato>
Date:   2024-09-18 15:04:20.07 -0700 PDT
Version tagging
In the output above, you may also have noticed that version 3 is now tagged with a label of latest. Every environment has a built-in latest that always points to the most recent version of the environment. You can fetch an environment by tag by adding an @ symbol with the tag name to the end of the environment name. For example, to pull the latest version explicitly:
$ pulumi env get tutorials/messages/dev@latest motd --value json

"Good day, world!"
In addition to using the built-in latest tag, you can also create version tags of your own, as well as change the environment version that a given tag points to. This additional layer of manageability lets you not only pin your configurations to a tag instead of to an explicit version — to a production tag, for example, whose underlying value may change — but also to apply broad configuration changes easily and instantaneously.
Using tagging to configure multiple applications
To demonstrate how version tagging works in practice, let’s stand up a set of web applications configured to respond with the same, shared message of the day.
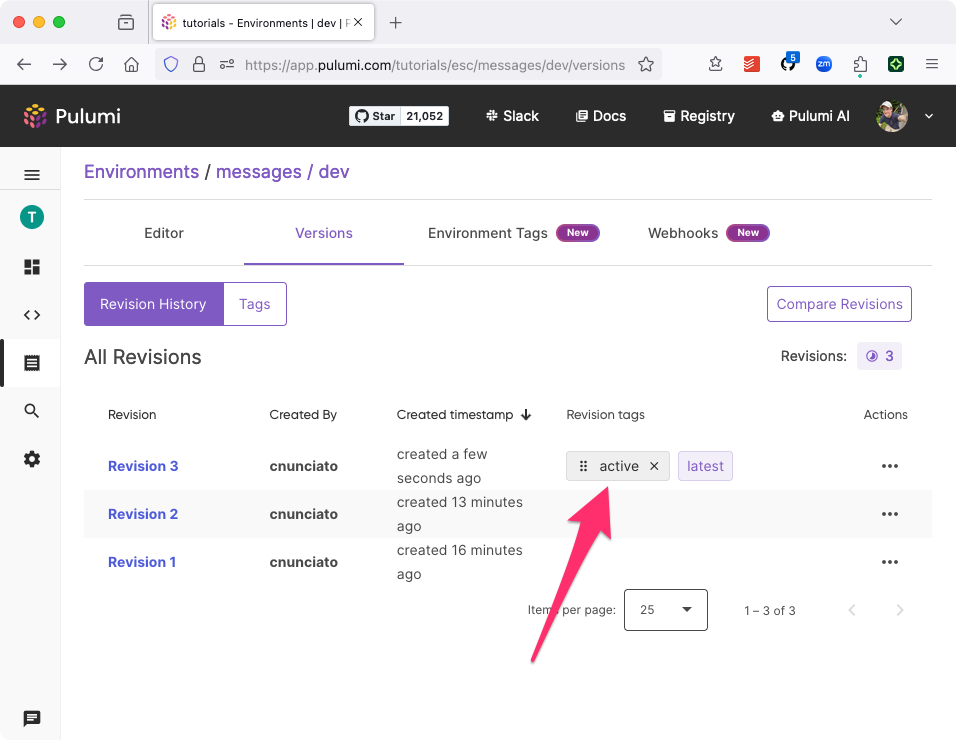
First, create a new version tag called active and apply it to version 3 of the environment:
$ pulumi env version tag tutorials/messages/dev@active @3
The active tag identifies the message that all applications should deliver.
Verify the currently tagged version with the CLI:
$ pulumi env get tutorials/messages/dev@active motd --value json

"Good day, world!"
The Versions tab should also reflect this:
Now try setting a new motd value, and notice that while the latest tag immediately reflects the new value, the active tag’s value remains unchanged at version 3:
$ pulumi env set tutorials/messages/dev motd 'Lovely to see you, world!'

$ pulumi env get tutorials/messages/dev@latest motd --value json
"Lovely to see you, world!"

$ pulumi env get tutorials/messages/dev@active motd --value json
"Good day, world!"
Next, initialize new Node.js project and install the Pulumi ESC SDK for Node.js:
$ npm init -y
$ npm install @pulumi/esc-sdk
$ touch index.js
Copy the following script into index.js and save the file, substituting your Pulumi organization for tutorials. The script starts five Node.js web servers (to simulate multiple running applications) that handle requests by fetching and returning the active greeting:
const http = require("http");
const esc = require("@pulumi/esc-sdk");

const startServers = () => {

    // Instantiate the ESC client.
    const client = esc.DefaultClient();

    // Start five web servers on successive ports, beginning with 8080.
    for (let i = 0; i < 5; i++) {
        const port = 8080 + i;

        http.createServer(async (req, res) => {

            // Fetch and return the `active` message of the day.
            const result = await client.openAndReadEnvironmentAtVersion(
                "tutorials", "messages", "dev", "active"
            );

            res.end(result.values.motd);
        }).listen(port);

        console.log(`Listening on http://localhost:${port}`);
    }
}

startServers();
Making sure you’re in the same shell into which you exported your PULUMI_ACCESS_TOKEN earlier, run the script with Node.js, and see that five HTTP servers are now listening on five different local ports:
$ node index.js

Listening on http://localhost:8080
Listening on http://localhost:8081
Listening on http://localhost:8082
Listening on http://localhost:8083
Listening on http://localhost:8084
In a new terminal session, run the following Bash for loop, which curls each endpoint and shows that the active MOTD is returned:
$ for i in {0..4}; do curl "http://localhost:$((8080 + i))"; done

Good day, world!
Good day, world!
Good day, world!
Good day, world!
Good day, world!
Finally, update the active tag (either with the CLI as below or in the Pulumi Cloud console) to point to the latest version of the environment, then run the loop again to see that all applications have now been reconfigured:
$ pulumi env version tag tutorials/messages/dev@active @4

$ for i in {0..4}; do curl "http://localhost:$((8080 + i))"; done

Lovely to see you, world!
Lovely to see you, world!
Lovely to see you, world!
Lovely to see you, world!
Lovely to see you, world!
You can stop the server with Control-C.
Wrapping up
In this tutorial, you learned how to use Pulumi ESC’s version-tagging features and the ESC SDK for Node.js to apply real-time configuration changes to multiple running applications simultaneously — without having to touch the source code of any of those applications or redeploy them.
To learn more about working with Pulumi ESC environments — versions, tagging, dynamic credentials, third-party providers, and more — see the ESC documentation.