
Holiday Shopping Challenge!
What you will learn
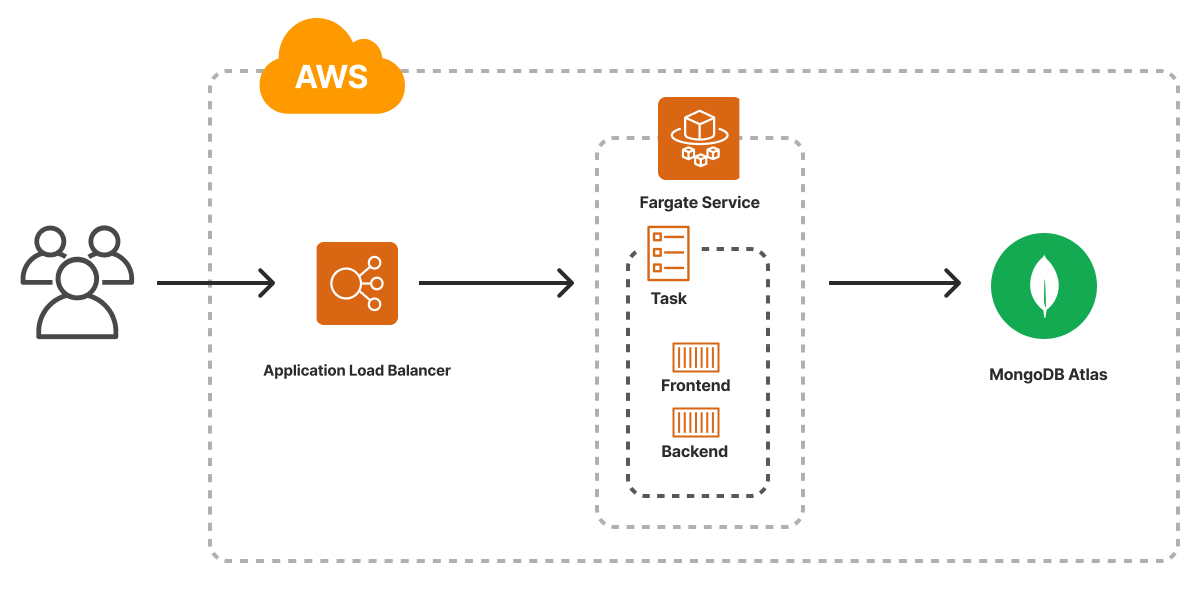
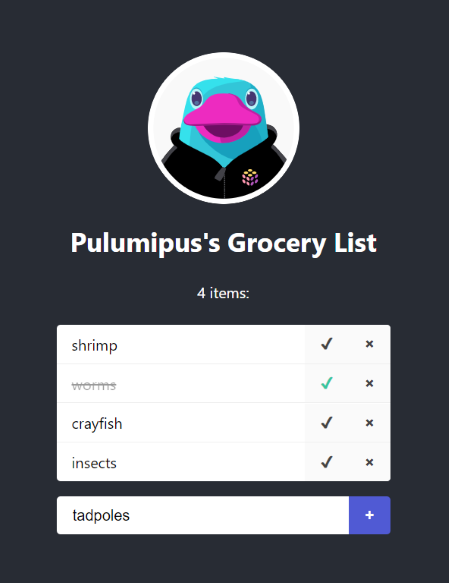
The holidays are upon us and mere anarchy has been loosed upon our psyches. More specifically how do you keep track of everything you need to buy for gifts or food?!? Surely some salvation is at hand? Lucky for you, our friend, The Pulumipus, has created a simple to-do list application to bring order to your life. In this challenge, you will build this simple to-do list application that has a React frontend, Express backend, and a MongoDB database. This frontend and backend of the app run in Fargate with an Application Load Balancer (ALB) in front and the database is running in a MongoDB Atlas cluster.
After completing this challenge and if you feel so inclined to thank The Pulumipus, please write a blog post or post a quick video about it. Tag us on social media or email us at da@pulumi.com, and we will help spread the word about your experience.
Prerequisites
In order to complete this challenge, you’ll need a couple things set up in advance. The challenge utilizes the MongoDB Cloud free tier and incurs a small charge for using AWS Fargate.
- A Pulumi account
- The Pulumi CLI
- Python 3.9 or higher
- Docker
- An AWS account
- The AWS CLI
- A MongoDB Cloud account
- A GitHub account
Challenge
Step 1. Initialize a project
You will first clone the base application and then the rest of the steps will take you through building the Pulumi program.
git clone -b challenge https://github.com/aaronkao/atlas-fargate.git
Next, initialize the stack.
cd atlas-fargate
pulumi stack init dev
You will also need to export your AWS and MongoDB Cloud credentials. To access your MongoDB Cloud credentials, go to the Organization Access Manager panel and the API Keys tab. If you don’t have any API keys, please click Create API Key and select Organization Project Creator under Organization Permissions.
export AWS_ACCESS_KEY_ID=<YOUR_ACCESS_KEY_ID>
export AWS_SECRET_ACCESS_KEY=<YOUR_SECRET_ACCESS_KEY>
export MONGODB_ATLAS_PUBLIC_KEY=<YOUR_PUBLIC_KEY>
export MONGODB_ATLAS_PRIVATE_KEY=<YOUR_PRIVATE_KEY>
Lastly, you will need to set your AWS region (e.g., us-west-2) in your Pulumi configuration.
pulumi config set aws:region <YOUR_AWS_REGION>
Step 2. Provision containers on AWS Fargate
Let’s start by building and publishing our application from /app/frontend and /app/backend as container images to an ECR repository. The frontend app is a static website served by an nginx server. The backend app is an Express server that retrieves and stores data in a MongoDB database. Add the below into __main__.py.
# An ECR repository to store our application's container images
repo = awsx.ecr.Repository("grocery_list_repo")

frontend_image = awsx.ecr.Image(
    "grocery_frontend_image",
    repository_url=repo.url,
    path="./app/frontend")

# Build and publish our application from /app/frontend and /app/backend
# as container images to the ECR repository
backend_image = awsx.ecr.Image(
    "grocery_backend_image",
    repository_url=repo.url,
    path="./app/backend")
Next, let’s create an Application Load Balancer (ALB) to receive traffic and an Amazon Elastic Container Service (ECS) cluster in which the containers will run.
# An ECS cluster to deploy into
cluster = aws.ecs.Cluster("cluster")

# An ALB to serve the frontend service to the internet
lb = awsx.lb.ApplicationLoadBalancer("grocery-lb")
Now, create an AWS Fargate service that will run the containers. There are some configuration values for the Fargate service that you can set via Pulumi config, but for this example, you can just use the default values. This code creates a Fargate service that runs a task with two containers, a front and back. The front container is using the frontend image created in Step 1 and is wired to receive traffic from the ALB. The back container is using the backend image and listens on port 8000.
# AWS configs
container_port = config.get_int("containerPort", 80)
cpu = config.get_int("cpu", 1024)
memory = config.get_int("memory", 1024)

# Deploy an ECS Service on Fargate to host the application containers
service = awsx.ecs.FargateService(
    "grocery-service",
    cluster=cluster.arn,
    assign_public_ip=True,
    task_definition_args=awsx.ecs.FargateServiceTaskDefinitionArgs(
        containers={
            "front": awsx.ecs.TaskDefinitionContainerDefinitionArgs(
                image=frontend_image.image_uri,
                cpu=cpu,
                memory=memory,
                essential=True,
                port_mappings=[awsx.ecs.TaskDefinitionPortMappingArgs(
                    container_port=container_port,
                    target_group=lb.default_target_group,
                )],
            ),
            "back": awsx.ecs.TaskDefinitionContainerDefinitionArgs(
                image=backend_image.image_uri,
                cpu=cpu,
                memory=memory,
                essential=True,
                port_mappings=[awsx.ecs.TaskDefinitionPortMappingArgs(
                    container_port=8000,
                    host_port=8000
                )],
            ),
        }
    ),
    desired_count=1
)

# AWS export
pulumi.export("app_url", Output.concat("http://", lb.load_balancer.dns_name))
Run pulumi up and select yes to perform the update (this can take up to 10 minutes). Pulumi will output the app_url. Go to the URL, and you will be presented with the Pulumipus’ Grocery List web application. You can try to add some items, but nothing will happen because there is no database connected yet. You will do that in the next step.
Step 3. Create a MongoDB Atlas database
The web app stores the grocery list items inside a MongoDB database. MongoDB Atlas is a fully managed cloud database that you will be using for this application. Add the below before the code from the previous steps (above the ECR repo declaration) in __main__.py. This code creates a MongoDB project, sets up the network access controls, creates a Free Tier cluster in US_WEST_2 in AWS, and a database user that is scoped to the created cluster.
# MongoDB Atlas configs
db_username = config.require("dbUser")
db_password = config.require_secret("dbPassword")
atlas_org_id = config.require("orgID")

# Create MongoDB Project
mongo_project = mongodb.Project("mongo_project", org_id=atlas_org_id)

# Open access to all IPs
mongo_acl = mongodb.ProjectIpAccessList("mongo_acl",
    cidr_block="0.0.0.0/0",
    comment="Open access for backend",
    project_id=mongo_project.id,)

# Create Free Tier cluster
mongo_cluster = mongodb.Cluster("mongo-cluster",
    backing_provider_name="AWS",
    project_id=mongo_project.id,
    provider_instance_size_name="M0",
    provider_name="TENANT",
    provider_region_name="US_WEST_2")

# Create Database user and give access to the cluster and database
mongo_user = mongodb.DatabaseUser("db_user",
    auth_database_name="admin",
    labels=[mongodb.DatabaseUserLabelArgs(
        key="project",
        value="pulumi",
    )],
    password=db_password,
    project_id=mongo_project.id,
    roles=[
        mongodb.DatabaseUserRoleArgs(
            database_name="grocery-list",
            role_name="readWrite",
        ),
        mongodb.DatabaseUserRoleArgs(
            database_name="admin",
            role_name="readAnyDatabase",
        ),
    ],
    scopes=[
        mongodb.DatabaseUserScopeArgs(
            # Extracts the cluster name to add to database scopes
            name=Output.all(mongo_cluster.srv_address).apply(
                lambda v: re.split("\.|\/\/", v[0])[1]),
            type="CLUSTER",
        ),
    ],
    username=db_username
)
Next, you need to set the config values for your MongoDB Cloud org, database username, and database password. The Organization ID is under the Organization Settings panel in the MongoDB Cloud console. The database username and password values are self-selected and don’t require you to look up anything in the MongoDB Cloud console.
pulumi config set orgID [value]
pulumi config set dbUser [value]
pulumi config set dbPassword [value] --secret
Step 4. Pass database URL as environment variable to backend container
Before you update the stack, you need to pass the URL of the database to the backend container so it can connect to it. Add the highlighted into the FargateService code.
service = awsx.ecs.FargateService(
    "grocery-service",
    cluster=cluster.arn,
    assign_public_ip=True,
    task_definition_args=awsx.ecs.FargateServiceTaskDefinitionArgs(
        containers={
            "front": awsx.ecs.TaskDefinitionContainerDefinitionArgs(
                image=frontend_image.image_uri,
                cpu=cpu,
                memory=memory,
                essential=True,
                port_mappings=[awsx.ecs.TaskDefinitionPortMappingArgs(
                    container_port=container_port,
                    target_group=lb.default_target_group,
                )],
            ),
            "back": awsx.ecs.TaskDefinitionContainerDefinitionArgs(
                image=backend_image.image_uri,
                cpu=cpu,
                memory=memory,
                essential=True,
                port_mappings=[awsx.ecs.TaskDefinitionPortMappingArgs(
                    container_port=8000,
                    host_port=8000
                )],
                environment=[{
                    "name":"DATABASE_URL",
                    "value":Output.format("mongodb+srv://{0}:{1}@{2}", db_username, db_password,
                                Output.all(mongo_cluster.srv_address).apply(
                                    lambda v: v[0].split("//"))[1])
                }],
            ),
        }
    ),
    desired_count=1
)
Step 5. Validate endpoints
Run pulumi up and select yes to update the stack. Go to the app_url export to validate that the endpoints of your deployed infrastructure is working. You can now add, delete, and check off items because the application is now able to connect to your newly created Atlas database.
Congratulations
Congratulations! You’ve completed this Pulumi Challenge. Tag us on social media or email us at da@pulumi.com and tell us what you thought of this Pulumi Challenge!
What you have learned
In this challenge, you have learned how to build a web application as a container image and push it to Amazon Elastic Container Registry. You also learned how to deploy the containerized application on AWS Fargate with traffic load balanced through an Application Load Balancer. Lastly, you learned how to create a MongoDB Atlas cluster and database for your web application to store and retrieve data.
Clean up
If you’d like to tear down all of these resources and delete your stack, run pulumi destroy -rf --remove. Otherwise, have fun playing around with your infrastructure stack and add whatever you like! 🙂