Configuring OpenID Connect for Vault
This document outlines the steps required to use Pulumi with OpenID Connect to authenticate with Vault. This is accomplished using Vault’s JWT authentication method to assume a role. Access to the role is authorized using a Vault policy that validates the contents of the OIDC token issued by Pulumi Cloud.
Prerequisites
- You must have admin access to Vault.
- Pulumi Cloud must be able to access Vault.
Login Flow
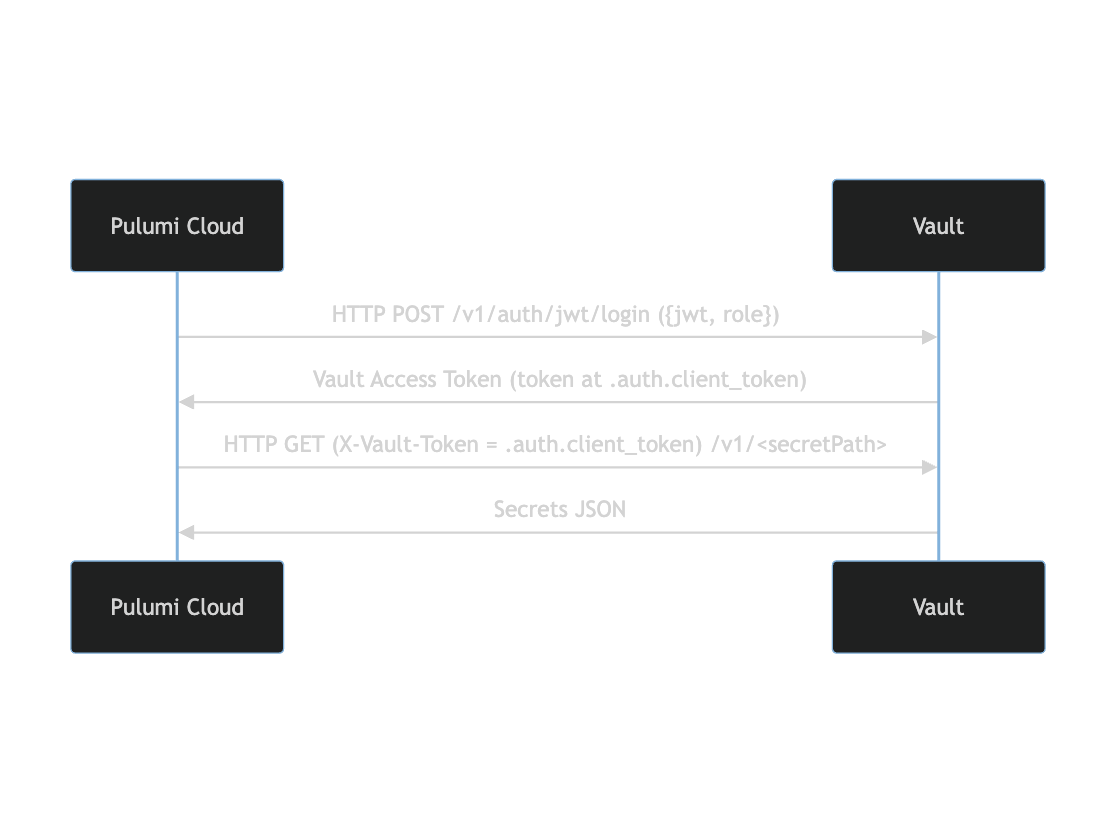
The following diagram demonstrates the high level overview of how Pulumi Cloud authenticates to Vault using the JWT OIDC login flow:
The contents of the JWT token from Pulumi is shown below:
{
  "aud": "<org-name>",
  "env": "<project-name>/<environment-name>",
  "exp": 1699300519,
  "iat": 1699296919,
  "iss": "https://api.pulumi.com/oidc",
  "nbf": 1699296919,
  "org": "<org-name>",
  "sub": "<subject-identifier>"
}
Where:
<org-name>is your Pulumi Cloud organization name (or your username if not part of an organization)<project-name>/<environment-name>is the Pulumi Cloud environment identifier<subject-identifier>is the subject identifier of the Pulumi service requesting access
Configure Vault JWT OIDC Auth
Enable JWT Auth Method in Vault
To enable the JWT auth method in Vault:
$ vault auth enable -path=jwt jwt
Success! Enabled jwt auth method at: jwt/

$ vault write auth/jwt/config \
    oidc_discovery_url="https://api.pulumi.com/oidc" \
    bound_issuer="https://api.pulumi.com/oidc"
Success! Data written to: auth/jwt/config
jwt path by default.Create Vault policy
For our example we will create a simple readonly policy (called reader) that allows read/list permissions to the secret path in Vault.
vault policy write reader -<<EOF
# read secrets only
path "/secret/*" {
 capabilities = ["read","list"]
}
EOF
For more advanced use cases see Vault documentation.
Create Vault JWT role
To create a role, use bound_claims_type: "glob" with a wildcard sub claim to restrict access to all ESC environments in your organization:
$ vault write auth/jwt/role/<role-name> -<<EOF
{
  "user_claim": "sub",
  "bound_audiences": "<org-name>",
  "role_type": "jwt",
  "token_policies": "<policy-name>",
  "bound_claims_type": "glob",
  "bound_claims": { "sub": "pulumi:environments:org:<org-name>:env:*" },
  "allowed_redirect_uris": ["<vault-url>/jwt/callback"]
}
EOF
role_type is set to jwt and not oidc.Replace:
<role-name>with your own role name<policy-name>with your policy (for example thereaderpolicy above)<org-name>with your Pulumi Cloud organization name (or your username if you are not part of an organization)<vault-url>with your Vault URL (Pulumi Cloud must be able to access this URL)
For environment-specific restrictions, use the env claim as JSON:
$ vault write auth/jwt/role/<role-name> -<<EOF
{
  "user_claim": "sub",
  "bound_audiences": "<org-name>",
  "role_type": "jwt",
  "token_policies": "<policy-name>",
  "bound_claims": { "env": ["<project-name>/<environment-name>","<project-name>/<another-environment-name>"] },
  "allowed_redirect_uris": ["<vault-url>/jwt/callback"]
}
EOF
Configure ESC for OIDC
To configure OIDC for Pulumi ESC, create a new environment in the Pulumi Cloud console. Make sure that you have the correct organization selected in the left-hand navigation menu. Then:
Click the Environments link.
Click the Create environment button.
Provide a project to create your new environment in and a name for your environment.
Click the Create environment button.
You will be presented with a split-pane document view. Delete the default placeholder content in the editor and replace it with the following code:
values:
  vault:
    login:
      fn::open::vault-login:
        address: <your-vault-url>
        jwt:
          role: <your-role-name>
        namespace: <your-namespace> # namespace is only supported for Vault Enterprise
    secrets:
      fn::open::vault-secrets:
        login: ${vault.login}
        read:
          test1:
            path: <path-to-secret>
Replace
<your-vault-url>,<your-role-name>,<your-namespace>, and<path-to-secret>with the values from the previous steps.Click Save.
jwt, you will need to specify that path using the mount option of the vault-login provider.You can validate that your configuration is working by running either of the following:
pulumi env open <your-org>/<your-project>/<your-environment>command of the Pulumi CLIpulumi env open <your-org>/<your-project>/<your-environment>command of the Pulumi CLI
Make sure to replace the values of <your-org>, <your-project>, and <your-environment> with the values of your Pulumi organization, project, and environment file respectively. You should see output similar to the following:
# example output
$ pulumi env open <my-org>/<my-project>/<my-environment>
{
  "vault": {
    "login": {
      "address": "***",
      "token": "***"
    },
    "secrets": {
      "test1": {
        "data": {
          "keyA": "valA",
          "keyB": "valB"
        },
        "metadata": {
          "created_time": "2023-11-06T18:24:05.784222Z",
          "custom_metadata": null,
          "deletion_time": "",
          "destroyed": false,
          "version": 1
        }
      }
    }
  }
}
To learn more about how to set up and use the various providers in Pulumi ESC, please refer to the Pulumi ESC providers documentation.
Subject claim customization
You can customize the subject claim in the OIDC token to control which Pulumi environments or users are allowed to assume a given IAM role. This allows for more granular access control than the default organization-level permissions.
You do so by configuring the subjectAttributes setting. It expects an array of keys to include in it:
rootEnvironment.name: the name of the root environment being evaluatedcurrentEnvironment.name: the name of the current environment being evaluatedpulumi.user.login: the login identifier of the user opening the environmentpulumi.organization.login: the login identifier of the organization
The subject always contains the following prefix pulumi:environments:pulumi.organization.login:{ORGANIZATION_NAME} and every key configured will be appended to this prefix. For example, consider the following environment:
values:
  vault:
    login:
      fn::open::vault-login:
        ...
        jwt:
          ...
          subjectAttributes:
            - currentEnvironment.name
            - pulumi.user.login
The subject will be pulumi:environments:pulumi.organization.login:contoso:currentEnvironment.name:project/development:pulumi.user.login:userLogin. Note how the keys and values are appended along with the prefix.
Thank you for your feedback!
If you have a question about how to use Pulumi, reach out in Community Slack.
Open an issue on GitHub to report a problem or suggest an improvement.