AWS Static Website
Available in TypeScript, Python, Go, C#, YAML, HCL
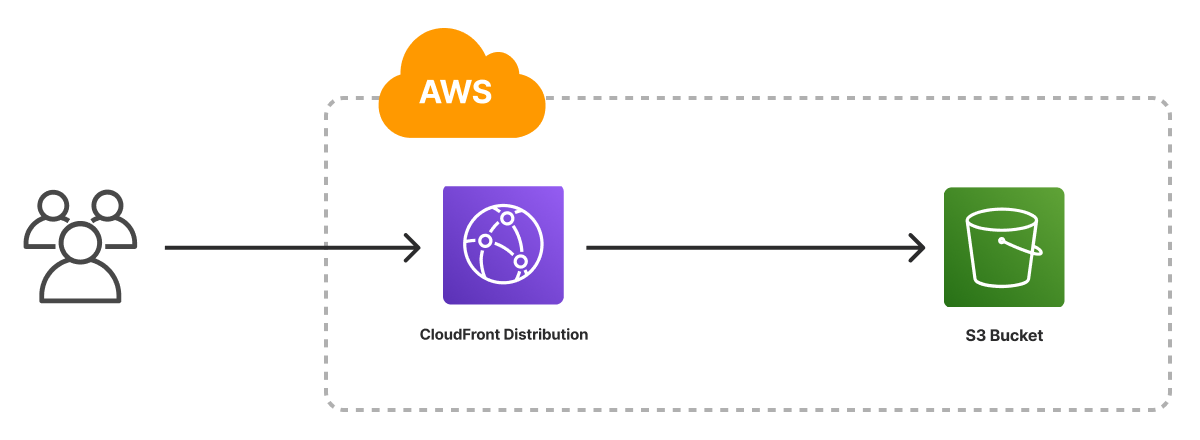
The AWS Static Website template scaffolds a Pulumi project that stores site files in a private Amazon S3 bucket and serves them through an Amazon CloudFront distribution using Origin Access Control. The bucket isn’t publicly readable; CloudFront authenticates to the S3 REST endpoint via a bucket policy scoped to the distribution. The template ships with placeholder web content so the project deploys end to end out of the box.
Using this template
To use this template to deploy a website of your own, make sure you’ve installed Pulumi and configured your AWS credentials, then create a new project using the template in the language of your choice:
$ mkdir my-site && cd my-site
$ pulumi new static-website-aws-typescript

$ mkdir my-site && cd my-site
$ pulumi new static-website-aws-python
$ mkdir my-site && cd my-site
$ pulumi new static-website-aws-go
$ mkdir my-site && cd my-site
$ pulumi new static-website-aws-csharp
$ mkdir my-site && cd my-site
$ pulumi new static-website-aws-yaml
$ mkdir my-site && cd my-site
$ pulumi new static-website-aws-hcl
Follow the prompts to complete the new-project wizard. When it’s done, you’ll have a finished project that’s ready to deploy and configured with the most common settings. Feel free to inspect the code in index.jsindex.ts__main__.pymain.goProgram.csProgram.fsProgram.vbApp.javaPulumi.yamlmain.tf
Deploying the project
The template requires no additional configuration. Once the new project is created, you can deploy it immediately with pulumi up:
$ pulumi up
When the deployment completes, Pulumi exports the following stack output values:
- cdnHostname
- The provider-assigned hostname of the CloudFront CDN. Useful for creating
CNAMErecords to associate custom domains. - cdnURL
- The fully-qualified HTTPS URL of the CloudFront CDN.
- cdn_url
- The fully-qualified HTTPS URL of the CloudFront CDN.
- cdn_hostname
- The provider-assigned hostname of the CloudFront CDN. Useful for creating
CNAMErecords to associate custom domains.
Output values like these are useful in many ways, most commonly as inputs for other stacks or related cloud resources. The computed CDN URL, for example, can be used from the command line to open the newly deployed website in your favorite web browser:
$ open $(pulumi stack output cdnURL)
$ open $(pulumi stack output cdn_url)
Customizing the project
Projects created with the Static Website template expose the following configuration settings:
- path
- The path to the folder containing the files of the website. Defaults to
www, which is the name (and relative path) of the folder included with the template. - indexDocument
- The file to use for top-level pages. Defaults to
index.html. - errorDocument
- The file to use for error pages. Defaults to
error.html.
- path
- The path to the folder containing the files of the website. Defaults to
./www, which is the name (and relative path) of the folder included with the template. - index_document
- The file to use for top-level pages. Defaults to
index.html. - error_document
- The file to use for error pages. Defaults to
error.html.
All of these settings are optional and may be adjusted either by editing the stack configuration file directly (by default, Pulumi.dev.yaml) or by changing their values with pulumi config set:
Using your own web content
If you already have a static website you’d like to deploy on AWS with Pulumi, you can do so either by replacing placeholder content in the www folder or by configuring the stack to point to another folder on your computer with the path setting:
$ pulumi config set path ../my-existing-website/build
$ pulumi up
Adjusting your cache settings
By default, the generated program configures the CloudFront CDN to cache files for 600 seconds (10 minutes), which may or may not be the best fit for your project or stack. You can adjust these settings by changing the code in index.jsindex.ts__main__.pymain.goProgram.csProgram.fsProgram.vbApp.javaPulumi.yamlmain.tf
const cdn = new aws.cloudfront.Distribution("cdn", {
    defaultCacheBehavior: {
-       defaultTtl: 600,
-       maxTtl: 600,
-       minTtl: 600,
+       defaultTtl: 3600,
+       maxTtl: 3600,
+       minTtl: 3600,
cdn = aws.cloudfront.Distribution(
    default_cache_behavior=aws.cloudfront.DistributionDefaultCacheBehaviorArgs(
-       default_ttl=600,
-       max_ttl=600,
-       min_ttl=600,
+       default_ttl=3600,
+       max_ttl=3600,
+       min_ttl=3600,
cdn, err := cloudfront.NewDistribution(ctx, "cdn", &cloudfront.DistributionArgs{
    DefaultCacheBehavior: &cloudfront.DistributionDefaultCacheBehaviorArgs{
-       DefaultTtl: pulumi.Int(600),
-       MaxTtl:     pulumi.Int(600),
-       MinTtl:     pulumi.Int(600),
+       DefaultTtl: pulumi.Int(3600),
+       MaxTtl:     pulumi.Int(3600),
+       MinTtl:     pulumi.Int(3600),
var cdn = new Aws.CloudFront.Distribution("cdn", new()
{
    DefaultCacheBehavior = new Aws.CloudFront.Inputs.DistributionDefaultCacheBehaviorArgs
    {
-       DefaultTtl = 600,
-       MaxTtl = 600,
-       MinTtl = 600,
+       DefaultTtl = 3600,
+       MaxTtl = 3600,
+       MinTtl = 3600,
cdn:
  type: aws:cloudfront:Distribution
  properties:
    defaultCacheBehavior:
-     defaultTtl: 600
-     maxTtl: 600
-     minTtl: 600
+     defaultTtl: 3600
+     maxTtl: 3600
+     minTtl: 3600
resource "aws_cloudfront_distribution" "cdn" {
  default_cache_behavior {
-   default_ttl = 600
-   max_ttl     = 600
-   min_ttl     = 600
+   default_ttl = 3600
+   max_ttl     = 3600
+   min_ttl     = 3600
Alternatively, and perhaps better, you could make these settings configurable as well, which would allow them to vary between other stacks in your project.
Next steps
Templated projects are meant to be customized, and every web project comes with its own unique set of needs. This section includes a few examples aimed at helping you to adapt your new project to address some of the more common ones.
Adding a custom domain
Once your website is deployed on AWS, you may want to give it a domain of its own. For this, you have many options, and they generally fall into one of two categories: using Amazon Route 53, which is a good choice if your domain is already being managed on AWS, or using a third-party service like DNSimple or Google Cloud DNS. Both options are easily managed with Pulumi.
Using a Route 53 managed domain
If the domain you’d like to use is already configured as a Route 53 hosted zone, you can easily add a subdomain for your website by making a few small changes to your program.
To do so, start by adding two new configuration settings — one for the domain, another for subdomain to use for the website:
$ pulumi config set domain example.com
$ pulumi config set subdomain www
Then, in your editor of choice, open index.jsindex.tsmain.pymain.goProgram.csProgram.fsProgram.vbApp.javaPulumi.yamlmain.tf
Then, in your editor of choice, open index.jsindex.tsmain.pymain.goProgram.csProgram.fsProgram.vbApp.javaPulumi.yamlmain.tf
const domain = config.require("domain");
const subdomain = config.require("subdomain");
const domainName = `${subdomain}.${domain}`;
domain = config.require("domain");
subdomain = config.require("subdomain");
domain_name = f"{subdomain}.{domain}";
domain := cfg.Require("domain")
subdomain := cfg.Require("subdomain")
domainName := fmt.Sprintf("%s.%s", subdomain, domain)
var domain = config.Require("domain");
var subdomain = config.Require("subdomain");
var domainName = $"{subdomain}.{domain}";
configuration:
  # ...
  domain:
    type: String
  subdomain:
    type: String

variables:
  domainName: ${subdomain}.${domain}
variable "domain" {
  type = string
}

variable "subdomain" {
  type = string
}

locals {
  domain_name = "${var.subdomain}.${var.domain}"
}
Next, just above the aws.cloudfront.Distribution declaration, add these lines to provision and validate a new SSL/TLS certificate with AWS Certificate Manager (ACM):
Next, just above the aws_cloudfront_distribution resource, add these lines to provision and validate a new SSL/TLS certificate with AWS Certificate Manager (ACM):
// Look up your existing Route 53 hosted zone.
const zone = aws.route53.getZoneOutput({ name: domain });

// Provision a new ACM certificate.
const certificate = new aws.acm.Certificate("certificate",
    {
        domainName: domainName,
        validationMethod: "DNS",
    },
    {
        // ACM certificates must be created in the us-east-1 region.
        provider: new aws.Provider("us-east-provider", {
            region: "us-east-1",
        }),
    },
);

// Validate the ACM certificate with DNS.
const validationOption = certificate.domainValidationOptions[0];
const certificateValidation = new aws.route53.Record("certificate-validation", {
    name: validationOption.resourceRecordName,
    type: validationOption.resourceRecordType,
    records: [ validationOption.resourceRecordValue ],
    zoneId: zone.zoneId,
    ttl: 60,
});
# Look up your existing Route 53 hosted zone.
zone = aws.route53.get_zone_output(name=domain)

# Provision a new ACM certificate.
certificate = aws.acm.Certificate(
    "certificate",
    domain_name=domain_name,
    validation_method="DNS",
    opts=pulumi.ResourceOptions(
        # ACM certificates must be created in the us-east-1 region.
        provider=aws.Provider("us-east-provider", region="us-east-1"),
    ),
);

# Validate the ACM certificate with DNS.
options = certificate.domain_validation_options.apply(lambda options: options[0])
certificate_validation = aws.route53.Record(
    "certificate-validation",
    name=options.resource_record_name,
    type=options.resource_record_type,
    records=[options.resource_record_value],
    zone_id=zone.zone_id,
    ttl=60,
);
// Look up your existing Route 53 hosted zone.
zone, err := route53.LookupZone(ctx, &route53.LookupZoneArgs{
	Name: pulumi.StringRef(domain),
}, nil)
if err != nil {
	return err
}

// Provision a new ACM certificate in the us-east-1 region.
provider, _ := aws.NewProvider(ctx, "us-east-provider", &aws.ProviderArgs{
	Region: pulumi.StringPtr("us-east-1"),
})
certificate, err := acm.NewCertificate(ctx, "certificate", &acm.CertificateArgs{
	DomainName:       pulumi.String(domainName),
	ValidationMethod: pulumi.String("DNS"),
}, pulumi.Provider(provider))
if err != nil {
	return err
}

validationOption := certificate.DomainValidationOptions.Index(pulumi.Int(0))
_, err = route53.NewRecord(ctx, "certificate-validation", &route53.RecordArgs{
	Name: validationOption.ResourceRecordName().Elem(),
	Type: validationOption.ResourceRecordType().Elem(),
	Records: pulumi.StringArray{
		validationOption.ResourceRecordValue().Elem(),
	},
	ZoneId: pulumi.String(zone.ZoneId),
	Ttl:    pulumi.Int(60),
})
if err != nil {
	return err
}
You’ll need these imports as well, for ACM and Route 53 support:
import (
	// ...
	"github.com/pulumi/pulumi-aws/sdk/v5/go/aws/acm"
	"github.com/pulumi/pulumi-aws/sdk/v5/go/aws/route53"
)
// Look up your existing Route 53-managed zone.
var zone = Aws.Route53.GetZone.Invoke(new()
{
	Name = domain,
});

// Provision a new ACM certificate.
var certificate = new Aws.Acm.Certificate("certificate", new()
{
	DomainName = domainName,
	ValidationMethod = "DNS",
},
// ACM certificates must be created in the us-east-1 region.
new CustomResourceOptions {
	Provider = new Aws.Provider("us-east-provider", new() {
		Region = "us-east-1",
	})
});

// Validate the ACM certificate with DNS.
var validationOption = certificate.DomainValidationOptions.GetAt(0);
var certificateValidation = new Aws.Route53.Record("certificate-validation", new()
{
	Name = validationOption.Apply(option => option.ResourceRecordName!),
	Type = validationOption.Apply(option => option.ResourceRecordType!),
	Records = new[]
	{
		validationOption.Apply(option => option.ResourceRecordValue!),
	},
	ZoneId = zone.Apply(zone => zone.ZoneId),
	Ttl = 60,
});
variables:
  # ...

  # Add this block to the variables section to look up your existing
  # Route 53 hosted zone.
  zone:
    Fn::Invoke:
      Function: aws:route53:getZone
      Arguments:
        name: ${domain}

resources:
  # ...

  # ACM certificates must be provisioned in the us-east-1 region, so
  # we configure an explicit provider for this resource.
  us-east-provider:
    type: pulumi:providers:aws
    properties:
      region: us-east-1

  # Provision a new ACM certificate.
  certificate:
    type: aws:acm:Certificate
    properties:
      domainName: ${domainName}
      validationMethod: DNS
    options:
      # ACM certificates must be created in the us-east-1 region.
      provider: ${us-east-provider}

  # Validate the ACM certificate with DNS.
  certificateValidation:
    type: aws:route53:Record
    properties:
      name: ${certificate.domainValidationOptions[0].resourceRecordName}
      type: ${certificate.domainValidationOptions[0].resourceRecordType}
      zoneId: ${zone.zoneId}
      ttl: 60
      records:
        - ${certificate.domainValidationOptions[0].resourceRecordValue}
# Look up your existing Route 53 hosted zone.
data "aws_route53_zone" "zone" {
  name = var.domain
}

# ACM certificates for CloudFront must be created in the us-east-1 region.
provider "aws" {
  alias  = "us_east_1"
  region = "us-east-1"
}

# Provision a new ACM certificate.
resource "aws_acm_certificate" "certificate" {
  provider          = aws.us_east_1
  domain_name       = local.domain_name
  validation_method = "DNS"
}

# Validate the ACM certificate with DNS.
resource "aws_route53_record" "certificate_validation" {
  for_each = {
    for option in aws_acm_certificate.certificate.domain_validation_options : option.domain_name => {
      name   = option.resource_record_name
      type   = option.resource_record_type
      record = option.resource_record_value
    }
  }

  zone_id = data.aws_route53_zone.zone.zone_id
  name    = each.value.name
  type    = each.value.type
  records = [each.value.record]
  ttl     = 60
}
Extend the CloudFront configuration to handle requests for the new domain by adding an aliases argument to the CDN configuration and adjusting viewerCertificate to use the newly provisioned ACM certificate:
Extend the CloudFront configuration to handle requests for the new domain by adding an aliases argument to the CDN configuration and adjusting the viewer_certificate block to use the newly provisioned ACM certificate:
const cdn = new aws.cloudfront.Distribution("cdn", {
    // ...
    aliases: [
        domainName,
    ],
    viewerCertificate: {
        cloudfrontDefaultCertificate: false,
        acmCertificateArn: certificate.arn,
        sslSupportMethod: "sni-only",
    },
});
cdn = aws.cloudfront.Distribution(
    # ...
    aliases=[
        domain_name,
    ],
    viewer_certificate=aws.cloudfront.DistributionViewerCertificateArgs(
        cloudfront_default_certificate=False,
        acm_certificate_arn=certificate.arn,
        ssl_support_method="sni-only",
    ),
)
cdn, err := cloudfront.NewDistribution(ctx, "cdn", &cloudfront.DistributionArgs{

    // ...
	Aliases: &pulumi.StringArray{
		pulumi.String(domainName),
	},
	ViewerCertificate: &cloudfront.DistributionViewerCertificateArgs{
		CloudfrontDefaultCertificate: pulumi.Bool(false),
		AcmCertificateArn:            certificate.Arn,
		SslSupportMethod:             pulumi.String("sni-only"),
	},
})
var cdn = new Aws.CloudFront.Distribution("cdn", new()
{
    // ...
    Aliases = new[]
    {
        domainName
    },
    ViewerCertificate = new Aws.CloudFront.Inputs.DistributionViewerCertificateArgs
    {
        CloudfrontDefaultCertificate = false,
        AcmCertificateArn = certificate.Arn,
        SslSupportMethod = "sni-only",
    },
});
cdn:
  type: aws:cloudfront:Distribution
  properties:
    # ...
    aliases:
      - ${domainName}
    viewerCertificate:
      cloudfrontDefaultCertificate: false
      acmCertificateArn: ${certificate.arn}
      sslSupportMethod: sni-only
resource "aws_cloudfront_distribution" "cdn" {
  # ...
  aliases = [local.domain_name]

  viewer_certificate {
    cloudfront_default_certificate = false
    acm_certificate_arn            = aws_acm_certificate.certificate.arn
    ssl_support_method             = "sni-only"
  }
}
Below that, add a Route 53 A record to create a DNS record pointing to the CloudFront CDN:
// Create a DNS A record to point to the CDN.
const record = new aws.route53.Record(domainName, {
    name: subdomain,
    zoneId: zone.zoneId,
    type: "A",
    aliases: [
        {
            name: cdn.domainName,
            zoneId: cdn.hostedZoneId,
            evaluateTargetHealth: true,
        }
    ],
}, { dependsOn: certificate });
# Create a DNS A record to point to the CDN.
my_site = aws.route53.Record(domain_name,
    zone_id=zone.zone_id,
    name=subdomain,
    type="A",
    aliases=[
        aws.route53.RecordAliasArgs(
            name=cdn.domain_name,
            zone_id=cdn.hosted_zone_id,
            evaluate_target_health=True,
        )
    ],
    opts=pulumi.ResourceOptions(
        depends_on=certificate,
    ),
)
// Create a DNS A record to point to the CDN.
_, err = route53.NewRecord(ctx, domainName, &route53.RecordArgs{
	Name:   pulumi.String(subdomain),
	ZoneId: pulumi.String(zone.ZoneId),
	Type:   pulumi.String("A"),
	Aliases: route53.RecordAliasArray{
		&route53.RecordAliasArgs{
			Name:                 cdn.DomainName,
			ZoneId:               cdn.HostedZoneId,
			EvaluateTargetHealth: pulumi.Bool(true),
		},
	},
}, pulumi.DependsOn([]pulumi.Resource{certificate}))
if err != nil {
	return err
}
// Create a DNS A record to point to the CDN.
var record = new Aws.Route53.Record(domainName, new()
{
    Name = subdomain,
    ZoneId = zone.Apply(zone => zone.ZoneId),
    Type = "A",
    Aliases = new[]
    {
        new Aws.Route53.Inputs.RecordAliasArgs
        {
            Name = cdn.DomainName,
            ZoneId = cdn.HostedZoneId,
            EvaluateTargetHealth = true,
        }
    },
},
new CustomResourceOptions {
    DependsOn = certificate,
});
resources:
  # ...

  # Create a DNS A record to point to the CDN.
  ${domainName}:
    type: aws:route53:Record
    properties:
      name: ${subdomain}
      zoneId: ${zone.zoneId}
      type: A
      aliases:
        - name: ${cdn.domainName}
          zoneId: ${cdn.hostedZoneId}
          evaluateTargetHealth: true
    options:
      dependsOn:
        - ${certificate}
# Create a DNS A record to point to the CDN.
resource "aws_route53_record" "domain" {
  zone_id = data.aws_route53_zone.zone.zone_id
  name    = var.subdomain
  type    = "A"

  alias {
    name                   = aws_cloudfront_distribution.cdn.domain_name
    zone_id                = aws_cloudfront_distribution.cdn.hosted_zone_id
    evaluate_target_health = true
  }

  depends_on = [aws_acm_certificate.certificate]
}
And finally, complete the program by exporting the new URL as a Pulumi stack output:
export const domainURL = `https://${domainName}`;
pulumi.export("domainURL", f"https://{domain_name}")
ctx.Export("domainURL", pulumi.Sprintf("https://%s", domainName))
["domainURL"] = $"https://{subdomain}.{domain}",
outputs:
  # ...
  domainURL: https://${domainName}
output "domain_url" {
  value = "https://${local.domain_name}"
}
Save your changes, then preview and deploy with another pulumi up:
$ pulumi up
In a few moments, you should be able to browse to your website using the custom domain:
$ open $(pulumi stack output domainURL)
$ open $(pulumi stack output domain_url)
Using a third-party DNS service
If the domain you’d like to use is being managed by a third-party DNS service, you can generally use the exported cdnHostname to create a CNAME record with your DNS provider. You can obtain this value with pulumi stack output:
$ pulumi stack output cdnHostname
If the domain you’d like to use is being managed by a third-party DNS service, you can generally use the exported cdn_hostname to create a CNAME record with your DNS provider. You can obtain this value with pulumi stack output:
$ pulumi stack output cdn_hostname
Pulumi supports many third-party DNS providers, all of which are available in the Pulumi Registry and accompanied by examples, including:
Integration details vary by provider, so we suggest exploring the Pulumi API documentation of your provider of choice to learn more. See the Registry for a complete list of supported providers.
Cleaning up
You can cleanly destroy the stack and all of its infrastructure with pulumi destroy:
$ pulumi destroy
Learn more
- Browse other architecture templates in the Templates gallery.
- Explore the AWS provider API docs in the Pulumi Registry.
- Walk through Pulumi from the ground up in Pulumi Tutorials.
- Read the latest AWS posts on the Pulumi blog.