Container Service on Azure
Available in TypeScript, Python, Go, C#, HCL
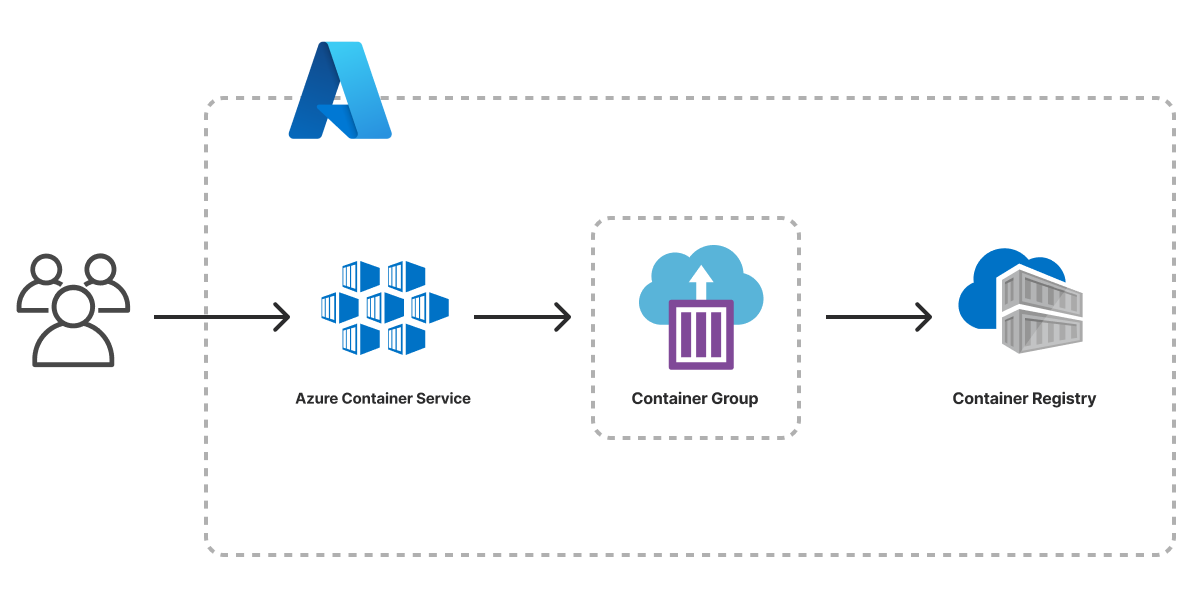
The Azure Container Service template scaffolds a Pulumi project that deploys a containerized service to Azure. The architecture includes an Azure Container Registry for the container image and Azure Container Instances (ACI) for serverless container execution. The template ships with placeholder app content so the project deploys end to end out of the box.
Using this template
To use this template to deploy your own container service, make sure you’ve installed Pulumi and configured your Azure credentials, then create a new project using the template in the language of your choice:
$ mkdir my-container-service && cd my-container-service
$ pulumi new container-azure-typescript

$ mkdir my-container-service && cd my-container-service
$ pulumi new container-azure-python
$ mkdir my-container-service && cd my-container-service
$ pulumi new container-azure-go
$ mkdir my-container-service && cd my-container-service
$ pulumi new container-azure-csharp
$ mkdir my-container-service && cd my-container-service
$ pulumi new container-azure-hcl
Follow the prompts to complete the new-project wizard. When it’s done, you’ll have a complete Pulumi project that’s ready to deploy and configured with the most common settings. Feel free to inspect the code in index.jsindex.ts__main__.pymain.goProgram.csProgram.fsProgram.vbApp.javaPulumi.yamlmain.tf
Deploying the project
The template requires no additional configuration. Once the new project is created, you can deploy it immediately with pulumi up:
$ pulumi up
When the deployment completes, Pulumi exports the following stack output values:
- hostname
- The hostname of the container group.
- ip
- The public IP address of the container group.
- url
- The HTTP URL of the container group.
Output values like these are useful in many ways, most commonly as inputs for other stacks or related cloud resources. The computed url, for example, can be used from the command line to open the newly deployed application in your favorite web browser:
$ open $(pulumi stack output url)
Customizing the project
Projects created with the Container Service template expose the following configuration settings:
- appPath
- The path to the folder containing the application and Dockerfile. Defaults to
app, which contains a “Hello world” example. - containerPort
- The port to expose on the container. Defaults to
80. - cpu
- The number of CPU cores to allocate on the container. Defaults to
1. - memory
- The amount of memory, in GB, to allocate on the container. Defaults to
2. - imageName
- The name of the container image to be published to Azure Container Registry. Defaults to
my-app. - imageTag
- The tag applied to published container images. Defaults to
latest.
- app_path
- The path to the folder containing the application and Dockerfile. Defaults to
./app, which contains a “Hello world” example. - image_name
- The name of the container image to be published to Azure Container Registry. Defaults to
my-app. - image_tag
- The tag applied to published container images. Defaults to
latest. - container_port
- The port to expose on the container. Defaults to
80. - cpu
- The number of CPU cores to allocate on the container. Defaults to
1. - memory
- The amount of memory, in GB, to allocate on the container. Defaults to
2.
All of these settings are optional and may be adjusted either by editing the stack configuration file directly (by default, Pulumi.dev.yaml) or by changing their values with pulumi config set:
$ pulumi config set containerPort 8080
$ pulumi up
$ pulumi config set container_port 8080
$ pulumi up
Cleaning up
You can cleanly destroy the stack and all of its infrastructure with pulumi destroy:
$ pulumi destroy
Learn more
- Browse other architecture templates in the Templates gallery.
- Explore the Azure Native provider API docs in the Pulumi Registry.
- Walk through Pulumi from the ground up in Pulumi Tutorials.
- Read the latest container posts on the Pulumi blog.