Deploy an AI/ML Chatbot Frontend on Vercel with Pulumi

The process of taking an idea and turning it into reality has been nothing short of extraordinary since we started innovating with Artificial Intelligence. With this technology, machines learn about and communicate with people, while also helping us in ways we never could have imagined only a few years ago. If you’ve been following along, you might recall that the real AI challenge is cloud, not code where we used Python and Pulumi to a chatbot API (named katwalk).
But our AI adventure hasn’t ended there; it’s only just begun.
Now, imagine this: A Vue.js chatbot frontend, seamlessly integrating human interaction and the AI chatbot API. This blog post is part of the series on AI Infrastructure as Python. We’d delve into the creation of a captivating Vue.js chatbot frontend, and with Pulumi, we’ll deploy it to Vercel.
Figure 1. Architecture diagram
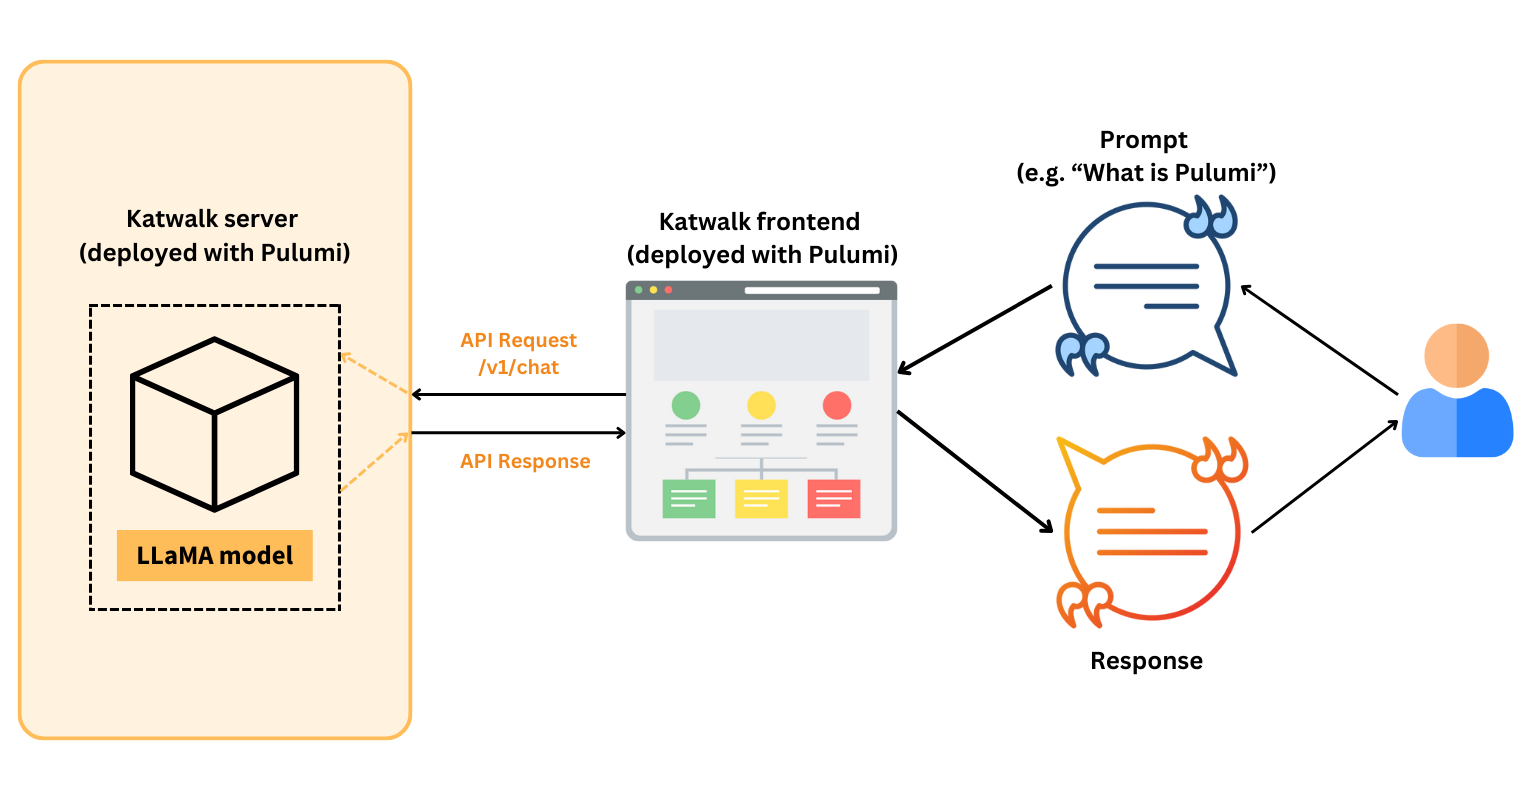
The complexity of building end-to-end AI/ML applications rests not only in the algorithms and models, but also in the several layers of infrastructure required to bring them to life. Consider this: You have a Vue.js chatbot frontend, a chatbot API powered by LLaMA models, a Vercel cloud hosting environment for the frontend, and a Runpod environment for the API. But here’s the catch: you have to weave all of these pieces together seamlessly.
Individual scripts or manual settings to set up and manage each component can soon create a tangled web of inefficiencies and potential problems. We can use Pulumi here to deploy everything. From the frontend to the backend, Pulumi orchestrates the programmatic generation and coordination of every critical infrastructure element.
With Pulumi, developer productivity increases, scalability is a breeze, and the complex infrastructure pieces fit together easily. Now that you can see why this is important, let’s get started.
Before we get into the details of using Pulumi to deploy a Vue.js frontend app to Vercel, let’s start with some quick terminology/context:
- Katwalk Frontend is a demo Vue.js application that integrates with the Katwalk Server to produce a function web interface for you to communicate with your chatbot.
- Vercel is a modern web development cloud platform and hosting provider. It specialises in making web application deployment simple and efficient.
How to Integrate Your Chatbot Frontend and Deploy to Vercel
If you are ready to integrate your chatbot and deploy it to Vercel along with us, then let’s double check a few requirements before we continue. While Pulumi supports many languages, we chose Python for this project, as Python is a familiar language in the AI industry and this is part of the #PulumiMLOps challenge.
Requirements
- Pulumi CLI
- Pulumi account and access token
- Python3
- Git CLI
- Endpoint of Katwalk Server API. Follow the steps in this article to deploy the API and get your endpoint.
- Vercel account and access token
Now that you have everything needed to get started, let’s hook up our frontend and deploy the frontend to Vercel using Pulumi.
1. Clone the repo and setup your project
The first thing we need to do is clone the repository from GitHub and setup the Pulumi Python environment. The Katwalk Frontend code is also in the repo for the Katwalk Server so this post will do both deployments.
# Clone the repository and cd to the infra directory
git clone https://github.com/pulumiverse/katwalk && cd katwalk/pulumi

# Create and initialize the python virtual env
python3 -m venv venv && source venv/bin/activate

# Install python dependencies
python -m pip install -r requirements.txt
2. Login to Pulumi Cloud and initialize stack
Next, let’s setup our state and secrets store in Pulumi Cloud.
# You can store Pulumi state in multiple ways, here we use Pulumi Cloud
# Other state backends include Azure storage, Amazon S3, local file, and more
pulumi login

# Initialize your stack
# Here we name the stack "dev"
pulumi stack init --stack dev
3. Configure deployment credentials
Before the deployment, you will need to set the config values for your Vercel token, the repository name, and the repository type. The Vercel token is supposed to be set as a secret. If you open the Pulumi.${stackName}.yaml file, you can see the encrypted secret in this plain text YAML configuration.
# The name of the git repository. It should have this format {account-name}/{repository-name}
pulumi config set gitRepoName <repo_name>

# The git provider of the repository. Must be either `github`, `gitlab`, or `bitbucket`.
pulumi config set gitRepoType <github|gitlab|bitbucket>

# Configure vercel project name. Your vercel website will be `https://{vcl_project_name}.vercel.app`
pulumi config set vclProjectName <vcl_project_name>

# Configure vercel token as secret
pulumi config set --secret vclToken <vcl_token>
4. Deploy to Vercel
Now, you’re set up to deploy your Vue app to Vercel.
# Finally, run `pulumi up` to deploy!
pulumi up
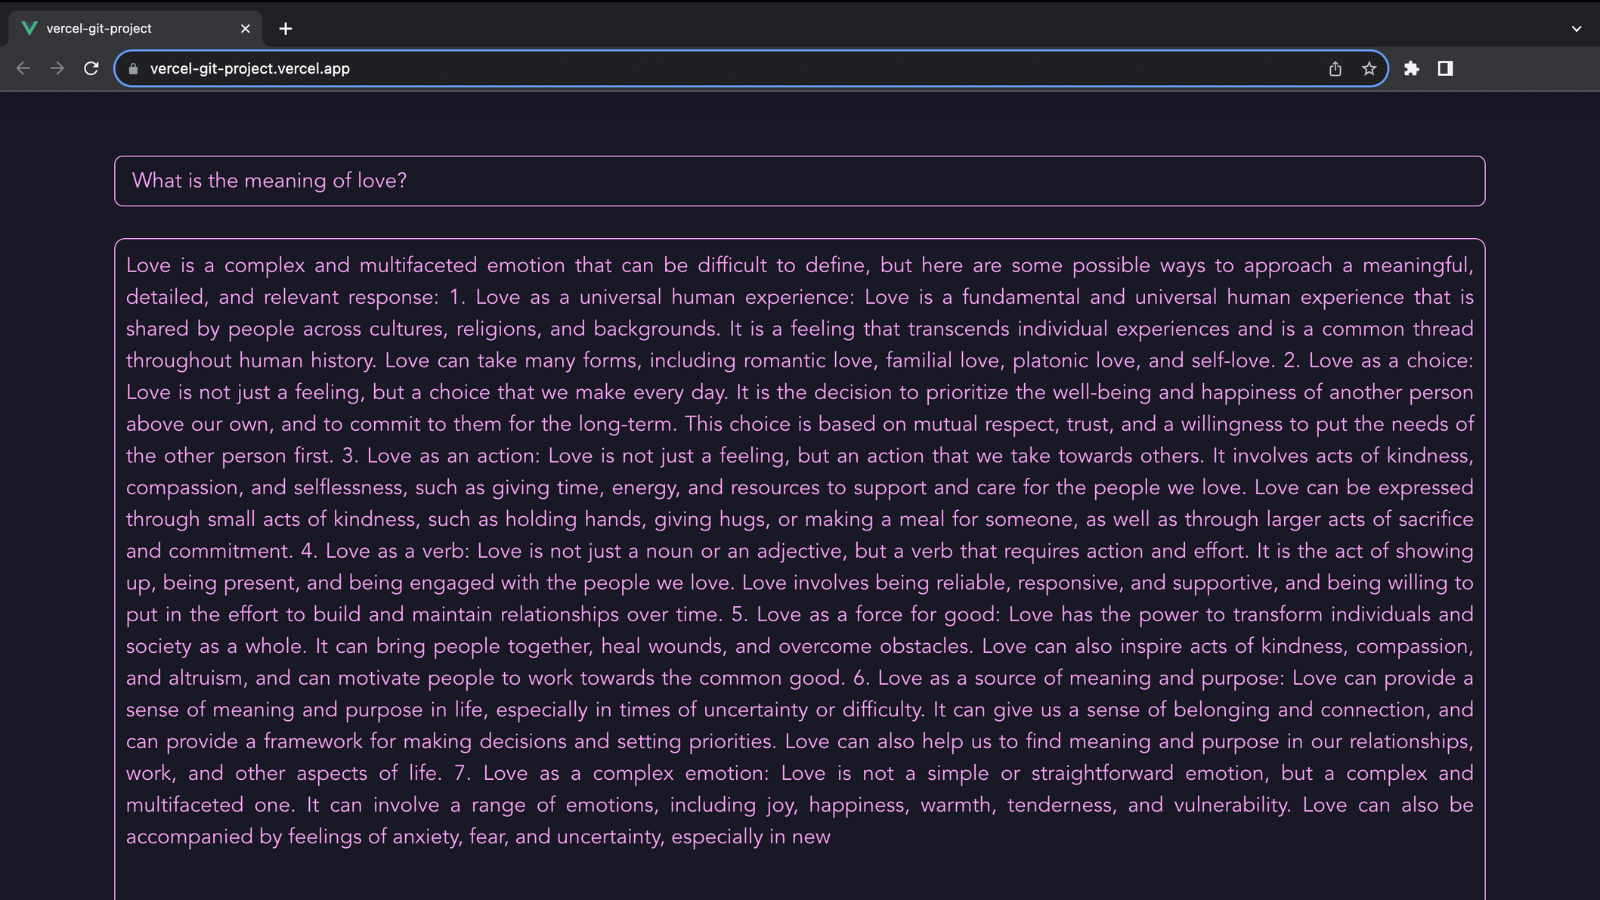
5. Interact with your chatbot
Once your web app is running, you can visit the website at https://{vcl_project_name}.vercel.app, send prompts and see the response in real-time!
Figure 2. A prompt and response screenshot from our Katwalk Frontend
6. Tear down resources
Now that you’ve tested out this code and you can see the chatbot in action, remember to deprovision your deployment by running:
pulumi destroy
Understanding the Pulumi Code for Vercel Deployment
If you’d like to learn about what the Pulumi code is doing, then stick around. In this section, we’ll dive into the Python Pulumi code which is responsible for deploying the Vue.js project to Vercel using Pulumi. Let’s break down the code step by step to understand how it works.
1. Import the necessary modules
import pulumi
import pulumiverse_vercel as vercel
The code begins by importing the required modules. pulumi is the primary Pulumi Python library, while pulumiverse_vercel is a Pulumi provider for Vercel. These modules provide the necessary functionality to define and manage our web app infrastructure.
2. Configuration settings
config = pulumi.Config()
vcl_project_name = config.require("vclProjectName")
vcl_token = config.require_secret("vclToken")
git_repo_name = config.require("gitRepoName")
git_repo_type = config.require("gitRepoType")
Here, we retrieve configuration settings using Pulumi’s configuration management. Configuration values like vclProjectName, vclToken, gitRepoName, and gitRepoType are essential for setting up the Vercel deployment. These were the values that you provided using the pulumi config set command before deploying the stack.
3. Vercel provider
provider = vercel.Provider("vercel-provider",
    api_token = vcl_token
)
This part initializes the Vercel provider with the Vercel API token. The provider is used to authenticate and interact with the Vercel platform programmatically.
4. Creating a Vercel project
project = vercel.Project("vercel-project",
    name = vcl_project_name,
    framework = "vue",
    git_repository = vercel.ProjectGitRepositoryArgs(
        repo = git_repo_name,
        type = git_repo_type
    ),
    root_directory = "src/app/katwalk-frontend",
    opts = pulumi.ResourceOptions(
        provider = provider
    )
)
Here, we define a Vercel project vcl_project_name. The git_repository parameter specifies the Git repository details, including git_repo_name and git_repo_type. We also associate this project with the Vercel provider using opts.
5. Setting Environment Variables
environment = vercel.ProjectEnvironmentVariable("vercel-env",
    project_id = project.id,
    key = "VUE_APP_BACKEND_DNS",
    value = runpod_id_fqdn,
    targets = ["production"],
    opts = pulumi.ResourceOptions(
        provider = provider
    )
)
This section sets an environment variable named VUE_APP_BACKEND_DNS for the Vercel project. The value of this variable is actually the DNS name that is generated by the backend server endpoint code. In the code snippet, the environment variable is also linked to the project.id and specifies that it should be available only in the production environment.
6. Deploying the Project
deployment = vercel.Deployment("vercel-deployment",
    project_id = project.id,
    production = True,
    ref = "main",
    opts = pulumi.ResourceOptions(
        provider = provider
    )
)
Finally, we deploy the Vercel project with the vercel.Deployment resource. This deployment is configured to use the main branch and is marked as a production deployment.
As you’ve seen above, we can integrate Pulumi into our deployments when building AI apps with Python.
If you’ve joined us on this incredible journey to connect the dots between the API and the Vue.js chatbot frontend using Pulumi and Python, we’re eager to hear your story. How did it work out for you? Did you find the process as exhilarating and empowering as we did? What are you most excited about in this AI-powered future?
Our journey doesn’t end here; it’s merely a waypoint on the ever-evolving road of innovation. We invite you to share your thoughts, ideas, and suggestions for future installments of the Pulumi Python + MLOps series. Together, we’ll continue pushing the boundaries of what’s possible in the world of AI development.
Join us in the Pulumi Community Slack or in the Pulumiverse Katwalk GitHub repository to decide what #aiChallenge we tackle next!