Dynamic Credentials for Every AWS CLI Command: A Step-by-Step Guide to 'esc run'

In a world where cloud computing is the backbone of modern applications, managing environments and secrets is of the utmost importance. Earlier this month we released a new service called Pulumi ESC (Environments, Secrets, and Configuration), the focus of which is to help alleviate the burden of managing cloud configuration and secrets by providing a centralized way to handle these critical aspects of cloud development. It’s like having a Swiss Army knife in your toolkit, ready to tackle the challenges of cloud infrastructure. This post will highlight the specific challenge of credentials management, and we’ll specifically dive into how using the esc run functionality of Pulumi ESC will make that easier.
Credentials Management in the Cloud
Dealing with cloud credentials can be a major headache, especially when you’re trying to manage them at scale. If you’ve ever agonized over things like how to:
- securely share credentials with teammates in a consistent way,
- minimize the risks associated with locally configured, long-lived and highly privileged credentials,
- ensure teams can easily and safely run commands like
aws s3 lswithout needing to be a security wizard,
then this post has got you covered. The esc run command was made to solve exactly these kinds of problems.
If we take a look at the Pulumi documentation for the esc run command, it states the following:
This command opens the environment with the given name and runs the given command. If the opened environment contains a top-level ’environmentVariables’ object, each key-value pair in the object is made available to the command as an environment variable.
But what does this actually mean? Using AWS as an example, it means that we can run the aws s3 ls command without having to manually configure AWS credentials in local environments because Pulumi ESC will dynamically generate and project those credentials on our behalf. In this post, we’ll show you how to use Pulumi ESC with the AWS CLI so that every command you run incorporates security best practices like short-term, scoped credentials issued via OpenID Connect (OIDC).
Getting Started with esc run
Now that we’ve covered the basics of what esc run does, let’s dive into how you can start using it! We’ll walk you through everything you need to be able to run the aws s3 ls command without manually configuring local AWS credentials.
Step 1: Install and login to Pulumi ESC
To begin, you’ll need to install Pulumi ESC. Once the installation is complete, run the esc login command and follow the steps to login to the CLI.
$ esc login
Manage your Pulumi ESC environments by logging in.
Run `esc --help` for alternative login options.
Enter your access token from https://app.pulumi.com/account/tokens
    or hit <ENTER> to log in using your browser                   :
Logged in to pulumi.com as …
Step 2: Create the OIDC configuration
Pulumi ESC offers you the ability to manually set your credentials as secrets in your Pulumi ESC environment files. When it comes to something like OIDC configuration, a more secure and efficient alternative is to leverage yet another great feature of Pulumi ESC: dynamic credentials.
This service can dynamically generate credentials on your behalf each time you need to interact with your AWS environments. To do so, you’ll need to configure OIDC between Pulumi and AWS. On the AWS side, there are two resources you’ll need to create:
- An IAM OIDC provider
- An IAM Role
Let’s start by creating the OIDC provider resource. There are a number of ways you can do this in AWS, but we will demonstrate how to create it via the AWS console.
a. Add identity provider
In the navigation pane of the IAM console, choose Identity providers, and then choose Add provider.
In the Provider type section, click the radio button next to OpenID Connect. For the Provider URL, provide the following URL:
https://api.pulumi.com/oidc
For the Audience field, provide the name of your Pulumi organization. Then scroll down to the bottom of the page and click Add provider.
b. Assign IAM role
You’ll see a notification at the top of your screen prompting you to assign an IAM role to your newly created provider. Click the Assign role button.
This will prompt you to either create a new role or use an existing role. For the purposes of this blog, we will select the Create a new role option and demonstrate how to configure it for use with Pulumi ESC.
This will then direct you to the IAM Create role page. The Web identity radio button should already be selected for you but if not, make sure that it is selected. Then scroll down and make sure that the following is selected in the Web identity section:
- the
api.pulumi.com/oidcprovider is selected under Identity provider - the name of your Pulumi organization is selected under Audience
Click Next which will direct you to the Add permissions page. This is where you will select what permissions you will allow your Pulumi ESC environment to have in your AWS account. Since we want to interact with S3, let’s go ahead and select the AmazonS3FullAccess policy from the list. Then scroll down and click Next.
You will be directed to the last page of the wizard, where you can provide the name and an optional description for the role and review all of the role’s configuration details before creating it.
c. Review trust policy
One area that we want to draw your attention to is the Select trusted entities section which is where the trust policy of the role is defined.
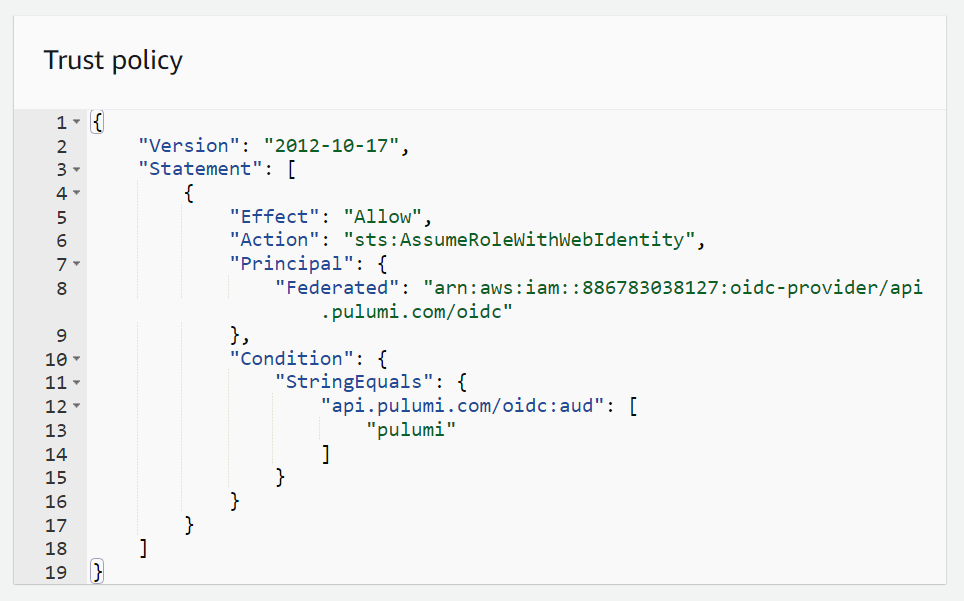
This definition currently allows any Pulumi service to assume this role, but only if the request comes from your organization. You can edit this policy to further limit access to this role to just the Pulumi ESC service, and you can make it even more granular by limiting access to a specific environment. This more detailed configuration is outside the scope of this blog post, but you can learn more about it by checking out the relevant Pulumi documentation.
After creating your role, make sure to make a note of your role’s ARN value as you will need it in the next step.
Step 3: Create a new environment
Now that we’ve created all the necessary AWS resources, let’s move over to the Pulumi side of things. You’ll first want to create a new environment in the Pulumi Cloud. Make sure that you have the correct organization selected in the left-hand navigation menu. Then click the Environments link, and click the Create environment button. In the following pop-up, provide a name for your environment before clicking the Create environment button.
Step 4: Add the AWS provider integration
Once you’ve created your new environment, you will be presented with a split-pane document view. You’ll want to clear out the default placeholder content in the editor on the left-hand side and replace it with the following code, making sure to replace <your-oidc-iam-role-arn> with the value of your IAM role ARN from the previous step:
values:
  aws:
    login:
      fn::open::aws-login:
        oidc:
          duration: 1h
          roleArn: <your-oidc-iam-role-arn>
          sessionName: pulumi-environments-session
  environmentVariables:
    AWS_ACCESS_KEY_ID: ${aws.login.accessKeyId}
    AWS_SECRET_ACCESS_KEY: ${aws.login.secretAccessKey}
    AWS_SESSION_TOKEN: ${aws.login.sessionToken}
The variables defined under the environmentVariables parameter above are the same environment variables that the AWS CLI uses if you were authenticating with something like the aws configure command. What the above configuration is doing is dynamically generating the credentials and projecting those credential values into your local environment. From there, the AWS CLI picks up those environment variables and runs the designated command. You can find out more about this provider definition and how it works in the Pulumi ESC documentation for the AWS provider as well as the documentation for projecting environment variables.
Click Save.
Step 5: Run your command
Now to the fun part! With your environment set up, try it out by listing all of the S3 buckets in your AWS account. Start by running the aws s3 ls command as normal, making sure to run it in an environment that does not have any AWS credentials configured. You should see the following response:
$ aws s3 ls

Unable to locate credentials. You can configure credentials by running "aws configure".
Now run the command using esc run as shown below, making sure to replace <your-pulumi-org-name> and <your-environment-name> with the names of your own Pulumi organization and environment respectively:
esc run <your-pulumi-org-name>/<your-environment-name> -i aws s3 ls
Voila! You’ve just run an AWS command without any local AWS credential configuration.
The Power of esc run
This is just the tip of the iceberg of how the esc run command can be a game-changer in how you and your team manage and interact with cloud resources. It’s a significant stride towards making your cloud interactions more efficient and less error-prone, and here’s a deeper dive into why:
Seamless Command Execution - The
esc runcommand lets you execute AWS commands effortlessly, freeing you from the intricacies of managing AWS credentials on your local machine. As a developer, you could get temporary credentials for a particular environment to check if your application is working as expected. Simply put, it significantly reduces the overhead of credential setup and maintenance.Enhanced Security - One of the standout features of
esc runis its commitment to security. By removing the local storage of credentials, it drastically reduces the risk of accidental exposure. Your credentials and secrets are securely managed within the Pulumi environment.Streamlined Collaboration - Because credentials will be centralized,
esc runfacilitates smoother team collaboration by providing a consistent environment for all team members to run commands with. Everyone can access the same secure environment which reduces the complexities of coordinating credentials and configurations across teams.
Real-World Use Cases
To further illustrate the power of Pulumi ESC, let’s consider a real-world use case: automated data backup. Imagine you have a web application that generates daily logs stored in an S3 bucket. You want to schedule a daily backup job to copy these logs to a separate bucket without exposing your AWS credentials in your scripts or having to manually configure them each time.
With Pulumi ESC, you can create an environment, dynamically generate your AWS credentials, and schedule a daily backup job using a simple script that runs the aws s3 cp command. This ensures your backups are automated, secure, and easily maintainable, all thanks to Pulumi ESC.
This is one example from several dozen use cases possible via Pulumi ESC. Other examples include but are not limited to:
- Disaster Recovery:
- Aside from data backups, Pulumi ESC can also be used in disaster recovery scenarios. The
esc runcommand can be utilized to automate the recovery processes, ensuring quicker restoration of services with the correct configurations.
- Aside from data backups, Pulumi ESC can also be used in disaster recovery scenarios. The
- Environment Segregation and Management:
- In organizations with multiple development, staging, and production environments, Pulumi ESC facilitates easy segregation and management of these environments. The
esc runcommand allows developers to execute commands in designated environments without the hassle of manual configuration changes.
- In organizations with multiple development, staging, and production environments, Pulumi ESC facilitates easy segregation and management of these environments. The
- Continuous Integration/Deployment (CI/CD) Pipelines:
- Pulumi ESC can be integrated into CI/CD pipelines to automate deployment processes. The
esc runcommand can be used to execute deployment scripts in a controlled and secure manner, making the deployment process more efficient and error-free.
- Pulumi ESC can be integrated into CI/CD pipelines to automate deployment processes. The
- Application Testing and Debugging:
- The esc run command facilitates smooth testing and debugging processes by allowing developers to run test scripts and debugging commands in designated environments with the necessary configurations set automatically.
Conclusion
Pulumi ESC, and the esc run command in particular, is designed to make your cloud journey smoother, more secure, and less daunting. So, the next time you find yourself drowning in a sea of cloud configurations, remember, with Pulumi ESC and a dash of code, you can say goodbye to manual configuration hassles and hello to efficient, secure, and scalable cloud development with Pulumi ESC.
Want to learn more about Pulumi? Our Get Started with Pulumi hub is a great place to start.
If you’re looking for an automated (and faster) way to configure OIDC with Pulumi, we’ve got you covered! Check out our Examples repo where we offer a wide variety of automations using Pulumi Infrastructure as Code (IaC). For OIDC configuration in particular, we have example automation for:
Feel free to join our community on Slack and let us know what you think!