Next-level IaC: Bridging the Declarative Gap

Pulumi stands out in the world of infrastructure-as-code (IaC) for its flexibility and ease of use. This is due to its unique approach of using general purpose programming languages to describe system configuration. It accomplishes this through a small but brilliant implementation detail that bridges the worlds of declarative and standard programming using asynchronous semantics.
In Pulumi, you describe your infrastructure in code – real code, not a DSL or YAML – using your preferred general purpose programming language. You don’t have to become a specialist in a niche proprietary declarative language, like Terraform’s HCL. Rather, you can reuse your existing programming skills, writing in standard imperative, object-oriented, and even functional language styles, while still gaining all of the benefits of the declarative style that other tools emphasize.
Pulumi provides a unique mix of a declarative model embedded and implemented inside of a standard programming language, allowing all the flexibility of custom imperative code, while still enabling Pulumi’s deployment engine to infer opportunities for parallel asynchronous execution and to converge a partially-realized system.
The secret sauce that lets Pulumi achieve this is the apply function, and the way it handles inputs and outputs via asynchronous programming constructs, similar to futures or promises. We’ll go deeper on that in this article, but first let’s talk a little bit about the flow of operations in Pulumi.
Pulumi’s architecture and flow of operations
Pulumi is a system that is made up of a number of components. At a high level, those are:
- Pulumi Programs: The code you write to describe the infrastructure you need.
- Deployment Engine: A process that executes requests to create/modify infrastructure.
- Resource Providers: Plugins that interface with cloud services like AWS, Azure, and others.
These components interact together to manage your infrastructure across multiple cloud providers using a consistent programming and execution model.
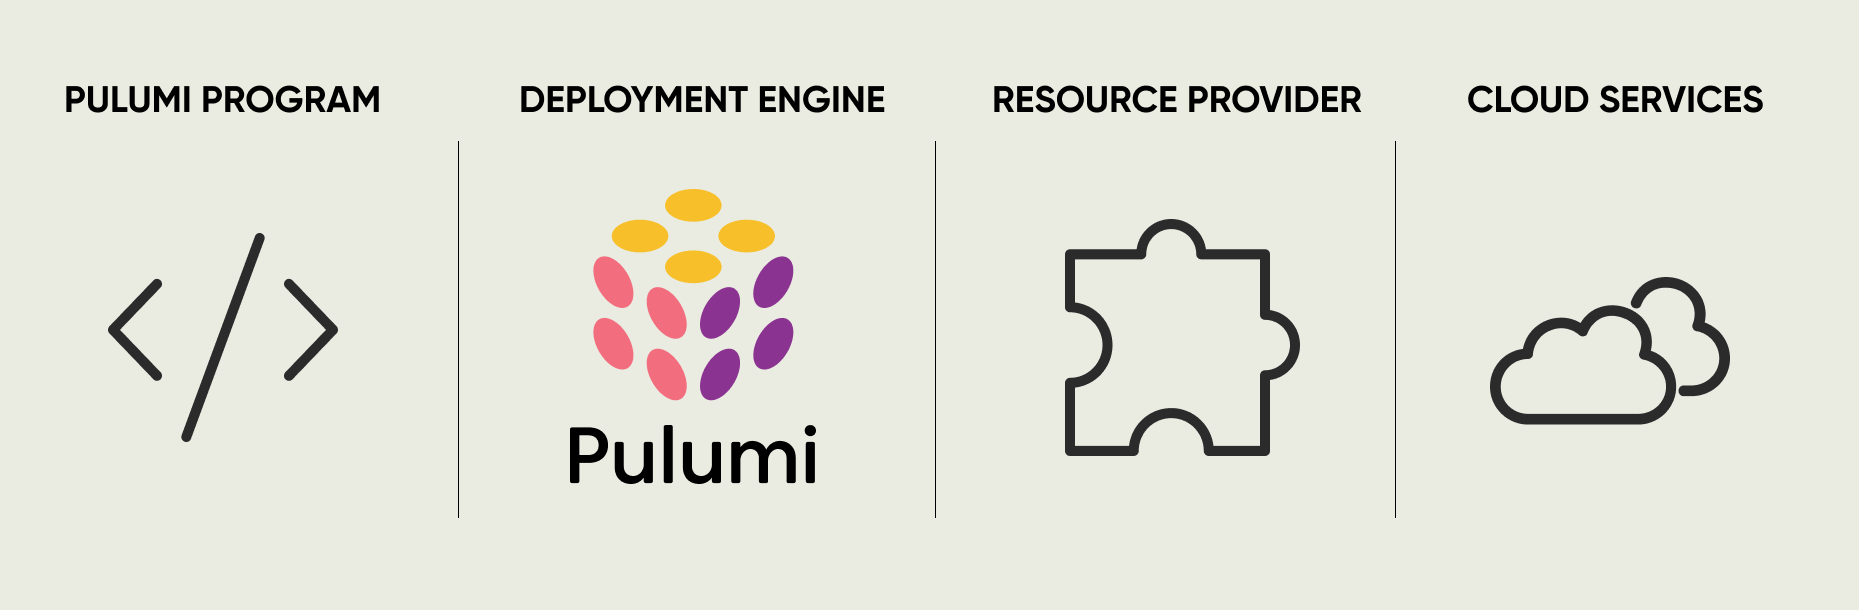
Figure: Pulumi’s Program, Deployment Engine, and Resource Provider architecture
Let’s get into an example of how information flows back and forth between these components. Suppose you want to write a Pulumi program to create an AWS S3 Bucket to host a static website. When that bucket is created, it will be given a unique identifier that you need to use in other parts of your infrastructure. Every time you create the bucket the identifier will change, and it’s generated by the AWS API, so we can’t know it ahead of time. We need to handle this as a variable, not a fixed configuration value.
To do that in a Pulumi program, you can create a bucket and then refer to its id property later, like this:
import * as pulumi from '@pulumi/pulumi';
import * as aws from '@pulumi/aws';

// Create an S3 bucket
const bucket = new aws.s3.Bucket("bucket");

// Export the name of the bucket
export const bucketName = bucket.id;
import pulumi
import pulumi_aws as aws

# Create an S3 bucket
bucket = aws.s3.Bucket('bucket')

# Export the name of the bucket
pulumi.export('bucket_name', bucket.id)
When this program runs, the call to create the bucket object will issue a request to the deployment engine. The deployment engine will load the resource provider for AWS, and ask it to create the S3 bucket. The AWS resource provider then issues the request to the AWS API, which will create the bucket and then return the id of the newly created resource. The provider will return that to the deployment engine, which will then set the realized value on your Pulumi program’s bucket.id property and then move on to creating anything that depends on that property.
This all seems pretty straight-forward, except that Pulumi programs don’t wait and imperatively do each operation, one at a time. Instead the deployment engine will run them in parallel, only waiting in cases where the output of one operation is needed to run the next operation. This can create complex structures with some operations needing to wait for inputs from other operations, and some that don’t, all finishing at different times, depending on how long the cloud service takes to process that request.
Inputs and Outputs as asynchronous futures
Infrastructure automation tasks can be long-running and can result in intermittent errors and may need to be retried before moving on to the next step. A robust IaC solution will need to run concurrently, be able to restart, retry, and resume itself, and understand that a set of tasks could happen in any order, not necessarily in the order you defined them in code.
Back in our Pulumi program code, that means that some of the time the bucket object from our earlier example has its id property set, and sometimes it doesn’t. We wouldn’t want to run any operation that needed that variable before it was set, but we also wouldn’t want to wait to start operations that don’t need that value.
To address this, Pulumi models the input and output values as futures. This allows you to describe a complex set of needs using a familiar value-like syntax. Instead of using a string result directly, which would only exist some of the time, you instead work with an Output<string>, that Pulumi understands as a reference to a value that currently doesn’t exist, but will exist when the operation completes. Similarly, Input<string> describes a dependency on an input string that will at some point be provided as the result of another operation.
This notion of future completion is essential to understanding why apply blocks are necessary within Pulumi programs. The apply function is called by the deployment engine only when the operation has completed and the fully realized value is available. By using Input<T> and Output<T> to build the connections between different parts of your infrastructure, the code is leveraging asynchronous value semantics not just to wrap and provide access to a future value, but also to describe a relationship between two components. This allows Pulumi programs to be very natural to author and as readable as traditional code, while also enabling Pulumi’s deployment engine to execute the entirety of your graph of operations in parallel, only waiting when necessary. This maximizes the efficiency of interacting with potentially slow and unreliable external cloud services.
Realizing values using the apply function
An important distinction though, is that Input<T>/Output<T> values are just declarative placeholders for the values that will eventually be present. At a certain point you will need to access the values directly, for example in the context of a transformation. The output of one operation might produce a string, which you need to transform into another data structure before passing to the next operation. Pulumi really shines in this context!
Using the apply function we can pass an Input<T> or Output<T> to a transformation function which will accept the realized value as its input (and only run when that value is available). Within that function you can handle the string as a normal string, then return it back as an Output<string>. This allows you to use the full power of your programming language to perform a custom operation inline with the rest of your infrastructure automation.
Here’s a simple example of using apply to transform an output to something new using your programming language’s libraries. In this case, Base64 encoding the id of our bucket object.
Example: Using apply to Base64 encode an Output
import * as pulumi from '@pulumi/pulumi';
import * as aws from '@pulumi/aws';

// Create an S3 bucket
const bucket = new aws.s3.Bucket("bucket");

// Export the name of the bucket
export const bucketName = bucket.id;

// Export the name of the bucket, in Base64 encoding
export const bucketNameBase64 = bucket.id.apply(id=> {
    // Transform the bucket name into a Base64 encoded string
    Buffer.from(id).toString('base64')
})
import base64
import pulumi
import pulumi_aws as aws

# Create an S3 bucket
bucket = aws.s3.Bucket('bucket')

# Export the name of the bucket
pulumi.export('bucket_name', bucket.id)

# A Base64 encoder function to use in the apply function's lambda
def base64_encode(data):
    data_bytes = data.encode("ascii")
    base64_bytes = base64.b64encode(data_bytes)
    base64_string = base64_bytes.decode("ascii")

# Export the name of the bucket, in Base64 encoding
pulumi.export('bucket_name', bucket.id.apply(lambda data: base64_encode))
Our example shows how to do Base64 encoding, but this technique can be used for any kind of transformation function. These can be as elaborate as your use case requires, and leverage the full power of your programming language and its entire ecosystem. Doing custom transformations like this in other popular tools is often not possible. This leaves you stuck using external coordination (e.g. gluing things together with Bash scripts) which breaks their declarative-only model (because you cannot describe everything you need to do in it) and interrupts these tools’ ability to fully understand your infrastructure’s dependency graph.
While Pulumi’s asynchronous semantics may seem somewhat complex for basic use cases, they unlock abilities in more complex use cases, which is when you really need your IaC tooling to show up for you. Because real life is never as simple as demo code.
Next steps
If you haven’t already, install Pulumi today, and follow our self-directed Getting Started guides to learn more about making the most of Pulumi’s next-level infrastructure management features at your organization.
To learn more, you can watch the following video which provides a high level overview of how Pulumi works:
Pulumi Cloud
The Pulumi Cloud is a fully managed service that helps you adopt Pulumi’s open source SDK with ease. It provides built-in state and secrets management, integrates with source control and CI/CD, and offers a web console and API that make it easier to visualize and manage infrastructure. It is free for individual use, with features available for teams.