
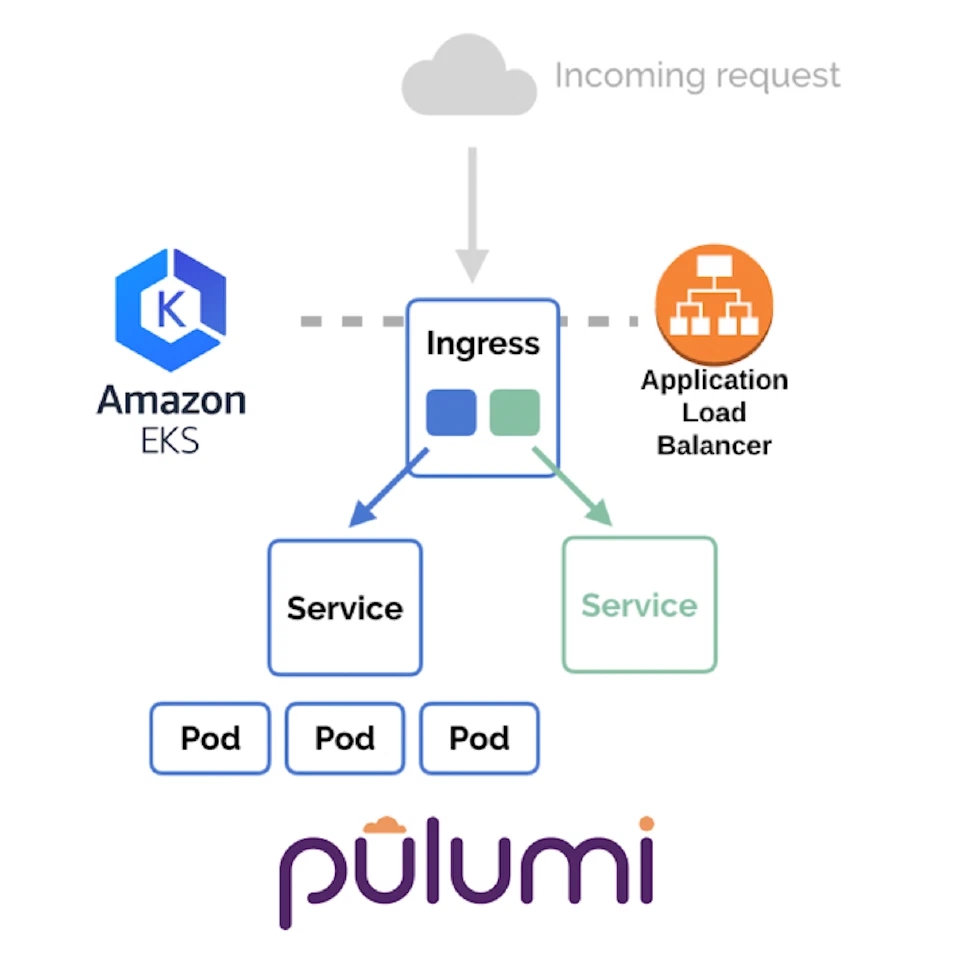
Kubernetes Ingress is an API object that allows you manage external (or) internal HTTP[s] access to Kubernetes services running in a cluster. Amazon Elastic Load Balancing Application Load Balancer (ALB) is a popular AWS service that load balances incoming traffic at the application layer across multiple targets, such as Amazon EC2 instances, in a region. ALB supports multiple features including host or path based routing, TLS (Transport layer security) termination, WebSockets, HTTP/2, AWS WAF (web application firewall) integration, integrated access logs, and health checks.
The AWS ALB Ingress controller is a Kubernetes SIG-AWS subproject - it was the second sub-project added to SIG-AWS after the aws-authenticator subproject. The ALB Ingress controller triggers the creation of an ALB and the necessary supporting AWS resources whenever a Kubernetes user declares an Ingress resource on the cluster. TargetGroups are created for each backend specified in the Ingress resource. Listeners are created for every port specified as Ingress resource annotation. When no port is specified, sensible defaults (80 or 443) are used. Rules are created for each path specified in your ingress resource. This ensures that traffic to a specific path is routed to the correct TargetGroup.
In this post, we will work through a simple example of running ALB based Kubernetes Ingresses with Pulumi EKS, AWS, and AWSX packages.
Step 1: Initialize Pulumi project and stack
Install pulumi CLI
and set up your AWS credentials.
Initialize a new Pulumi project
and Pulumi stack from
available programming language
templates. We will use the
aws-typescript template here and install all library
dependencies.
$ brew install pulumi/tap/pulumi # download pulumi CLI
$ mkdir eks-alb-ingress && cd eks-alb-ingress
$ pulumi new aws-typescript
$ npm install --save @pulumi/kubernetes @pulumi/eks
$ ls -la
drwxr-xr-x   10 nishidavidson  staff    320 Jun 18 18:22 .
drwxr-xr-x+ 102 nishidavidson  staff   3264 Jun 18 18:13 ..
-rw-------    1 nishidavidson  staff     21 Jun 18 18:22 .gitignore
-rw-r--r--    1 nishidavidson  staff     32 Jun 18 18:22 Pulumi.dev.yaml
-rw-------    1 nishidavidson  staff     91 Jun 18 18:22 Pulumi.yaml
-rw-------    1 nishidavidson  staff    273 Jun 18 18:22 index.ts
drwxr-xr-x   95 nishidavidson  staff   3040 Jun 18 18:22 node_modules
-rw-r--r--    1 nishidavidson  staff  50650 Jun 18 18:22 package-lock.json
-rw-------    1 nishidavidson  staff    228 Jun 18 18:22 package.json
-rw-------    1 nishidavidson  staff    522 Jun 18 18:22 tsconfig.json
Step 2: Create an EKS cluster
Once the steps above are complete, we update the typescript code in
index.ts file to create an EKS cluster and run pulumi
up from the command line:
import * as awsx from "@pulumi/awsx";
import * as eks from "@pulumi/eks";
import * as k8s from "@pulumi/kubernetes";

const vpc = new awsx.ec2.Vpc("vpc-alb-ingress-eks", {});
const cluster = new eks.Cluster("eks-cluster", {
  vpcId: vpc.id,
  subnetIds: vpc.publicSubnetIds,
  instanceType: "t2.medium",
  version: "1.12",
  nodeRootVolumeSize: 200,
  desiredCapacity: 3,
  maxSize: 4,
  minSize: 3,
  deployDashboard: false,
  vpcCniOptions: {
    warmIpTarget: 4
  }
});

export const clusterName = cluster.eksCluster.name;
export const kubeconfig = cluster.kubeconfig;
export const clusterNodeInstanceRoleName = cluster.instanceRoles.apply(
  roles => roles[0].name
);
export const nodesubnetId = cluster.core.subnetIds;
Configure the Public subnets in the console as defined in this guide.
Step 3: Deploy AWS ALB Ingress Controller
Lets confirm that the EKS cluster is up using the following commands:
$ pulumi stack export kubeconfig > kubeconfig.yaml
$ export KUBECONFIG=kubeconfig.yaml
$ kubectl get nodes
NAME                          STATUS   ROLES    AGE    VERSION
ip-10-10-0-58.ec2.internal    Ready    <none>   7h8m   v1.12.7
ip-10-10-1-167.ec2.internal   Ready    <none>   7h8m   v1.12.7
ip-10-10-1-84.ec2.internal    Ready    <none>   7h8m   v1.12.7
Adequate roles and policies must be configured in AWS and available to the node(s) running the controller. How access is granted is up to you. Some will attach the needed rights to node’s role in AWS. Others will use projects like kube2iam. We attach a minimal IAM policy to the EKS worker nodes and then declare this on the EKS cluster as shown in the code below.
When declaring the ALB Ingress controller we simply re-use the Helm chart as part of the code. There is no need to rewrite all the logic or install Tiller in the EKS cluster. This frees you from thinking about RBAC for Helm, Tiller and the k8s cluster per se'.
With the default “instance mode” Ingress traffic starts from the ALB and
reaches the
NodePort
opened for the service. Traffic is then routed to the container Pods
within cluster. This is all encoded using Pulumi libraries below. If you
wish to use “ip-mode” with your Ingress such that traffic directly
reaches your pods, you will need to modify the
alb.ingress.kubernetes.io/target-type annotation when using the helm
chart.
Append index.ts file from Step 2 with the code below and run
pulumi up:
// STEP 3: Declare the AWS ALB Ingress Controller

// Create IAM Policy for the IngressController called "ingressController-iam-policy” and read the policy ARN.
const ingressControllerPolicy = new aws.iam.Policy(
  "ingressController-iam-policy",
  {
    policy: {
      Version: "2012-10-17",
      Statement: [
        {
          Effect: "Allow",
          Action: [
            "acm:DescribeCertificate",
            "acm:ListCertificates",
            "acm:GetCertificate"
          ],
          Resource: "*"
        },
        {
          Effect: "Allow",
          Action: [
            "ec2:AuthorizeSecurityGroupIngress",
            "ec2:CreateSecurityGroup",
            "ec2:CreateTags",
            "ec2:DeleteTags",
            "ec2:DeleteSecurityGroup",
            "ec2:DescribeInstances",
            "ec2:DescribeInstanceStatus",
            "ec2:DescribeSecurityGroups",
            "ec2:DescribeSubnets",
            "ec2:DescribeTags",
            "ec2:DescribeVpcs",
            "ec2:ModifyInstanceAttribute",
            "ec2:ModifyNetworkInterfaceAttribute",
            "ec2:RevokeSecurityGroupIngress"
          ],
          Resource: "*"
        },
        {
          Effect: "Allow",
          Action: [
            "elasticloadbalancing:AddTags",
            "elasticloadbalancing:CreateListener",
            "elasticloadbalancing:CreateLoadBalancer",
            "elasticloadbalancing:CreateRule",
            "elasticloadbalancing:CreateTargetGroup",
            "elasticloadbalancing:DeleteListener",
            "elasticloadbalancing:DeleteLoadBalancer",
            "elasticloadbalancing:DeleteRule",
            "elasticloadbalancing:DeleteTargetGroup",
            "elasticloadbalancing:DeregisterTargets",
            "elasticloadbalancing:DescribeListeners",
            "elasticloadbalancing:DescribeLoadBalancers",
            "elasticloadbalancing:DescribeLoadBalancerAttributes",
            "elasticloadbalancing:DescribeRules",
            "elasticloadbalancing:DescribeSSLPolicies",
            "elasticloadbalancing:DescribeTags",
            "elasticloadbalancing:DescribeTargetGroups",
            "elasticloadbalancing:DescribeTargetGroupAttributes",
            "elasticloadbalancing:DescribeTargetHealth",
            "elasticloadbalancing:ModifyListener",
            "elasticloadbalancing:ModifyLoadBalancerAttributes",
            "elasticloadbalancing:ModifyRule",
            "elasticloadbalancing:ModifyTargetGroup",
            "elasticloadbalancing:ModifyTargetGroupAttributes",
            "elasticloadbalancing:RegisterTargets",
            "elasticloadbalancing:RemoveTags",
            "elasticloadbalancing:SetIpAddressType",
            "elasticloadbalancing:SetSecurityGroups",
            "elasticloadbalancing:SetSubnets",
            "elasticloadbalancing:SetWebACL"
          ],
          Resource: "*"
        },
        {
          Effect: "Allow",
          Action: ["iam:GetServerCertificate", "iam:ListServerCertificates"],
          Resource: "*"
        },
        {
          Effect: "Allow",
          Action: [
            "waf-regional:GetWebACLForResource",
            "waf-regional:GetWebACL",
            "waf-regional:AssociateWebACL",
            "waf-regional:DisassociateWebACL"
          ],
          Resource: "*"
        },
        {
          Effect: "Allow",
          Action: ["tag:GetResources", "tag:TagResources"],
          Resource: "*"
        },
        {
          Effect: "Allow",
          Action: ["waf:GetWebACL"],
          Resource: "*"
        }
      ]
    }
  }
);

// Attach this policy to the NodeInstanceRole of the worker nodes.
export const nodeinstanceRole = new aws.iam.RolePolicyAttachment(
  "eks-NodeInstanceRole-policy-attach",
  {
    policyArn: ingressControllerPolicy.arn,
    role: clusterNodeInstanceRoleName
  }
);

// Declare the ALBIngressController in 1 step with the Helm Chart.
const albingresscntlr = new k8s.helm.v2.Chart(
  "alb",
  {
    chart:
      "http://storage.googleapis.com/kubernetes-charts-incubator/aws-alb-ingress-controller-0.1.9.tgz",
    values: {
      clusterName: clusterName,
      autoDiscoverAwsRegion: "true",
      autoDiscoverAwsVpcID: "true"
    }
  },
  { provider: cluster.provider }
);
Confirm the alb-ingress-controller was created as follows:
$ kubectl get pods -n default | grep alb
alb-aws-alb-ingress-controller-58f44d4bb8lxs6w

$ kubectl logs alb-ingress-controller-58f44d4bb8lxs6w
-------------------------------------------------------------------------------
AWS ALB Ingress controller
  Release:    v1.1.2
  Build:      git-cc1c5971
  Repository: https://github.com/kubernetes-sigs/aws-alb-ingress-controller.git
-------------------------------------------------------------------------------
Make sure the ingress-controller logs do not show errors about missing subnet tags or missing cluster name before proceeding to Step 4.
Step 4: Deploy Sample Application
The Ingress controller should now be running on the EKS worker nodes.
Let’s now create a sample “2048-game” and expose it as an Ingress on
our EKS cluster. The code below will let you do so. Append this piece of
code into index.ts file from Step 3 and run pulumi up:
function createNewNamespace(name: string): k8s.core.v1.Namespace {
  //Create new namespace
  return new k8s.core.v1.Namespace(
    name,
    { metadata: { name: name } },
    { provider: cluster.provider }
  );
}

// Define the 2048 namespace, deployment, and service.
const nsgame = createNewNamespace("2048-game");

const deploymentgame = new k8s.extensions.v1beta1.Deployment(
  "deployment-game",
  {
    metadata: { name: "deployment-game", namespace: "2048-game" },
    spec: {
      replicas: 5,
      template: {
        metadata: { labels: { app: "2048" } },
        spec: {
          containers: [
            {
              image: "alexwhen/docker-2048",
              imagePullPolicy: "Always",
              name: "2048",
              ports: [{ containerPort: 80 }]
            }
          ]
        }
      }
    }
  },
  { provider: cluster.provider }
);

const servicegame = new k8s.core.v1.Service(
  "service-game",
  {
    metadata: { name: "service-2048", namespace: "2048-game" },
    spec: {
      ports: [{ port: 80, targetPort: 80, protocol: "TCP" }],
      type: "NodePort",
      selector: { app: "2048" }
    }
  },
  { provider: cluster.provider }
);

//declare 2048 ingress
const ingressgame = new k8s.extensions.v1beta1.Ingress(
  "ingress-game",
  {
    metadata: {
      name: "2048-ingress",
      namespace: "2048-game",
      annotations: {
        "kubernetes.io/ingress.class": "alb",
        "alb.ingress.kubernetes.io/scheme": "internet-facing"
      },
      labels: { app: "2048-ingress" }
    },
    spec: {
      rules: [
        {
          http: {
            paths: [
              {
                path: "/*",
                backend: { serviceName: "service-2048", servicePort: 80 }
              }
            ]
          }
        }
      ]
    }
  },
  { provider: cluster.provider }
);
After few seconds, verify the Ingress resource as follows:
$ kubectl get ingress/2048-ingress -n 2048-game
NAME         HOSTS         ADDRESS         PORTS   AGE
2048-ingress   *    DNS-Name-Of-Your-ALB    80     3m
Open a browser. Copy and paste your “DNS-Name-Of-Your-ALB”. You should be to access your newly deployed 2048 game – have fun!
Pulumi is open source and free to use. For more information on our product platform, check out the following resources:


