Code, Deploy, and Manage a Serverless REST API on AWS with Pulumi

Pulumi makes it easy to build serverless applications and connect to other cloud resources. In this blog post, we’ll create a simple REST API that counts the number of times a route has been hit, using JavaScript to define both the infrastructure and application code.
In Pulumi, you define your application infrastructure in regular code, using JavaScript, Python or Go, and you can target AWS, Azure, Google Cloud, or Kubernetes. The Pulumi command line tool transforms your into a declarative plan, following the best practices of immutable infrastructure. You can write your app code in any language supported by your serverless platform.
Example app: serverless route counter
In this tutorial, we’ll build a simple REST API that counts the number of times a route has been hit. For example:
$ curl $URL/wow
{"route":"wow","count":1}

$ curl $URL/pulumi
{"route":"pulumi","count":1}

$ curl $URL/wow
{"route":"wow","count":2}
We’ll implement this using API Gateway, Lambda, and Dynamo DB:

Setup
If this is your first time using Pulumi, go to app.pulumi.com and sign in with GitHub.
Then, run the following command to install the Pulumi CLI:
$ curl -fsSL https://get.pulumi.com/ | sh
If you’re on Windows, run this:
@"%SystemRoot%System32WindowsPowerShell1.0powershell.exe" -NoProfile -InputFormat None -ExecutionPolicy Bypass -Command "iex ((New-Object System.Net.WebClient).DownloadString('https://get.pulumi.com/install.ps1'))"
SET "PATH=%PATH%;%USERPROFILE%.pulumiin"
You’ll deploy this app to your own AWS account, so follow the steps to configure your AWS account.
Make sure you have Node.js installed, with a version of 6.10.x or later.
Create the App
First we’ll create a Pulumi project and add code for both the infrastructure definitions and application code.
To create a new Pulumi project, run the following commands:
mkdir hello-http && cd hello-http
pulumi new aws-javascript
This creates a new project in the directory
hello-http.Replace the contents of
index.jswith the following:const cloud = require("@pulumi/cloud-aws"); /* Create a mapping from 'route' to a count */ let counterTable = new cloud.Table("counterTable", "route"); /* Create an REST API endpoint */ let endpoint = new cloud.API("hello-world"); endpoint.get("/{route+}", (req, res) => { let route = req.params["route"]; console.log(`Getting count for '${route}'`); /* get previous value and increment */ /* reference outer counterTable object */ counterTable.get({ route }).then(value => { let count = (value && value.count) || 0; counterTable.insert({ route, count: ++count }).then(() => { res.status(200).json({ route, count }); console.log(`Got count ${count} for '${route}'`); }); }); }); exports.endpoint = endpoint.publish().url;The definition for
counterTablestores a counter for each route, usingcloud.Table. On AWS, this provisions a DynamoDB instance. To create a new API Gateway instance, we create an instance ofcloud.API. New routes can be added to this endpoint using functions such asget,post,putetc.The function passed to
getis the interesting part: this becomes the body of a new AWS Lambda function that is called on a GET request to the API Gateway. The body of this function can use variables defined in the main program, such ascounterTable. This is translated to a lookup on the provisioned DynamoDB instance; there is no need to store the table name in an environment variable.Finally, add
@pulumi/cloud-awsNPM package:$ npm install --save @pulumi/cloud @pulumi/cloud-aws
Deploy the App
To deploy both the infrastructure and app code, we’ll run
pulumi update. This command first shows a preview of all the resources
that will be created and prompts for confirmation.
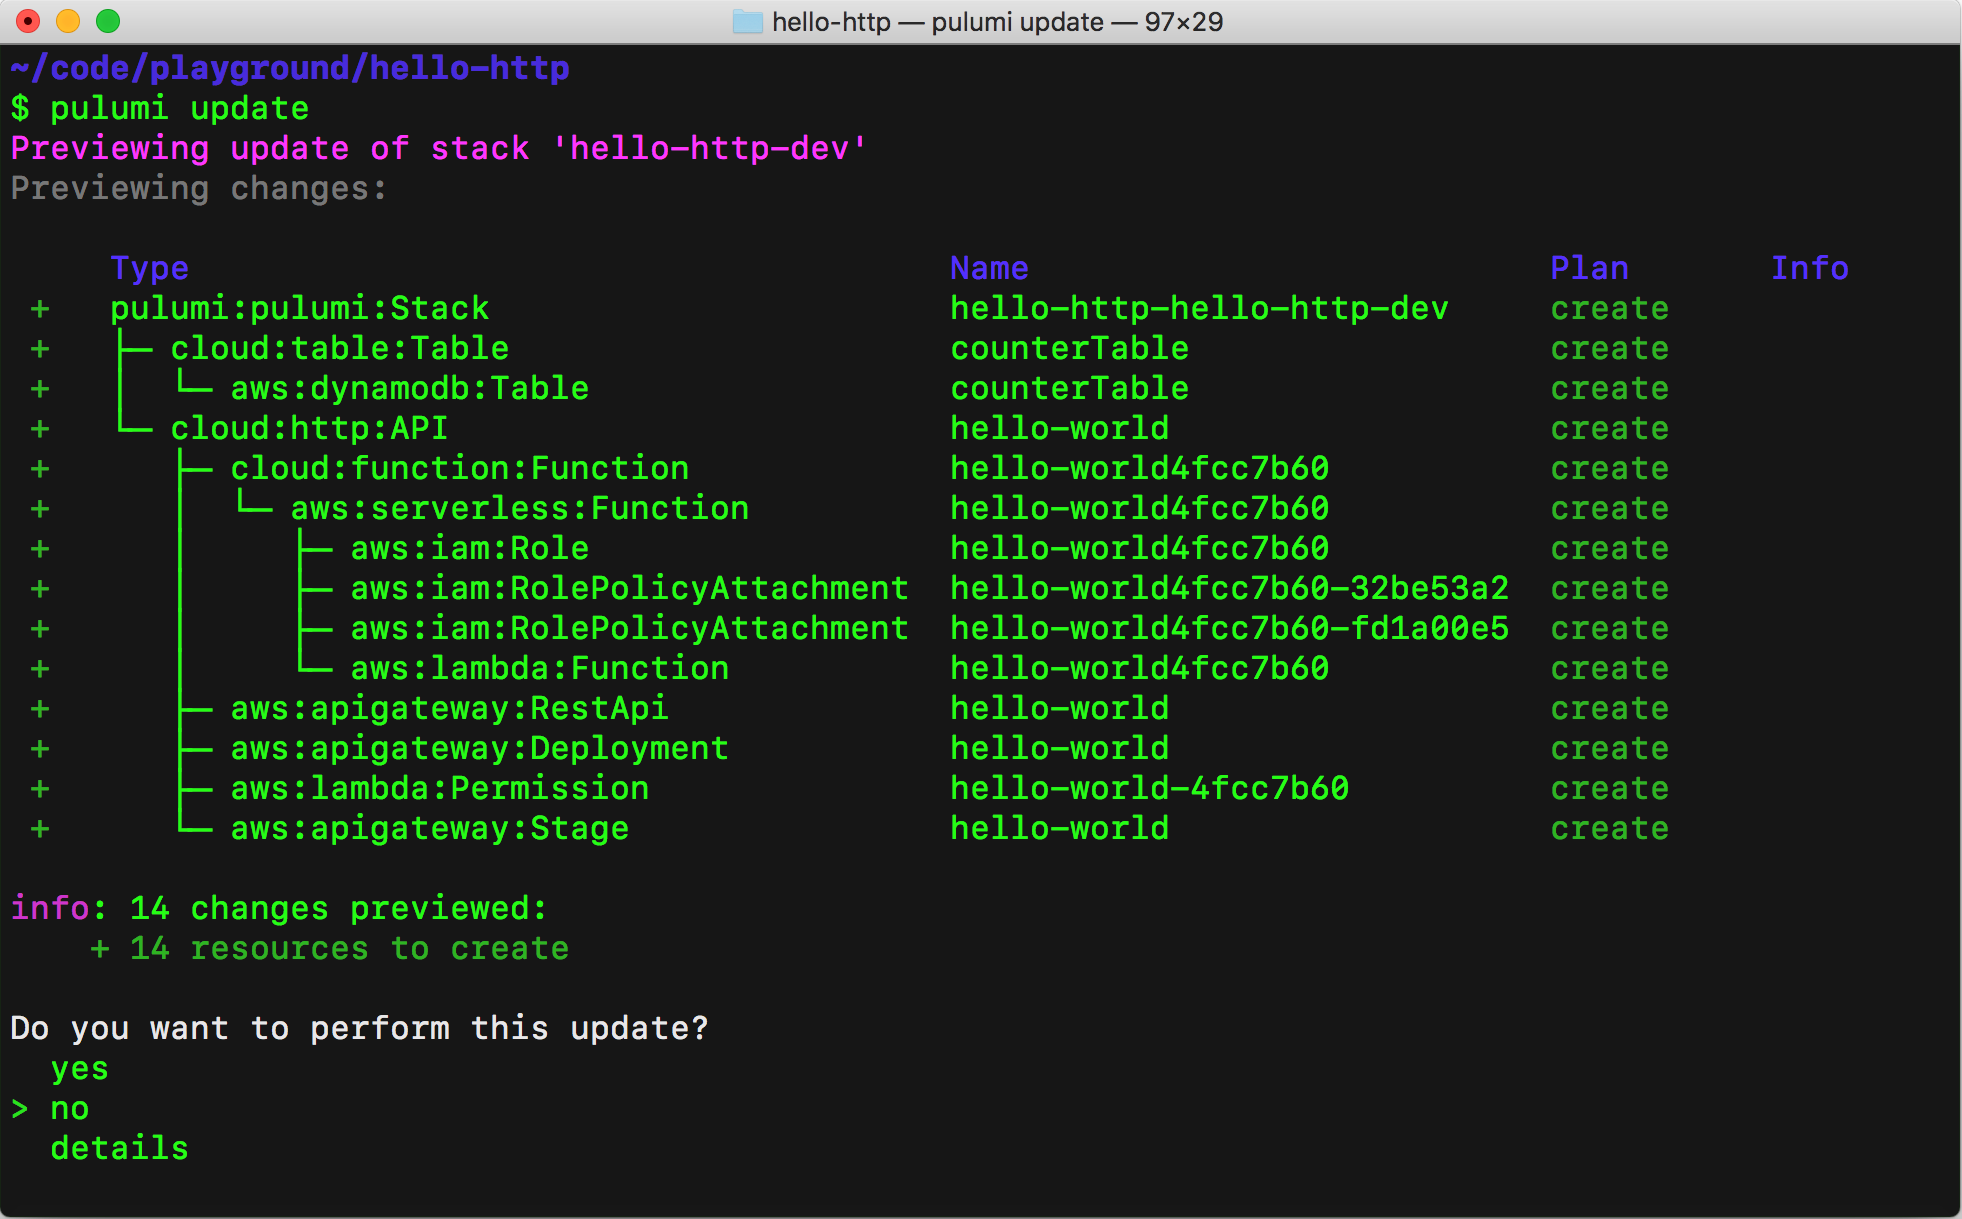
Choose the “yes” option to deploy to AWS. At the end of the update, you’ll see a link to the Pulumi Service that shows the details of the deployment.

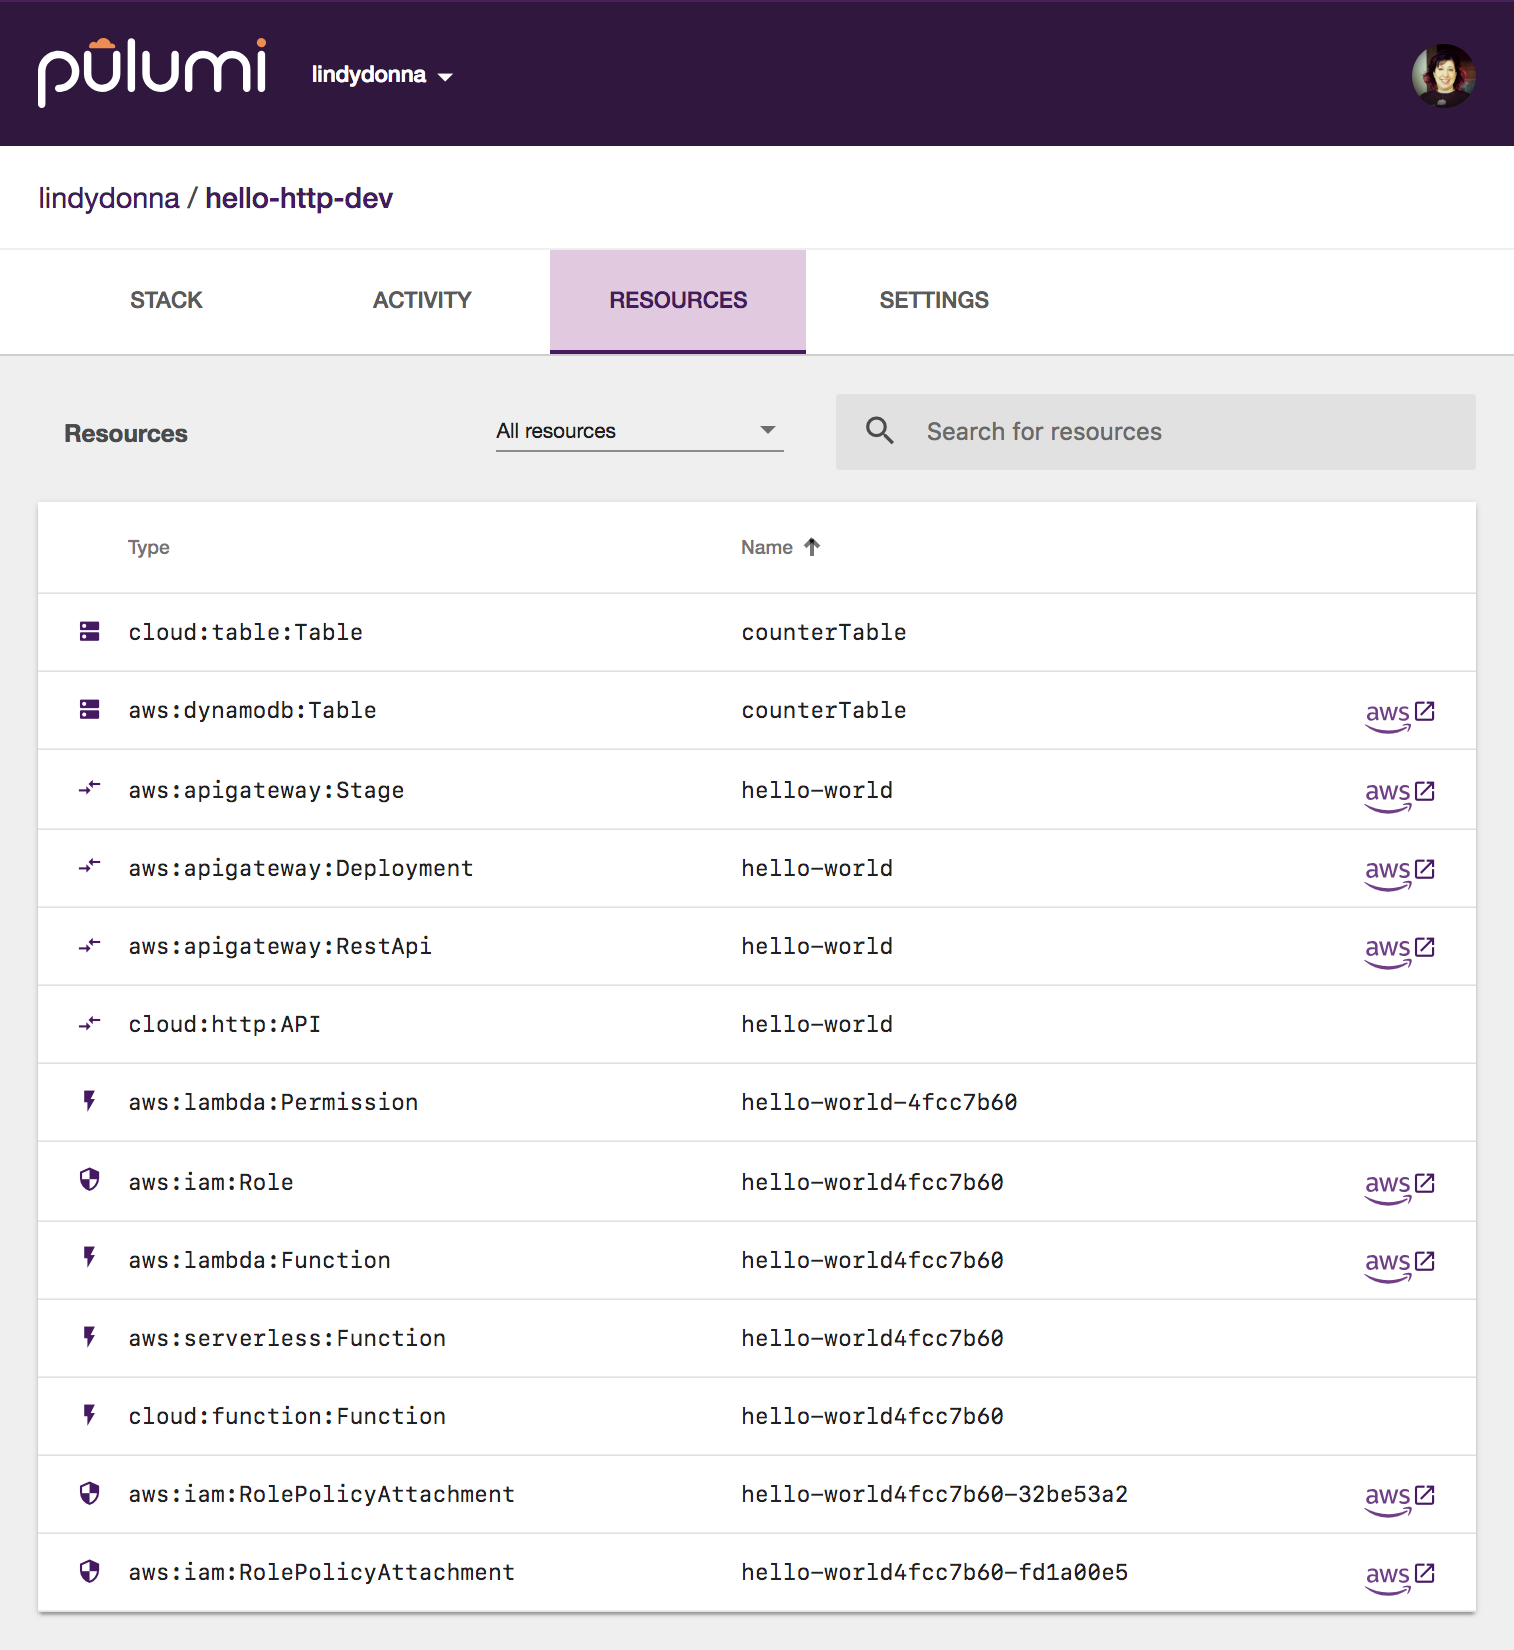
Go to this link and click the Resources tab. You’ll see all the resources you’ve created, including links to the AWS Console.
Test the App
Now that the app is deployed, let’s try it out! With the Pulumi CLI, you can easily view output properties for your stack. This line in the JavaScript code creates a stack output.
exports.endpoint = endpoint.publish().url;
You can view stack outputs in the Pulumi Service, or via
pulumi stack output:
$ pulumi stack output
Current stack outputs (1):
OUTPUT    VALUE
endpoint  https://5e8xrktey3.execute-api.us-west-2.amazonaws.com/stage/
Now, let’s curl some routes!
$ curl $(pulumi stack output endpoint)/wow
{"route":"wow","count":1}

$ curl $(pulumi stack output endpoint)/pulumi
{"route":"pulumi","count":1}

$ curl $(pulumi stack output endpoint)/wow
{"route":"wow","count":2}
You can also view logs for the Lambda via pulumi logs. To get a log
tail, use the --follow or -f flag:
$ pulumi logs
Collecting logs for stack hello-http-dev since 2018-06-15T12:53:35.000-07:00.

 2018-06-15T13:52:30.123-07:00[           hello-world4fcc7b60] Getting count for 'wow'
 2018-06-15T13:52:34.361-07:00[           hello-world4fcc7b60] Got count 1 for 'wow'
 2018-06-15T13:52:39.621-07:00[           hello-world4fcc7b60] Getting count for 'pulumi'
 2018-06-15T13:52:39.757-07:00[           hello-world4fcc7b60] Got count 1 for 'pulumi'
 2018-06-15T13:52:42.189-07:00[           hello-world4fcc7b60] Getting count for 'wow'
 2018-06-15T13:52:42.325-07:00[           hello-world4fcc7b60] Got count 2 for 'wow'
Clean up
To clean up the resources, run pulumi destroy.
Next steps
The sample code for this application is available in the Pulumi examples repo on GitHub. For an end-to-end TypeScript application with a frontend, see the URL shortener sample.