
Stop writing Kubernetes YAML by hand, and start using the power of familiar programming languages! Pulumi can generate Kubernetes manifests that easily integrate into existing CI/CD workflows.
While Pulumi has excellent support for deploying and updating
Kubernetes resources on a cluster, many users have asked for the option to render YAML that they can integrate into
existing workflows. The v1.5.4 release of
pulumi-kubernetes adds the renderYamlToDirectory
option, which enables this feature. This option is available in every Pulumi-supported language, including
TypeScript/JavaScript, Python, and .NET (Go support is coming soon!).
Aside from easily templating configuration across resources, using a familiar programming language allows you to write and consume libraries, and easily mix in infrastructure configuration (e.g., managed database endpoints, object storage, etc.), all in the same program.
Rendering YAML from TypeScript
First, choose a directory for the rendered manifests, and specify that path on a Provider.
import * as k8s from "@pulumi/kubernetes";
import * as kx from "@pulumi/kubernetesx";

// Instantiate a Kubernetes Provider and specify the render directory.
const provider = new k8s.Provider("render-yaml", {
    renderYamlToDirectory: "rendered",
});
Next, use that Provider for any Kubernetes resources you want to render as YAML.
// Create a Kubernetes PersistentVolumeClaim.
const pvc = new kx.PersistentVolumeClaim("data", {
    spec: {
        accessModes: [ "ReadWriteOnce" ],
        resources: { requests: { storage: "1Gi" } },
    }
}, { provider });

// Create a Kubernetes ConfigMap.
const cm = new kx.ConfigMap("cm", {
    data: { "config": "very important data" },
}, { provider });

// Create a Kubernetes Secret.
const secret = new kx.Secret("secret", {
    stringData: {
        "password": new random.RandomPassword("pw", {
            length: 12}).result,
    }
}, { provider });

// Define a Pod.
const pb = new kx.PodBuilder({
    containers: [{
        env: {
            CONFIG: cm.asEnvValue("config"),
            PASSWORD: secret.asEnvValue("password"),
        },
        image: "nginx",
        ports: {http: 8080},
        volumeMounts: [ pvc.mount("/data") ],
    }]
});

// Create a Kubernetes Deployment.
const deployment = new kx.Deployment("nginx", {
    spec: pb.asDeploymentSpec( { replicas: 3 } ),
}, { provider });

// Create a Kubernetes Service.
const service = deployment.createService({
    type: kx.types.ServiceType.LoadBalancer,
});
Now, run pulumi update, and Pulumi renders these resources to YAML. The update process resolves Outputs
as usual, so that the manifests can include other infrastructure configuration specified in your program. The rendered
manifests are kept in sync with changes to the program on each update.
Here’s what the resulting directory looks like:
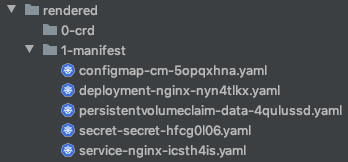
Note that CustomResourceDefinition resources need to be applied first, so they are rendered in a separate
subdirectory. (This example doesn’t include any CRDs, so the directory is empty). You could deploy the rendered
manifests with kubectl like this:
kubectl apply -f "${RENDER_DIRECTORY}/0-crd"
kubectl apply -f "${RENDER_DIRECTORY}/1-manifest"
Voilà! From 33 (44 with whitespace and comments) lines of TypeScript code to 102 lines of YAML!
Here’s the rendered Deployment resource.
See this gist for the complete rendered output.
Caveats
There are two important caveats to note about YAML rendering support:
- The YAML-rendered resources are not created on a Kubernetes cluster, so information that is computed server-side
will not be available in your program. For example, a
Servicewill not have IP assignments, so attempting to export these values will not work as usual (i.e., the value will beundefined). - Any Secret values will appear in plaintext in the rendered manifests. This includes any values marked as secret in Pulumi. A warning will be printed for any secret values being rendered to YAML, but it is your responsibility to protect the rendered files.
Learn More
If you’d like to learn about Pulumi and how to manage your infrastructure and Kubernetes through code, get started today. Pulumi is open source and free to use.
For further examples on how to use Pulumi to create Kubernetes clusters, or deploy workloads to a cluster, check out the rest of the Kubernetes tutorials.
As always, you can check out our code on GitHub, follow us on Twitter, subscribe to our YouTube channel, or join our Community Slack channel if you have any questions, need support, or just want to say hello.


