
Redis Enterprise Cloud makes apps faster by providing an in-memory database that enables teams to create a real-time data platform. In this post, you’ll learn how to enable connectivity between Redis Enterprise Cloud and your workloads using Pulumi and the Redis Cloud provider.
About Redis Enterprise Cloud
Redis Enterprise Cloud is a fully managed database as-a-service (DBaaS) provider that offers managed Redis clusters. Redis Enterprise Cloud clusters can be accessed via network peering in AWS or Google Cloud, or over the internet. The Redis Cloud provider allows you to manage Redis Enterprise Cloud resources in Pulumi programs.
Some of Redis Enterprise Cloud’s key features include:
- Automated failover, backups, and scaling.
- Linear scaling based on a serverless architecture, with an optimized engine that provides higher throughput and lower latencies compared to solutions based on Redis’ open-source version.
- A subscription-based pricing pricing model based on consumption (as opposed to being billed hourly on provisioned hardware).
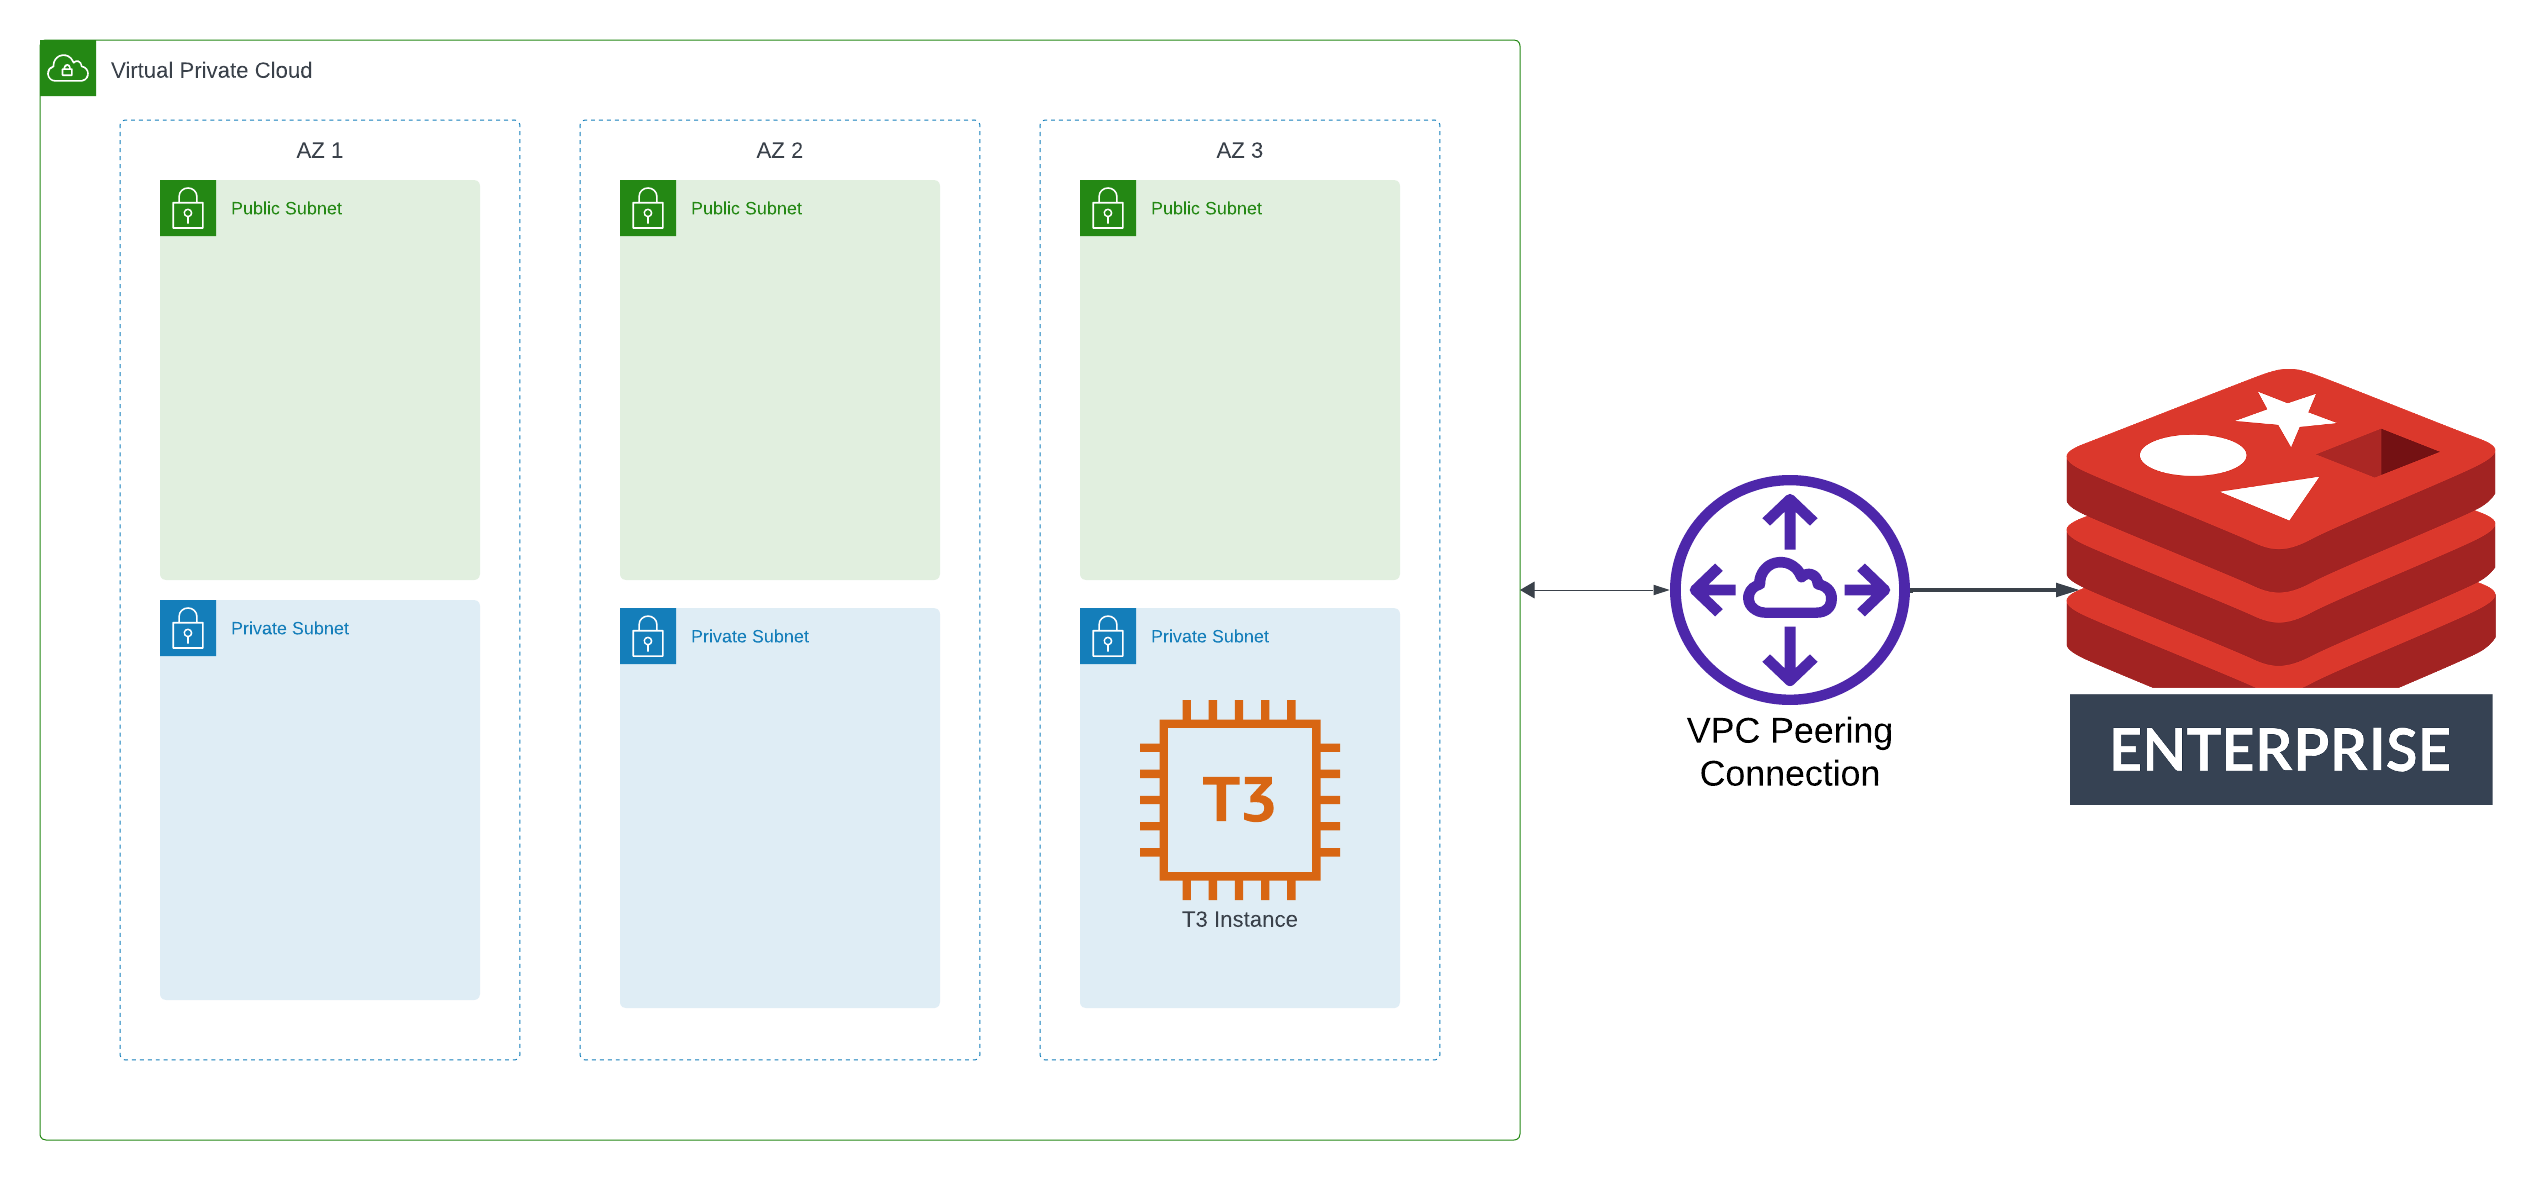
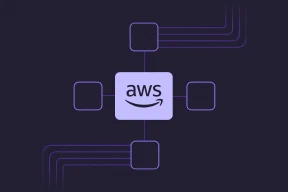
Architecture
One of the most common scenarios for using Redis Enterprise Cloud is to run a workload in a hyperscaler (like AWS or Google Cloud), and then to establish a low-latency connection between your workload and your managed Redis cluster via network peering. In this post, you’ll create an architecture for a sample AWS workload. The architecture you’ll build will include:
- A Redis Enterprise Cloud database cluster.
- An AWS VPC across 3 Availability Zones, with public and private subnets.
- VPC Peering to enable connectivity between the Redis cluster and the VPC.
You’ll also prove the architecture works by spinning up an EC2 instance and running simple commands that target the Redis cluster.
The following diagram shows the major components of the architecture:
Project Initialization and Redis Enterprise Cloud Resources
To begin, initialize your Pulumi program in an empty directory:
pulumi new typescript
Then, add a reference to the Redis Cloud provider:
npm i @rediscloud/pulumi-rediscloud
Then, in your index.ts file, add use the getPaymentMethodOutput function to obtain your payment information, and use the resulting card ID to create a Redis Subscription:
Please note the following:
- The Redis Cloud provider does not support Fixed subscriptions. You’ll need to create a Flexible subscription in order to use the provider to manage resources with Pulumi.
- The snippet below uses hard-coded values for things like payment info or CIDR blocks for simplicity. In a multi-stack Pulumi program, these should be refactored to configurable values.
import * as pulumi from "@pulumi/pulumi";
import * as rediscloud from "@rediscloud/pulumi-rediscloud";

const card = rediscloud.getPaymentMethodOutput({
  cardType: "<YOUR-CARD-TYPE>" // e.g. "Visa" (capitalization matters here),
  lastFourNumbers: "1234",
});

const subscription = new rediscloud.Subscription("redis-subscription", {
  name: "pulumi-redis-aws-example",
  paymentMethod: "credit-card",
  paymentMethodId: card.id,
  cloudProvider: {
    regions: [
      {
        region: "us-east-1",
        // This CIDR block must not conflict with the CIDR block of the AWS
        // VPC to which you wish to connect:
        networkingDeploymentCidr: "10.0.0.0/24",
        // We use a single AZ here to minimize the cost incurred from running
        // this example. For a production workload, consider multiple availability
        // zones:
        multipleAvailabilityZones: false,
        preferredAvailabilityZones: ["use1-az1"],
      },
    ],
  },

  creationPlan: {
    memoryLimitInGb: 10,
    quantity: 1,
    replication: true,
    supportOssClusterApi: false,
    throughputMeasurementBy: "operations-per-second",
    throughputMeasurementValue: 20000,
    modules: ["RedisJSON"],
  },
});
Then, create a database in your subscription:
const database = new rediscloud.SubscriptionDatabase("redis-db", {
  name: "my-db",
  subscriptionId: subscription.id,
  protocol: "redis",
  memoryLimitInGb: 10,
  dataPersistence: "aof-every-1-second",
  throughputMeasurementBy: "operations-per-second",
  throughputMeasurementValue: 20000,
  replication: true,
});
AWS Networking Resources
Now you are ready to add your AWS resources. First, you’ll need to add some reference to your Pulumi program. Add the Pulumi AWS Provider, which provides basic AWS resources, and the AWSX package, which provides a convenient VPC component:
npm i @pulumi/awsx @pulumi/aws
Now you can add some AWS resources to your program. Start by adding import statements for the packages you added to our project, then create a VPC with with the AWSX package:
import * as awsx from "@pulumi/awsx";
import * as aws from "@pulumi/aws";

const vpc = new awsx.ec2.Vpc("vpc", {
  cidrBlock: "10.1.0.0/16", // Cannot conflict with the Redis CIDR block,
  natGateways: {
    strategy: "Single"
  }
});
Next, peer the Redis Cloud subscription with your AWS VPC:
const callerIdentity = aws.getCallerIdentity();

const peering = new rediscloud.SubscriptionPeering("redis-peering", {
  subscriptionId: subscription.id,
  region: region,
  awsAccountId: callerIdentity.then(x => x.accountId),
  vpcId: vpc.vpcId,
  vpcCidr: vpc.vpc.cidrBlock,
});

new aws.ec2.VpcPeeringConnectionAccepter("aws-peering-accepter", {
  vpcPeeringConnectionId: peering.awsPeeringId,
  autoAccept: true
});
To complete network connectivity between your Redis Cloud database and your AWS VPC, add routes to the private subnets in which your workloads will run that allow traffic to to through the peering connection to the Redis Cloud database’s network:
vpc.privateSubnetIds.apply(ids => {
  ids.forEach((id, index) => {
    const routeTable = aws.ec2.getRouteTableOutput({
      subnetId: id,
    });

    new aws.ec2.Route(`peering-route-${index}`, {
      routeTableId: routeTable.id,
      destinationCidrBlock: redisVpcCidr,
      vpcPeeringConnectionId: peering.awsPeeringId,
    });
  });
});
apply(), you can learn more about why this is necessary in Inputs and Outputs. Creating resources within apply is usually not necessary, but this is one of the few cases where it is.Now, deploy the infrastructure using the pulumi up command:
pulumi up
Creating an EC2 Instance to Test
To test the architecture, create an EC2 instance running Amazon Linux 2 and enable AWS SSM Systems Manager to allow you easy access to a shell prompt without having to worry about SSH keys. From the shell prompt, you will run the Redis CLI to prove that network connectivity is working as expected.
First, create a Security Group to allow all egress traffic. This will allow connectivity to Redis, SSM Systems Manager, and HTTP/S to update the underlying operating system and install dependencies:
const sg = new aws.ec2.SecurityGroup("instance-sg", {
  description: "Allow all egress traffic.",
  vpcId: vpc.vpcId,
  egress: [{
    cidrBlocks: ["0.0.0.0/0"],
    description: "Allow all",
    protocol: "-1",
    fromPort: 0,
    toPort: 0,
  }]
});
Next, create an EC2 instance role that grants the necessary permissions to use SSM Systems Manager:
const instanceRole = new aws.iam.Role("instance-role", {
  assumeRolePolicy: JSON.stringify({
    "Version": "2012-10-17",
    "Statement": {
      "Effect": "Allow",
      "Principal": {
        "Service": "ec2.amazonaws.com",
      },
      "Action": "sts:AssumeRole",
    },
  })
});

new aws.iam.RolePolicyAttachment("instance-role-attachment", {
  role: instanceRole.name,
  policyArn: "arn:aws:iam::aws:policy/AmazonSSMManagedInstanceCore",
});

const instanceProfile = new aws.iam.InstanceProfile("instance-profile", {
  role: instanceRole.name,
});
Then, create the EC2 instance based on the latest Amazon Linux 2 AMI. Note that the userData input of the EC2 instance resource installs the Redis CLI, which is not included in the base operating system by default:
const amazonLinux2 = aws.ec2.getAmiOutput({
  mostRecent: true,
  owners: ["amazon"],
  filters: [
    { name: "name", values: ["amzn2-ami-hvm-*-x86_64-gp2"] },
    { name: "owner-alias", values: ["amazon"] },
  ]
});

const instance = new aws.ec2.Instance("instance", {
  ami: amazonLinux2.id,
  instanceType: "t3.micro",
  vpcSecurityGroupIds: [sg.id],
  subnetId: vpc.privateSubnetIds[0],
  tags: {
    Name: "pulumi-redis-cloud-tester"
  },
  iamInstanceProfile: instanceProfile.name,
  userData: `#!/bin/bash
  sudo amazon-linux-extras install redis6
  `
});
And again, deploy your stack:
pulumi up
pulumi up command this time, Pulumi does not attempt to re-create the resources you’ve already declared. This is because Pulumi is a declarative tool: You only need to specify the desired end state of your resources, and Pulumi will figure out what steps (if any) are necessary to get from your infrastructure’s current state to your declared desired state.Testing the Architecture
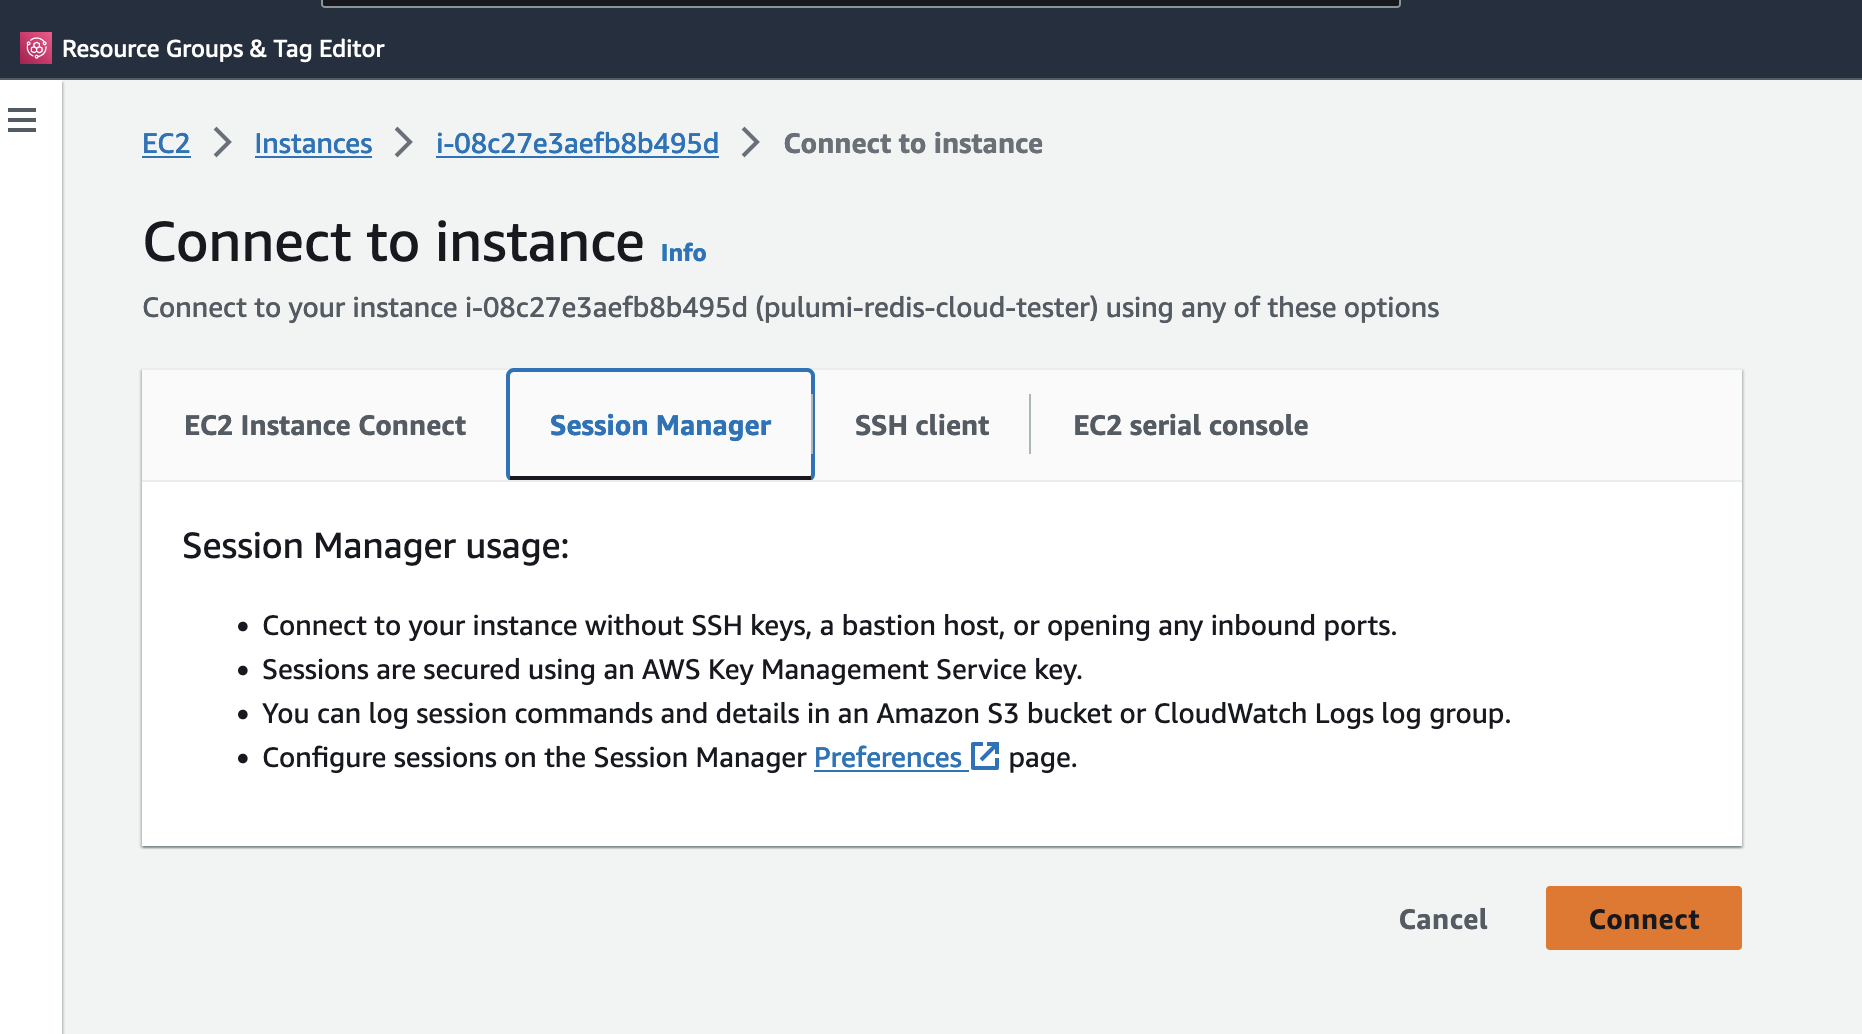
Now that you have your EC2 instance up and running, it’s time to verify that you can connect to your Redis cluster and run commands:
In the AWS Console, find the EC2 instance named
pulumi-redis-cloud-tester, and connect to it via SSM Systems Manager: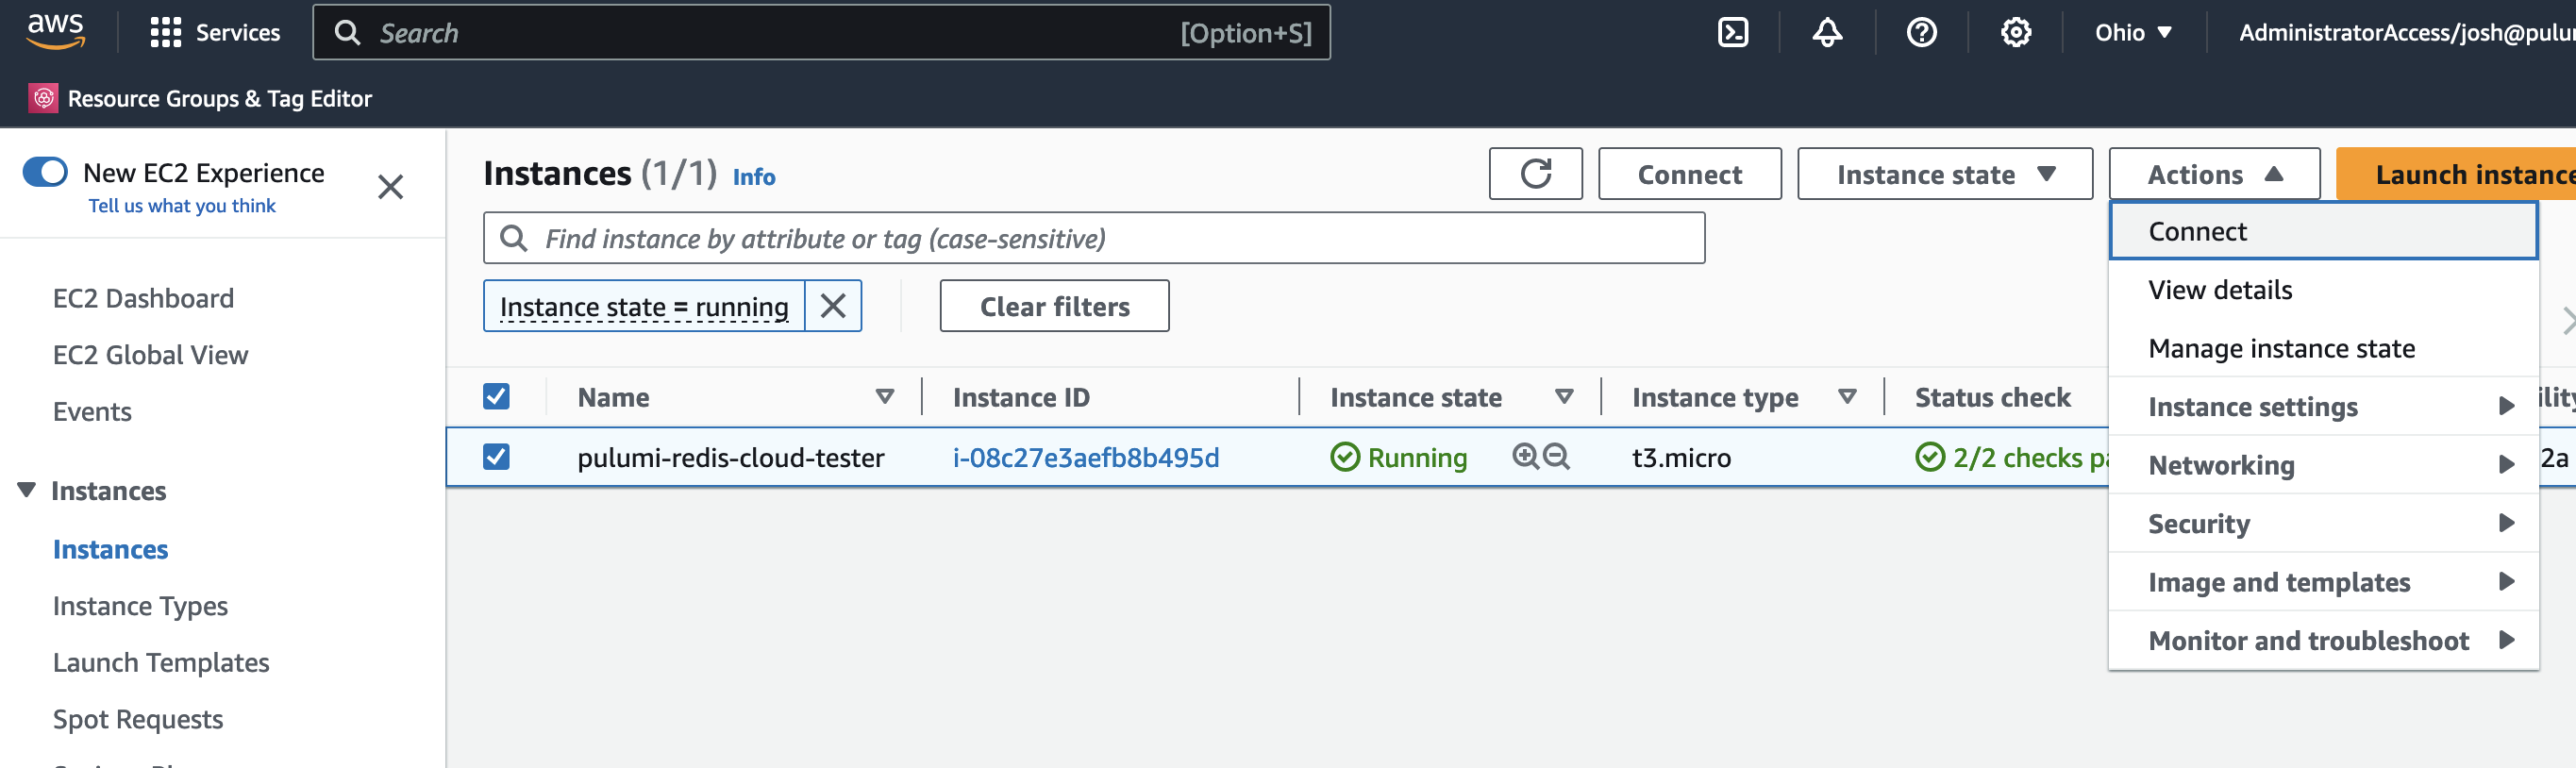
In the Redis Cloud console, locate your database, and select “Connect”:
In the connection dialog, copy the connection info for the Redis CLI:
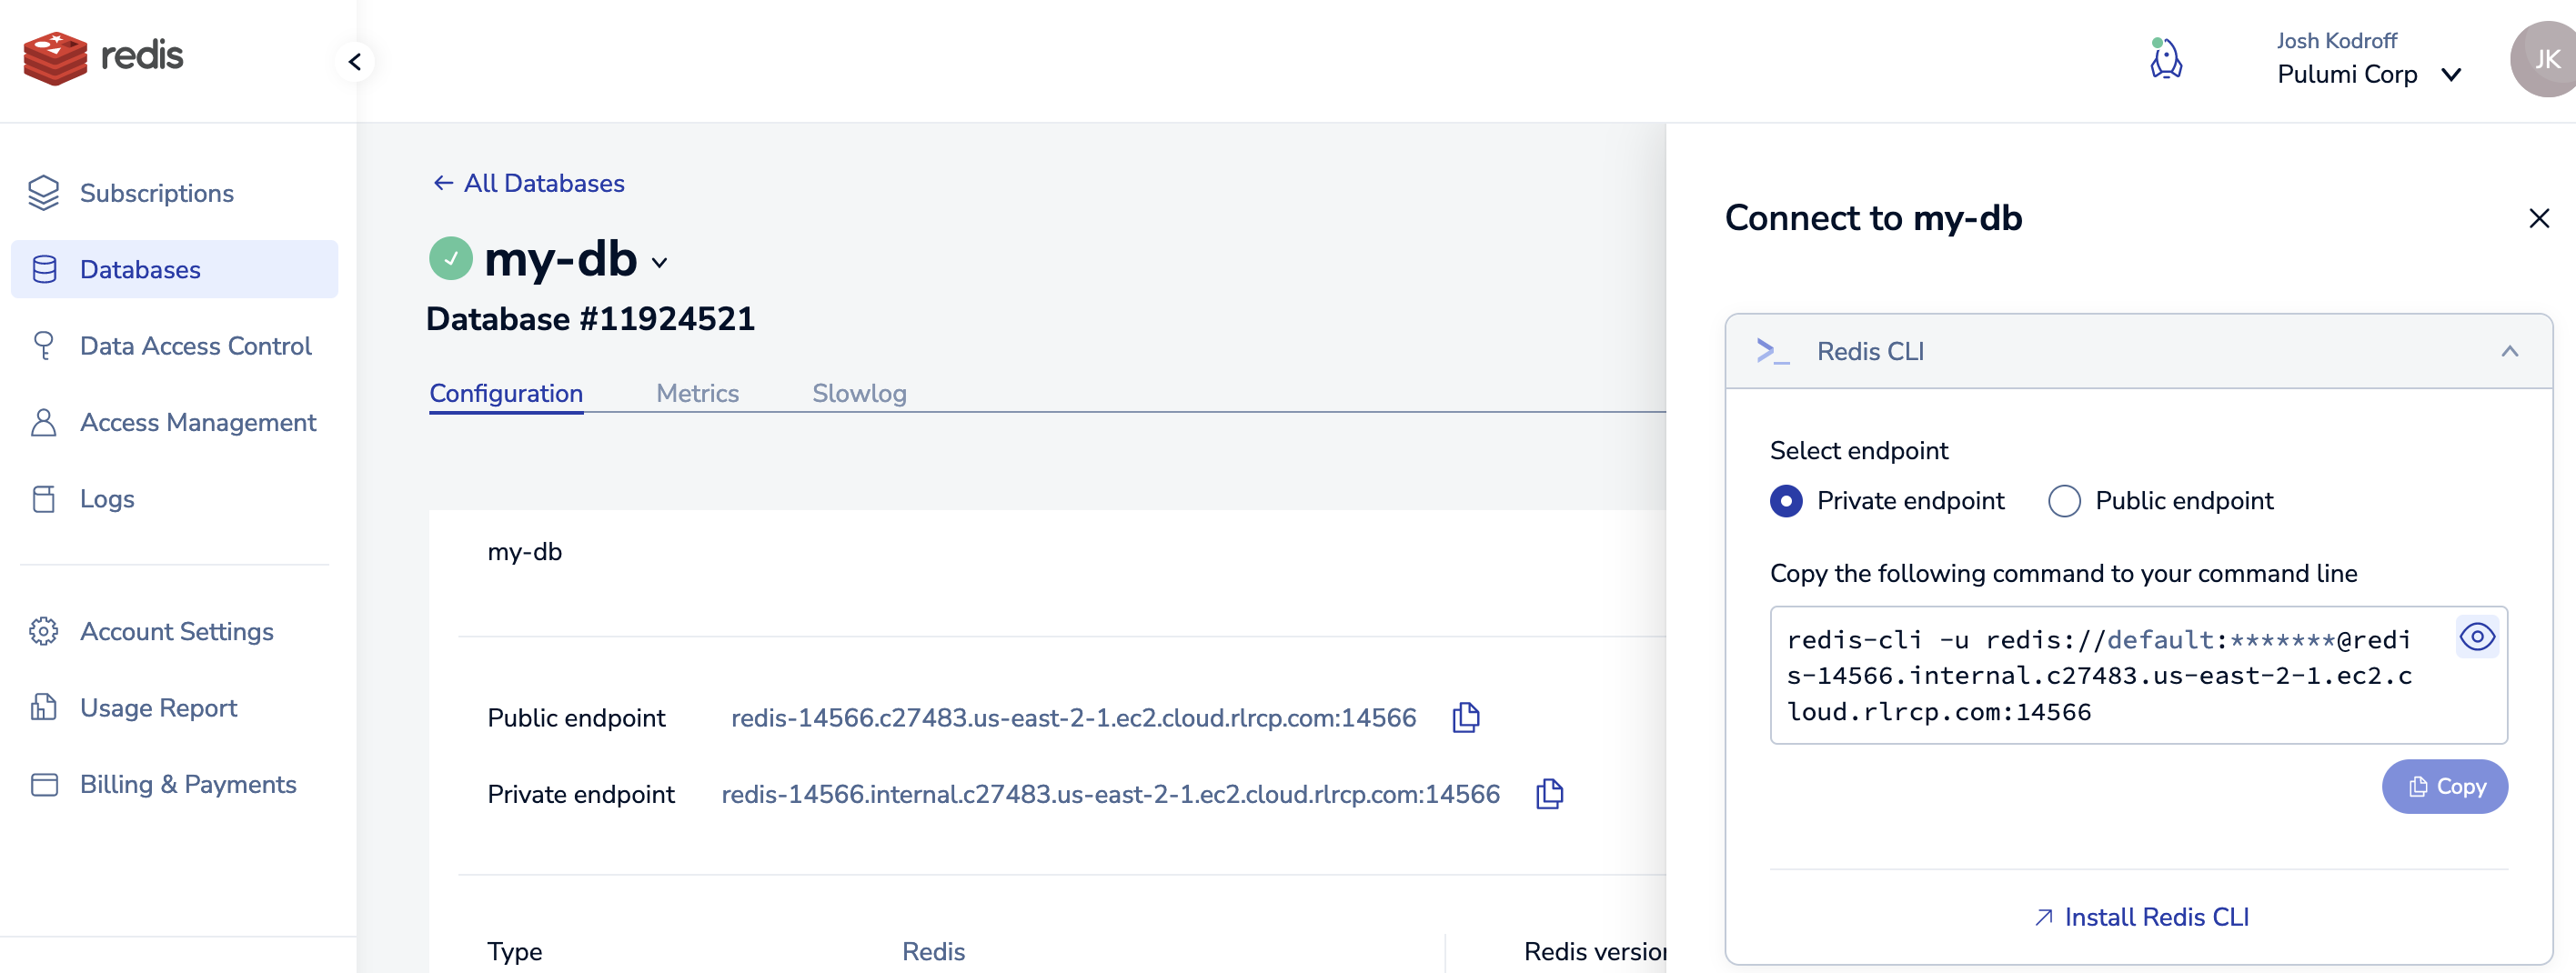
Paste the command into the Systems Manager shell prompt, which will connect you to the Redis instance. From there you can run Redis commands like
INCRthat will write to the Redis cluster:
Now your workloads can use your Redis Cloud cluster! You can tear down all the resources you created with the following command:
pulumi destroy
Next Steps and Conclusion
Now that you have proven that the architecture works, here are some next steps you might want to take with this codebase:
- Replace the EC2 test instance with a real workload that uses Redis:
- If your workload is running on EC2, then the code in this post should get you up and running. However, if you find you need some help Pulumi Neo can be a very helpful resource. Simply enter a natural language query and select a support Pulumi language, and Pulumi AI will generate a Pulumi program that can be copy/pasted into your program and iterated on in the same Pulumi AI conversation.
- If you’re using another AWS compute platform, Pulumi also has helpful guides for creating workloads on ECS, EKS, or Lambda.
- Try creating Redis Cloud clusters peered with Google Cloud.
- If you’re comfortable using Pulumi and are thinking of adopting it at a team or organizational level, consider creating an organization in Pulumi Cloud and enjoying a 2-week free trial of our full set of features, no credit card required!
With Redis Cloud you can enjoy lightning-fast access to whatever data your application needs. When Redis Cloud is coupled with Pulumi, you can manage your Redis databases and all your other cloud infrastructure using a single tool, in any language. That’s powerful stuff!


