Day 2 Kubernetes: Migrating EKS Node Groups with Zero Downtime
Posted on
Managed Kubernetes offerings greatly reduce the overhead required in administering Kubernetes. However, the cluster is only one of the components under management, as app lifecycles are self-driven tasks that vary by workloads.
In Kubernetes, node groups are a useful mechanism for creating pools of resources that can enforce scheduling requirements. They also provide a utility for shifting workloads around during cluster management and updates.
In this post, we’ll see how to use Pulumi for Day 2 Kubernetes administration.
We’ll spin up a new EKS cluster with two node groups and a given workload.
Then we’ll add one more node group with an updated configuration, and migrate the workload
over to it with zero downtime using code and kubectl.
View the full tutorial and code.
Create an EKS cluster and Deploy the Workload
For our initial update, we will configure and launch an EKS cluster using
v1.13 of Kubernetes, with the cluster’s infrastructure dependencies
(such as VPC and IAM) defined using Crosswalk for AWS.
Crosswalk allows us to leverage the Pulumi libraries of common infrastructure
for AWS to simplify cloud resource instantiation and management while gaining
best-practices as defaults.
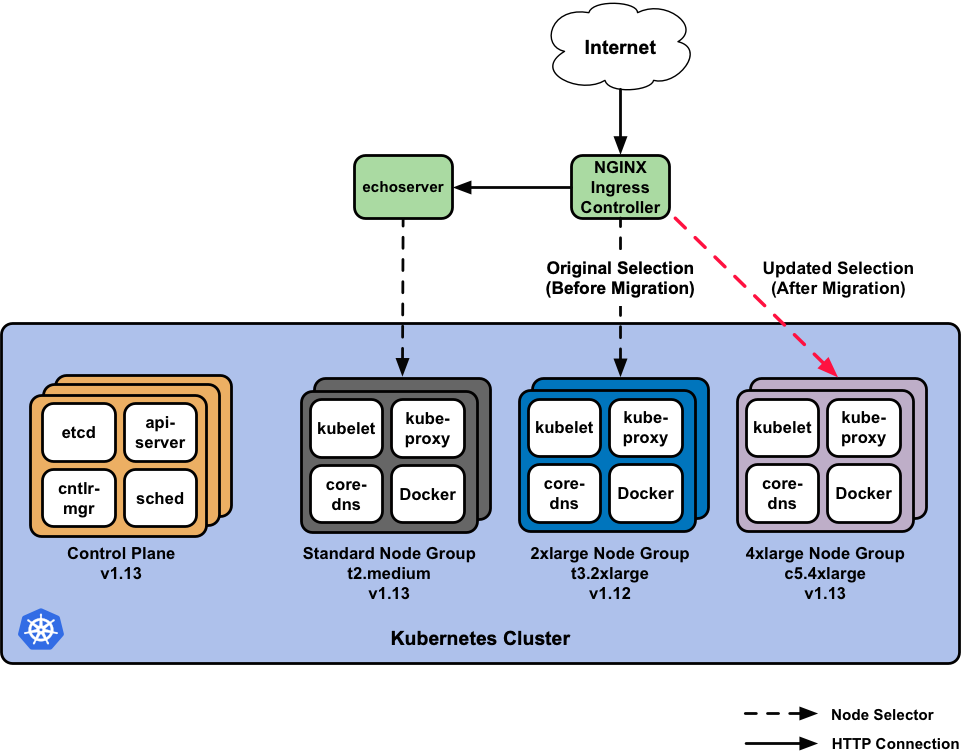
We’ll also create and attach the following node groups to the cluster:
- A standard
t2.mediumworker node group using the recentv1.13.7worker AMI, for general purpose workloads such as theEchoServer— a simple app that echo’s client request headers. - A 2xlarge
t3.2xlargeworker node group using an olderv1.12.7worker AMI, for use by larger, intensive workloads such as the NGINX Ingress Controller.
With the cluster successfully created and the node groups available, Pulumi
will deploy the workload: the EchoServer, and the NGINX Ingress Controller that will manage its ingress.
The echoserver will land on the Standard node group, and NGINX is set
to specifically target the 2xlarge node group.
Once the workload is deployed, we can validate it is up and running by accessing
the echoserver behind the NGINX endpoint using curl:
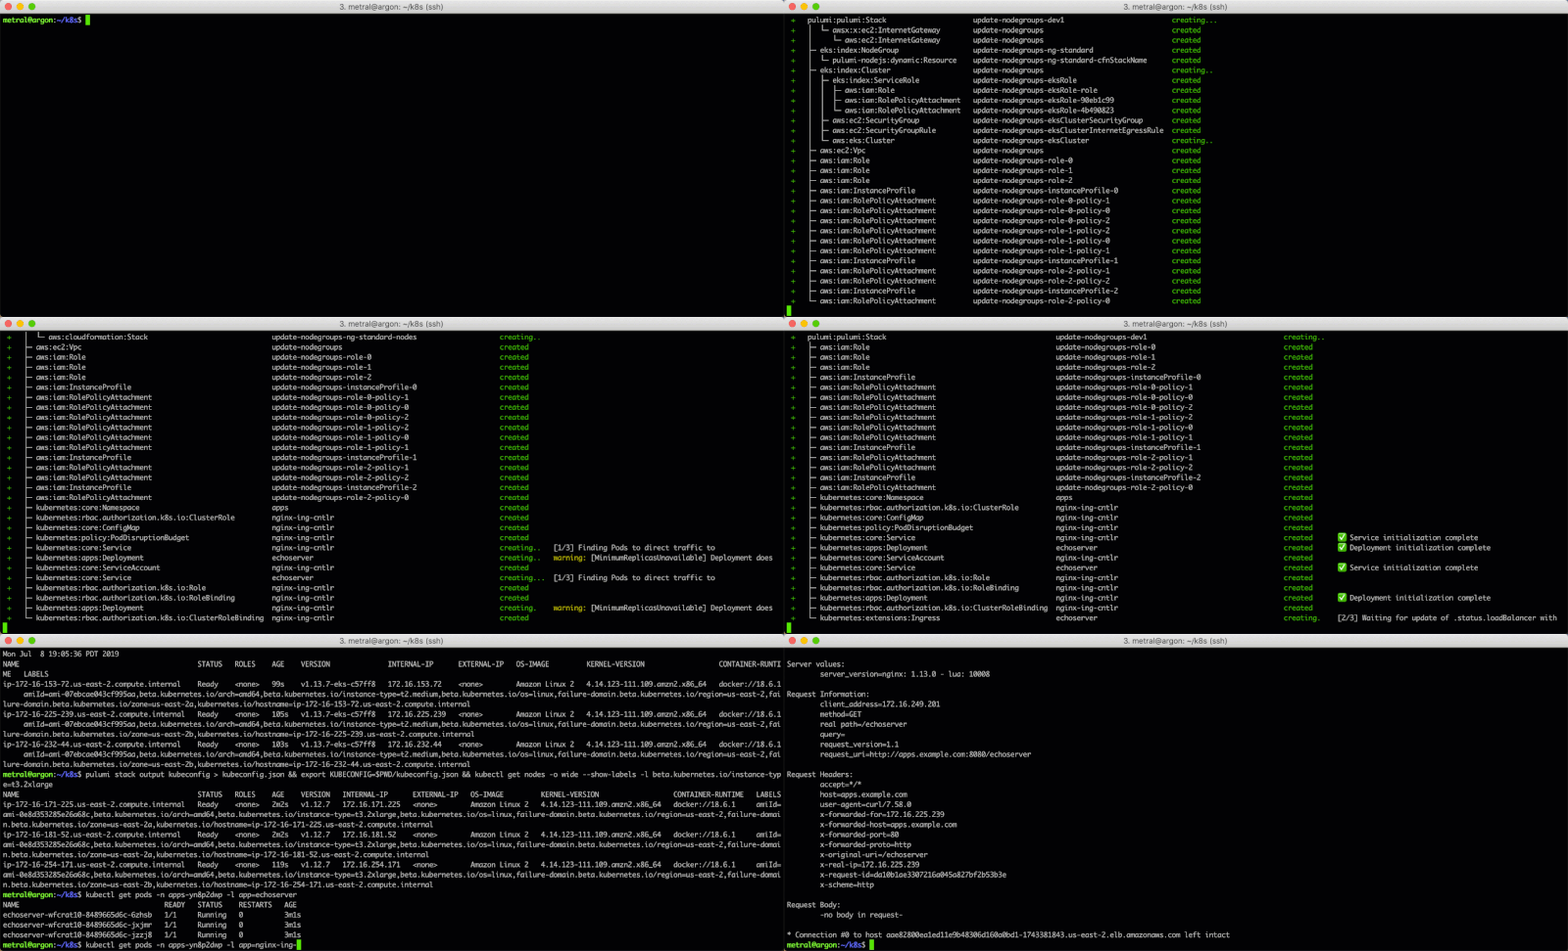
Note: You can open the GIF for a maximized view.
The Great Migration
After our initial deployment, let’s say we decide to update the node group used by NGINX.
To do so, we’ll move NGINX from the 2xlarge node group over to a new, 4xlarge worker
node group with an updated AMI, a different instance type, and a different desired instance count.
As we migrate NGINX over to the 4xlarge and decommission the 2xlarge node
group in the next steps, we’ll also actively load test the endpoint of the
echoserver to ensure that we are not losing requests throughout the migration.
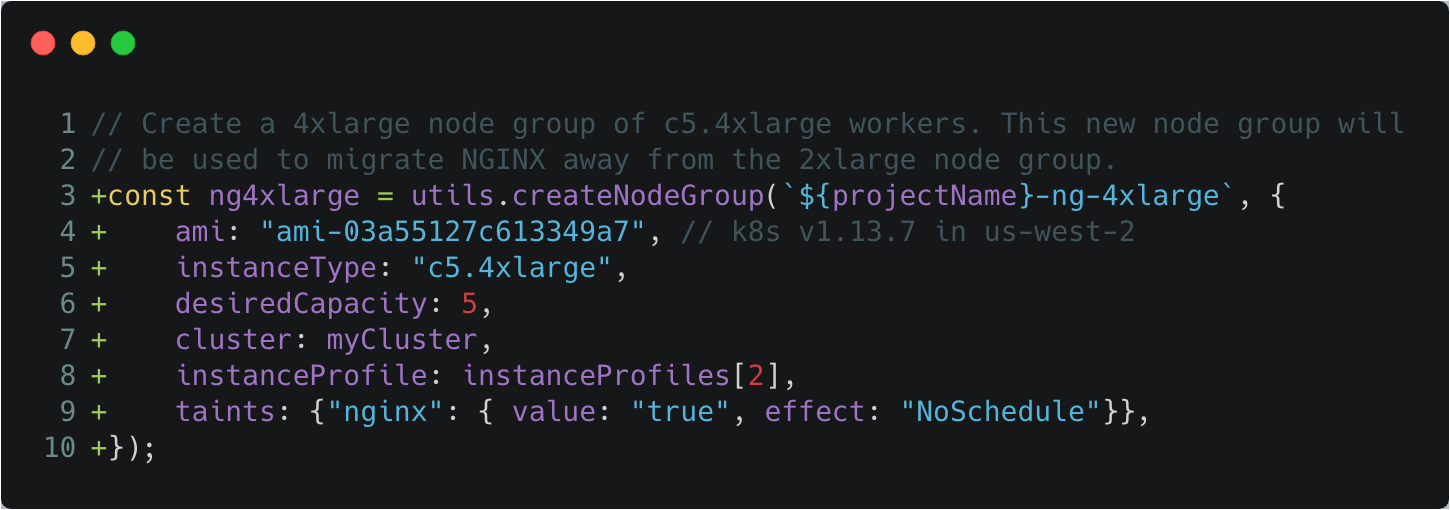
Step 1: Create the new 4xlarge node group.
Create the new, 4xlarge node group by defining it and running an update.
Step 2: Migrate NGINX to the 4xlarge node group.
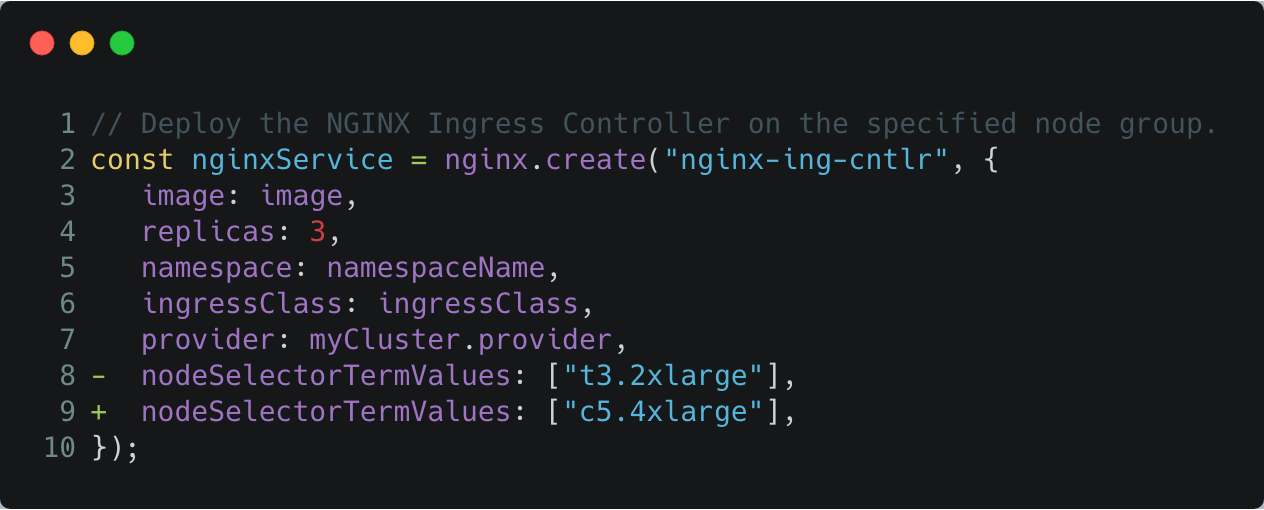
With the 4xlarge node group created, we’ll migrate the NGINX service away
from the 2xlarge node group over to the 4xlarge node group by changing
its node selector scheduling terms.
This change updates the NGINX Deployment spec to require the use of
c5.4xlarge nodes during scheduling, and forces a rolling update over to the
4xlarge node group.
NGINX is able to successfully migrate across node groups because it is configured with HA settings, spread-type scheduling predicates, and can gracefully terminate within the Kubernetes Pod lifecycle.
Step 3: Decommission the 2xlarge node group.
Once NGINX has been completely migrated to the 4xlarge node group, we can
begin decommissioning the original 2xlarge node group which is no longer in use.
Decommissioning the node group involves:
- Draining the Kubernetes nodes.
- Deleting the Kubernetes nodes from the APIServer.
- Scaling down the Auto Scaling Group to
0. - Deleting the node group.
Set up kubectl by using the kubeconfig from the stack output.
$ pulumi stack output kubeconfig > kubeconfig.json
$ export KUBECONFIG=$PWD/kubeconfig.json
To drain the 2xlarge node group, we’ll use kubectl drain:
for node in $(kubectl get nodes -l beta.kubernetes.io/instance-type=t3.2xlarge -o=name); do
    kubectl drain --force --ignore-daemonsets --delete-local-data --grace-period=10 "$node";
done
After draining has completed, use kubectl delete node to delete the nodes from the APIServer.
for node in $(kubectl get nodes -l beta.kubernetes.io/instance-type=t3.2xlarge -o=name); do
    kubectl delete "$node";
done
Scale down the node group Auto Scaling Group completely by setting
the desiredCapacity: 0 and running an update:
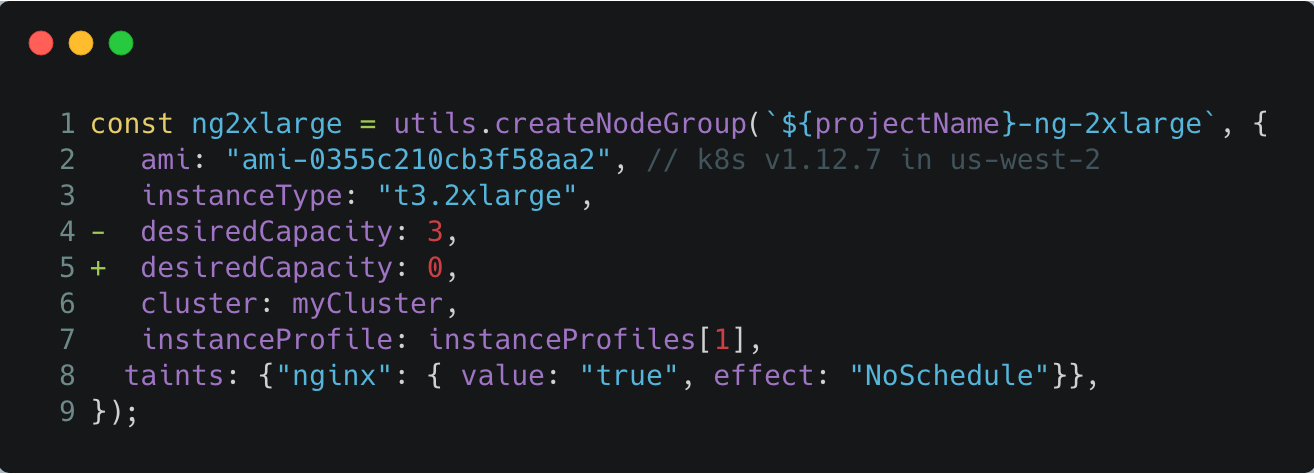
Once the Auto Scaling Group has scaled down, we can delete the node group from AWS and the Pulumi program:

Summary
In this post, we stood up an EKS cluster with a couple of node groups, and an
echoserver and NGINX workload. We then created a new, updated node group and
migrated NGINX over to it.
We achieved this node group migration with zero downtime to our apps during load testing and decommissioning of the original node group.
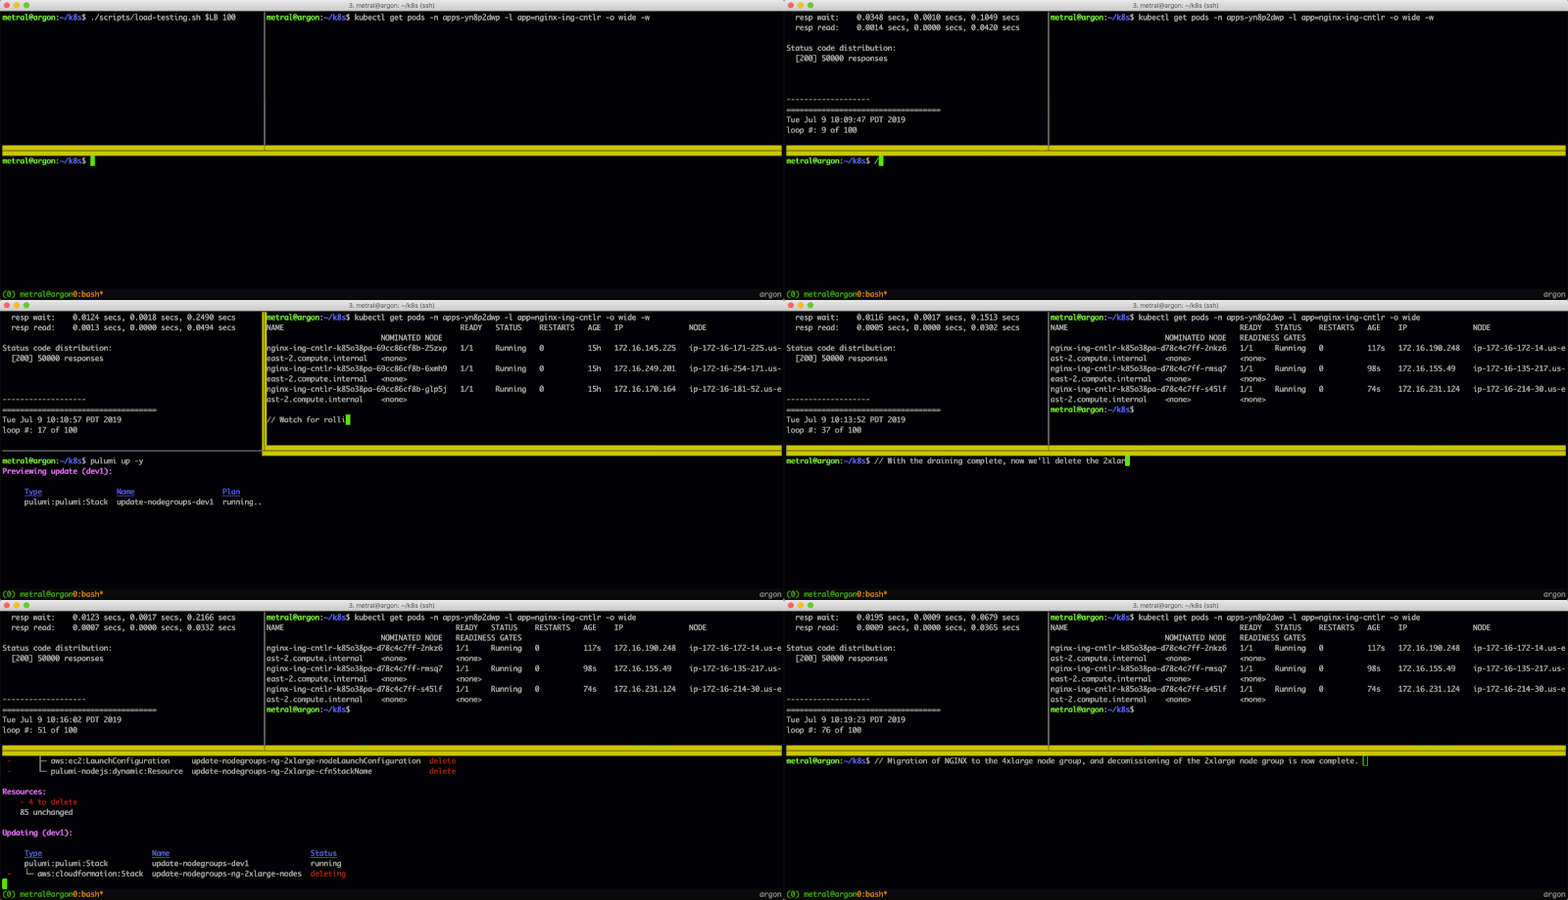
Note: You can open the GIF for a maximized view.
Learn More
If you’d like to learn about Pulumi and how to manage your infrastructure and Kubernetes through code, get started today. Pulumi is open source and free to use.
For further examples on how to use Pulumi to create Kubernetes clusters, or deploy workloads to a cluster, check out the rest of the Kubernetes tutorials.
As always, you can check out our code on GitHub, follow us on Twitter, subscribe to our YouTube channel, or join our Community Slack channel if you have any questions, need support, or just want to say hello.
If you’d like to chat with our team, or get hands-on assistance with migrating your existing configuration code to Pulumi, please don’t hesitate to drop us a line.

