Getting Started With Kubernetes: Advanced Deployment

Welcome to the third article in a series using infrastructure as code to deploy applications with Kubernetes. In the previous post, we reviewed basic Kubernetes objects and abstractions used when deploying an application. We examined code examples across the cloud providers to show how to use infrastructure as code to deploy an application using Kubernetes objects. In this installment, we’ll progress from a simple deployment with just a single application container to a complex application with multiple containers and Pods.
This series walks you through:
- Building a Kubernetes cluster on cloud providers
- Basic application deployment
- Advance application deployment and Helm charts
- Stateful applications
- Networking
- “Day 2” activities such as migrating node groups.
This article reviews three types of application deployment scenarios with commonly used examples. The first scenario is a 12-factor microservices multi-tier application consisting of multiple frontend and backend services backed by databases and a messaging queue to handle requests. The second scenario takes the Kubernetes guestbook and turns the Service and Deployment into a single component, demonstrating another pattern for organizing your stack. The third scenario shows how to deploy a popular web application using a Helm, the package manager for Kubernetes.
In this article, we’ll assume that we already have a Kubernetes cluster available. You will have to set the context with kubectl to deploy the examples in this article. Because of Kubernetes’ OpenAPI, we can use the same Typescript application code on any compliant instance.
Sock Shop Microservices
We’ll use the Sock Shop microservices reference application. This is a polyglot application comprised of microservices written in Java, Go, and Node. This demo application adheres to the 12-factor app pattern by creating a microservice for each function. The application services will be deployed to pods, and they communicate with each other via REST calls over HTTP.
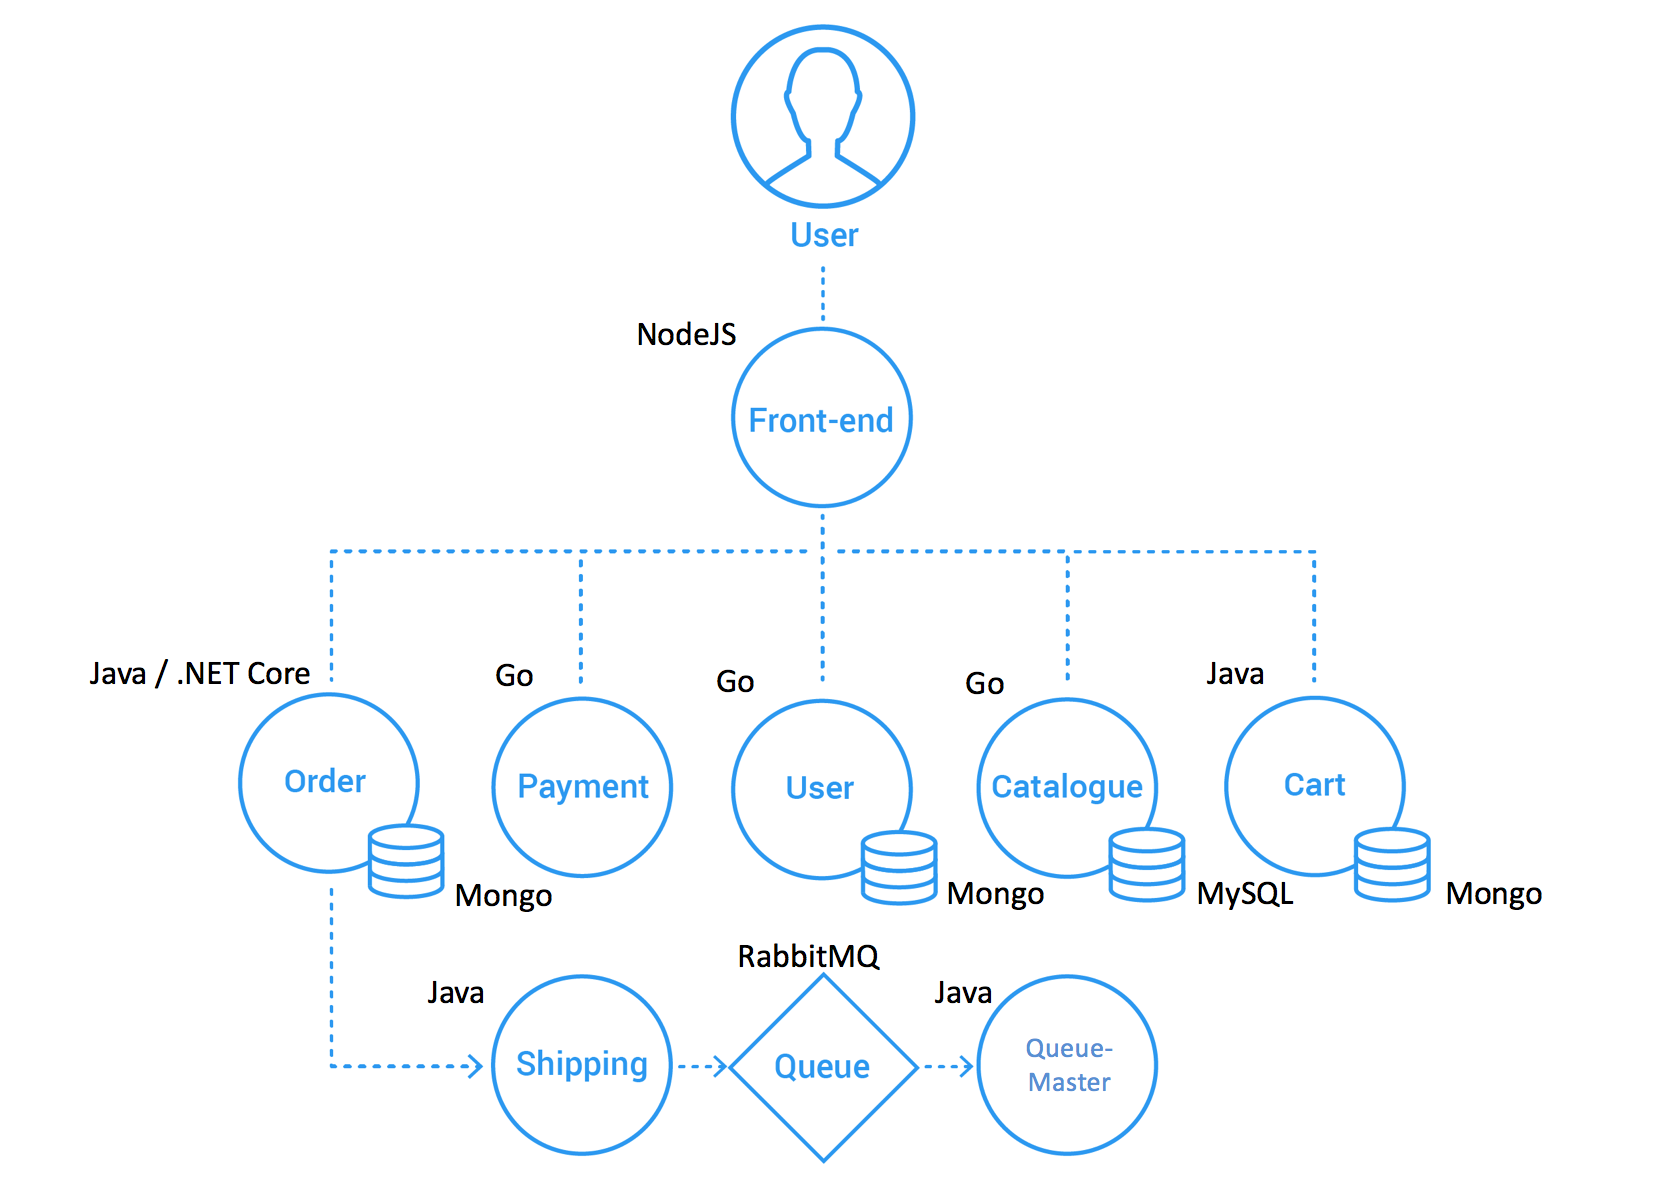
Let’s look at the Orders microservice, which is made up of a service worker and MongoDB for a backing service. Note that the code is organized by microservice with a separate Deployment and Service for each service and backing resource. The ordersDb configuration is straightforward, of note are the options in the container spec where we set securityContext and a emptyDir volume for storage. An emptyDir volume persists even if the container crashes, and the data in the volume is available if the container is restarted. The service definition for ordersDbService is also simple and opens port:27017 and ties the service back to the Deployment by the orders-db label.
const sockShopNs = new k8s.core.v1.Namespace("sock-shop", { metadata: { name: "sock-shop" } });

// --------------------------------------------------------------------------
// Orders microservice.
// --------------------------------------------------------------------------

const ordersDb = new k8s.apps.v1.Deployment("orders-db", {
    metadata: {
        name: "orders-db",
        labels: {
            name: "orders-db",
        },
        namespace: sockShopNs.metadata.name,
    },
    spec: {
        replicas: 1,
        template: {
            metadata: {
                labels: {
                    name: "orders-db",
                },
            },
            spec: {
                containers: [
                    {
                        name: "orders-db",
                        image: "mongo",
                        ports: [
                            {
                                name: "mongo",
                                containerPort: 27017,
                            },
                        ],
                        securityContext: {
                            capabilities: {
                                drop: ["all"],
                                add: ["CHOWN", "SETGID", "SETUID"],
                            },
                            readOnlyRootFilesystem: true,
                        },
                        volumeMounts: [
                            {
                                mountPath: "/tmp",
                                name: "tmp-volume",
                            },
                        ],
                    },
                ],
                volumes: [
                    {
                        name: "tmp-volume",
                        emptyDir: {
                            medium: "Memory",
                        },
                    },
                ],
                nodeSelector: {
                    "beta.kubernetes.io/os": "linux",
                },
            },
        },
    },
});

const ordersDbService = new k8s.core.v1.Service("orders-db", {
    metadata: {
        name: "orders-db",
        labels: {
            name: "orders-db",
        },
        namespace: sockShopNs.metadata.name,
    },
    spec: {
        ports: [
            {
                port: 27017,
                targetPort: 27017,
            },
        ],
        selector: ordersDb.spec.template.metadata.labels,
    },
});
The orders Deployment is similar to the ordersDb Deployment, but it includes environmental variables, such as JAVA_OPTS to set heap memory size and garbage collection intervals, for the containerized application. The container runs as a non-root user and drops all capabilities that can run as a non-root user, except for NET_BIND_SERVICE, which lets the container bind to any port.
const orders = new k8s.apps.v1.Deployment("orders", {
    metadata: {
        name: "orders",
        labels: {
            name: "orders",
        },
        namespace: sockShopNs.metadata.name,
    },
    spec: {
        replicas: 1,
        template: {
            metadata: {
                labels: {
                    name: "orders",
                },
            },
            spec: {
                containers: [
                    {
                        name: "orders",
                        image: "weaveworksdemos/orders:0.4.7",
                        env: [
                            {
                                name: "ZIPKIN",
                                value: "zipkin.jaeger.svc.cluster.local",
                            },
                            {
                                name: "JAVA_OPTS",
                                value:
                                    "-Xms64m -Xmx128m -XX:PermSize=32m -XX:MaxPermSize=64m -XX:+UseG1GC -Djava.security.egd=file:/dev/urandom",
                            },
                        ],
                        ports: [
                            {
                                containerPort: 80,
                            },
                        ],
                        securityContext: {
                            runAsNonRoot: true,
                            runAsUser: 10001,
                            capabilities: {
                                drop: ["all"],
                                add: ["NET_BIND_SERVICE"],
                            },
                            readOnlyRootFilesystem: true,
                        },
                        volumeMounts: [
                            {
                                mountPath: "/tmp",
                                name: "tmp-volume",
                            },
                        ],
                    },
                ],
                volumes: [
                    {
                        name: "tmp-volume",
                        emptyDir: {
                            medium: "Memory",
                        },
                    },
                ],
                nodeSelector: {
                    "beta.kubernetes.io/os": "linux",
                },
            },
        },
    },
});

const ordersService = new k8s.core.v1.Service("orders", {
    metadata: {
        name: "orders",
        labels: {
            name: "orders",
        },
        namespace: sockShopNs.metadata.name,
    },
    spec: {
        ports: [
            {
                port: 80,
                targetPort: 80,
            },
        ],
        selector: orders.spec.template.metadata.labels,
    },
});
If we look at the orders-db deployment manifest, we can see that the code follows it closely. You can find the full Sock Shop code in the Pulumi examples repository.
Although we encapsulate the deployment in a single large script, we can improve that by creating components using classes to abstract the implementation details.
Deploying Guestbook as a Component
We can abstract objects, such as Deployments and Services, into components to create our resources. ComponentResource is Pulumi construct or resource that can aggregate other resources into a combined resource. Let’s take a look at how we implement the Guestbook with components.
The Kubernetes GuestBook is a canonical example of a stateless application. It consists of multiple PHP frontend services backed by Redis replicas and a lead Redis database to store guestbook entries. In the previous example, we created a Deployment and a Service for each microservice in the application. Although this is a valid pattern for deploying an application in Kubernetes, it doesn’t take full advantage of the capabilities of infrastructure as code.
When you examine index.ts, the main program, you’ll notice that it imports the k8sjs module. Note that each service is instantiated by calling the ServiceDeployment class and passing arguments such as the image, ports, and replicas. As you can see, this is a more efficient way to deploy services than coding individual Deployments and Services.
import * as pulumi from "@pulumi/pulumi";
import * as k8sjs from "./k8sjs";

const config = new pulumi.Config();

const redisLeader = new k8sjs.ServiceDeployment("redis-leader", {
    image: "redis",
    ports: [6379],
});

const redisReplica = new k8sjs.ServiceDeployment("redis-replica", {
    image: "pulumi/guestbook-redis-replica",
    ports: [6379],
});

const frontend = new k8sjs.ServiceDeployment("frontend", {
    replicas: 3,
    image: "pulumi/guestbook-php-redis",
    ports: [80],
    allocateIpAddress: true,
    isMinikube: config.getBoolean("isMinikube"),
});

export const frontendIp = frontend.ipAddress;
The ServiceDeployment class is defined in the k8sjs module using ComponentResource. We define deployment, service, and ipAddress as public read-only properties. The constructor takes three arguments:
name: The unique name of the resource.args: Information passed to [initialize] method.opts: A bag of options that control this resource’s behavior.
ServiceDeploymentArgs is the interface for the arguments used to initialize the method. Next, we instantiate the container using the container image property from the ServiceDeploymentArgs and configure resources, environmental variables, and ports. The deployment is instantiated with the properties you typically see in a deployment such labels, selectors, containers, and replicas. The same goes for Services. Finally, based on whether Kubernetes is running on cluster or Minikube, the ServiceDeployment class returns the clusterIP if it runs on Minikube or instantiates a load balancer if it is a cluster.
import * as k8s from "@pulumi/kubernetes";
import * as k8stypes from "@pulumi/kubernetes/types/input";
import * as pulumi from "@pulumi/pulumi";

/**
 * ServiceDeployment is an example abstraction that uses a class to fold together the common pattern of a
 * Kubernetes Deployment and its associated Service object.
 */
export class ServiceDeployment extends pulumi.ComponentResource {
    public readonly deployment: k8s.apps.v1.Deployment;
    public readonly service: k8s.core.v1.Service;
    public readonly ipAddress?: pulumi.Output<string>;

    constructor(name: string, args: ServiceDeploymentArgs, opts?: pulumi.ComponentResourceOptions) {
        super("k8sjs:service:ServiceDeployment", name, {}, opts);

        const labels = { app: name };
        const container: k8stypes.core.v1.Container = {
            name,
            image: args.image,
            resources: args.resources || { requests: { cpu: "100m", memory: "100Mi" } },
            env: [{ name: "GET_HOSTS_FROM", value: "dns" }],
            ports: args.ports && args.ports.map(p => ({ containerPort: p })),
        };
        this.deployment = new k8s.apps.v1.Deployment(name, {
            spec: {
                selector: { matchLabels: labels },
                replicas: args.replicas || 1,
                template: {
                    metadata: { labels: labels },
                    spec: { containers: [ container ] },
                },
            },
        }, { parent: this });

        this.service = new k8s.core.v1.Service(name, {
            metadata: {
                name: name,
                labels: this.deployment.metadata.labels,
            },
            spec: {
                ports: args.ports && args.ports.map(p => ({ port: p, targetPort: p })),
                selector: this.deployment.spec.template.metadata.labels,
                // Minikube does not implement services of type `LoadBalancer`; require the user to specify if we're
                // running on minikube, and if so, create only services of type ClusterIP.
                type: args.allocateIpAddress ? (args.isMinikube ? "ClusterIP" : "LoadBalancer") : undefined,
            },
        }, { parent: this });

        if (args.allocateIpAddress) {
            this.ipAddress = args.isMinikube ?
                this.service.spec.clusterIP :
                this.service.status.loadBalancer.ingress[0].ip;
        }
    }
}

export interface ServiceDeploymentArgs {
    image: string;
    resources?: k8stypes.core.v1.ResourceRequirements;
    replicas?: number;
    ports?: number[];
    allocateIpAddress?: boolean;
    isMinikube?: boolean;
}
As this example demonstrates, components let you build higher-level objects from smaller resources. Using a programming language alleviates writing tedious boilerplate code and results in a more efficient and compact deployment.
Helm Charts
Helm is described as the package manager for Kubernetes. Applications are packaged in charts, a collection of files that declare and configure Kubernetes resources for an application. Helm Hub is a repository for charts with over 1000 applications ready for deploying in Kubernetes.
The code below is from the Kubernetes Typescript Helm Chart example. Deploying a Helm chart is uncomplicated; all you need to do is instantiate a Helm Chart object and provide a name and the appropriate properties.
import * as k8s from "@pulumi/kubernetes";
import * as pulumi from "@pulumi/pulumi";

// Minikube does not implement services of type `LoadBalancer`; require the user to specify if we're
// running on minikube, and if so, create only services of type ClusterIP.
const config = new pulumi.Config();
if (config.require("isMinikube") === "true") {
    throw new Error("This example does not yet support minikube");
}

// Deploy the latest version of the stable/wordpress chart.
const wordpress = new k8s.helm.v2.Chart("wpdev", {
    repo: "stable",
    version: "2.1.3",
    chart: "wordpress",
});

// Export the public IP for Wordpress.
const frontend = wordpress.getResourceProperty("v1/Service", "wpdev-wordpress", "status");
export const frontendIp = frontend.apply(status => status.loadBalancer.ingress[0].ip);
Choosing how to deploy
Using a Helm chart to deploy an application is the simplest solution if it’s a standard application. If you are deploying your application, you might start with a boilerplate code defining Deployments, Services, and other objects in a prototype and later refactor it using Components. These methods aren’t exclusive; for example, you could use a Helm chart to deploy an ELK stack to gather metrics from your application and display them using Kibana. As an application becomes more complex, e.g., every function is a microservice, it becomes more unwieldy and difficult to manage. Infrastructure as code can help reduce that complexity through abstracting resources into higher-level objects, applying software development practices to infrastructure, and enabling robust and reliable deployments.
Conclusion
This article demonstrated three ways to deploy an application in Kubernetes. The applications we examined are primarily stateless with no persistent storage or volumes. In the next installment, we’ll examine stateful services that require persistent storage such as a database. Until the next post, learn more about Kubernetes with these resources.
- Watch educational content on Pulumi TV
- Learn more about Pulumi’s support for Kubernetes
- Practice Kubernetes Tutorials using Pulumi