Importing resources
Most infrastructure as code projects require working with existing cloud resources, whether those resources were originally created with another IaC tool or manually provisioned with a cloud provider console or CLI. Interacting with a previously created cloud resource with Pulumi typically happens in one of two ways:
- Referencing the properties of the existing cloud resource in order to use those properties to configure a Pulumi-managed resource.
- Adopting the existing resource to bring it under management by Pulumi.
The first scenario is sometimes called coexistence, and you can learn more about it in Migrating to Pulumi > Coexistence. The second scenario is called adoption or import, and you can learn more about it in the sections that follow.
Two ways to import a resource
There are two ways to import an existing cloud resource into a Pulumi project:
With the
pulumi importCLI command. This command imports the resource into the currently selected stack and generates code describing the resource’s current configuration for you to add to your Pulumi program.In code, with the
importresource option. This option is expressed as an additional property on a resource declaration that you write into your Pulumi program yourself.
Both approaches allow you to adopt and begin managing existing cloud resources with Pulumi, but they work in slightly different ways, and are suited to slightly different use cases. The sections below explain both in more detail.
How resource import works
Import uses the selected stack’s configured provider to look up the desired resource in the cloud provider, read its current configuration, and add the resource to the stack to bring it under management by Pulumi from that point forward. For this, it requires two pieces of information:
The type of cloud resource to import — either as a type token (a string that uniquely identifies a Pulumi resource type) when using the CLI or as a resource declaration when importing in code. The type token of an Amazon S3 Bucket resource, for example, is
aws:s3/bucket:Bucket.The name and value of the property to use for the resource lookup. Lookup properties vary by resource. For an Amazon S3 bucket, the property used for lookup is
bucket, so the value to use for the lookup would be the bucket’s globally unique name. For an Amazon VPC, however, the property used for lookup isid, so the value to use for it would be its AWS-assigned unique identifier.
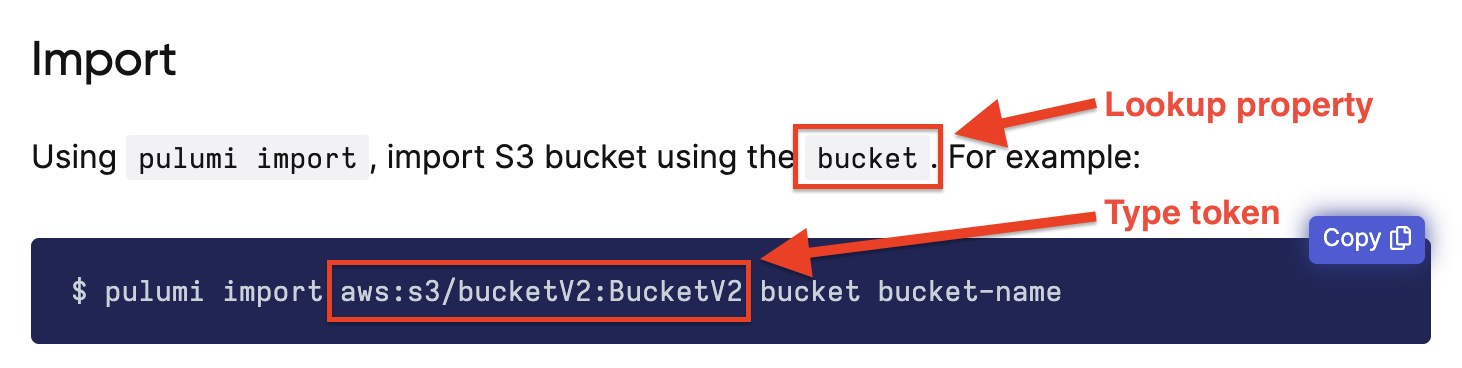
Where to find the type token and lookup property
You’ll find the type token and lookup property in the Import section of the resource’s API documentation in the Pulumi Registry. The type token is quoted in the pulumi import example, and the lookup property can be found in the description just above it:
Importing resources with the CLI
The pulumi import command looks up the resource using the specified type token and resource identifier, adds the resource to the stack’s current state, and emits the code required to manage the resource with Pulumi from that point forward. This option requires the least manual effort, so is generally recommended, and is best suited to projects consisting of only one stack.
To import an existing cloud resource with the Pulumi CLI, use the following syntax:
$ pulumi import <type> <name> <id>
The first argument,
type, is the Pulumi type token to use for the imported resource.As mentioned in Where to find the type token and lookup property, you’ll find the type token for a given resource by navigating to the Import section of the resource’s API documentation in the Pulumi Registry. For example, the type token of an Amazon S3 Bucket resource is
aws:s3/bucket:Bucket.The second argument,
name, is the resource name to apply to the resource once it’s imported. The generated code will use this name for the resource’s logical name, so like all Pulumi resource names, it must be unique among resources of the same type within the containing program. (That is, a program can contain an S3 bucket and a VPC both namedfoo, but it cannot contain two S3 buckets namedfoo.)The third argument,
id, is the value to use for the resource lookup in the cloud provider. This value should correspond to the designated lookup property specified in the Import section of the resource’s API documentation in the Registry.
For help identifying a resource’s type token and lookup property, see Where to find the type token and lookup property above. To learn more about the additional options available on the pulumi import command, see the import command documentation.
Example
In this example, a previously provisioned Amazon S3 bucket named company-infra-logs is imported into a Pulumi stack named dev (the currently selected stack) and given a resource name of infra-logs:
$ pulumi import aws:s3/bucket:Bucket infra-logs company-infra-logs

Previewing import (dev)

     Type                 Name        Plan
 +   pulumi:pulumi:Stack  dev         create
 =   └─ aws:s3:Bucket     my-bucket   import

Resources:
    + 1 to create
    = 1 to import
    2 changes

Do you want to perform this import?
> yes
  no
  details
Choosing to proceed immediately adds the resource to the current stack’s state and emits a block of code to STDOUT to be added to the Pulumi program. If the current program were written in TypeScript, for example, the resulting CLI output would resemble the following:
...

Importing (dev)

     Type                 Name        Status
 +   pulumi:pulumi:Stack  dev         created (3s)
 =   └─ aws:s3:Bucket     my-bucket   imported (1s)

Resources:
    + 1 created
    = 1 imported
    2 changes

Duration: 4s

Please copy the following code into your Pulumi application. Not doing so
will cause Pulumi to report that an update will happen on the next update command.

Please note that the imported resources are marked as protected. To destroy them
you will need to remove the `protect` option and run `pulumi update` *before*
the destroy will take effect.

import * as pulumi from "@pulumi/pulumi";
import * as aws from "@pulumi/aws";

const my_bucket = new aws.s3.Bucket("infra-logs", {
    arn: "arn:aws:s3:::company-infra-logs",
    bucket: "company-infra-logs",
    hostedZoneId: "Z3BJ4Q6RFIQJ6N",
    requestPayer: "BucketOwner",
}, {
    protect: true,
});
After importing the resource and pasting the generated code into your program, you can run pulumi up, and all subsequent operations
will behave as though Pulumi had provisioned the new resource from the outset:
$ pulumi up
...

Updating (dev)

    Type                 Name
    pulumi:pulumi:Stack  dev

Resources:
    2 unchanged

Duration: 2s
Notice that by default, resources imported with the CLI are marked as protected to guard against accidental deletion. If you forgot, for example, to append the generated code to your program before running another pulumi up, Pulumi would first interpret the missing code as an intention to delete the new resource, but then fail on the existence of the protect property, leaving the resource intact. See the protect documentation to learn more.
Demo
The following short video illustrates the pulumi import process end to end:
Bulk Import Operations
If you need to import multiple resources, the CLI import command can be used with a JSON file that contains references to existing cloud resources. Using a JSON file with the import command can be helpful as part of scripting large bulk imports of cloud resources.
{
	"resources": [
        {
			"type": "aws:ec2/vpc:Vpc",
			"name": "application-vpc",
			"id": "vpc-0ad77710973388316"
		},
		{
			"type": "aws:ec2/subnet:Subnet",
			"name": "public-1",
			"id": "subnet-0fb5fdff92b9e5a3b"
		},
		{
			"type": "aws:ec2/subnet:Subnet",
			"name": "private-1",
			"id": "subnet-0a39d25dd9f7b7808"
		}
	]
}
Pass the path to the JSON file using the --file (-f) option:
$ pulumi import --file ./my-resources.json
After adding the specified resources to the current stack state, Pulumi will generate all of the code necessary for managing the resources from that point forward:
import * as pulumi from "@pulumi/pulumi";
import * as aws from "@pulumi/aws";

const application_vpc = new aws.ec2.Vpc("application-vpc", {
    assignGeneratedIpv6CidrBlock: false,
    cidrBlock: "172.16.0.0/16",
    enableDnsSupport: true,
    instanceTenancy: "default",
    tags: {
        Name: "pulumi-vpc",
        Owner: "pulumi",
        Project: "pulumi-k8s-aws-cluster",
    },
}, {
    protect: true,
});
const public_1 = new aws.ec2.Subnet("public-1", {
    assignIpv6AddressOnCreation: false,
    cidrBlock: "172.16.32.0/19",
    mapPublicIpOnLaunch: true,
    tags: {
        Name: "pulumi-vpc-public-1",
        Owner: "pulumi",
        Project: "pulumi-k8s-aws-cluster",
        "kubernetes.io/role/elb": "1",
        type: "public",
    },
    vpcId: "vpc-0ad77710973388316",
}, {
    protect: true,
});
const private_1 = new aws.ec2.Subnet("private-1", {
    assignIpv6AddressOnCreation: false,
    cidrBlock: "172.16.160.0/19",
    mapPublicIpOnLaunch: false,
    tags: {
        Name: "pulumi-vpc-private-1",
        Owner: "pulumi",
        Project: "pulumi-k8s-aws-cluster",
        "kubernetes.io/role/internal-elb": "1",
        type: "private",
    },
    vpcId: "vpc-0ad77710973388316",
}, {
    protect: true,
});
import pulumi
import pulumi_aws as aws

application_vpc = aws.ec2.Vpc("application-vpc",
    assign_generated_ipv6_cidr_block=False,
    cidr_block="172.16.0.0/16",
    enable_dns_support=True,
    instance_tenancy="default",
    tags={
        "Name": "pulumi-vpc",
        "Owner": "pulumi",
        "Project": "pulumi-k8s-aws-cluster",
    },
    opts=ResourceOptions(protect=True))
public_1 = aws.ec2.Subnet("public-1",
    assign_ipv6_address_on_creation=False,
    cidr_block="172.16.32.0/19",
    map_public_ip_on_launch=True,
    tags={
        "Name": "pulumi-vpc-public-1",
        "Owner": "pulumi",
        "Project": "pulumi-k8s-aws-cluster",
        "kubernetes.io/role/elb": "1",
        "type": "public",
    },
    vpc_id="vpc-0ad77710973388316",
    opts=ResourceOptions(protect=True))
private_1 = aws.ec2.Subnet("private-1",
    assign_ipv6_address_on_creation=False,
    cidr_block="172.16.160.0/19",
    map_public_ip_on_launch=False,
    tags={
        "Name": "pulumi-vpc-private-1",
        "Owner": "pulumi",
        "Project": "pulumi-k8s-aws-cluster",
        "kubernetes.io/role/internal-elb": "1",
        "type": "private",
    },
    vpc_id="vpc-0ad77710973388316",
    opts=ResourceOptions(protect=True))
package main

import (
	"github.com/pulumi/pulumi-aws/sdk/v4/go/aws/ec2"
	"github.com/pulumi/pulumi/sdk/v3/go/pulumi"
)

func main() {
	pulumi.Run(func(ctx *pulumi.Context) error {
		_, err := ec2.NewVpc(ctx, "application_vpc", &ec2.VpcArgs{
			AssignGeneratedIpv6CidrBlock: pulumi.Bool(false),
			CidrBlock:                    pulumi.String("172.16.0.0/16"),
			EnableDnsSupport:             pulumi.Bool(true),
			InstanceTenancy:              pulumi.String("default"),
			Tags: pulumi.StringMap{
				"Name":    pulumi.String("pulumi-vpc"),
				"Owner":   pulumi.String("pulumi"),
				"Project": pulumi.String("pulumi-k8s-aws-cluster"),
			},
		}, pulumi.Protect(true))
		if err != nil {
			return err
		}
		_, err = ec2.NewSubnet(ctx, "public_1", &ec2.SubnetArgs{
			AssignIpv6AddressOnCreation: pulumi.Bool(false),
			CidrBlock:                   pulumi.String("172.16.32.0/19"),
			MapPublicIpOnLaunch:         pulumi.Bool(true),
			Tags: pulumi.StringMap{
				"Name":                   pulumi.String("pulumi-vpc-public-1"),
				"Owner":                  pulumi.String("pulumi"),
				"Project":                pulumi.String("pulumi-k8s-aws-cluster"),
				"kubernetes.io/role/elb": pulumi.String("1"),
				"type":                   pulumi.String("public"),
			},
			VpcId: pulumi.String("vpc-0ad77710973388316"),
		}, pulumi.Protect(true))
		if err != nil {
			return err
		}
		_, err = ec2.NewSubnet(ctx, "private_1", &ec2.SubnetArgs{
			AssignIpv6AddressOnCreation: pulumi.Bool(false),
			CidrBlock:                   pulumi.String("172.16.160.0/19"),
			MapPublicIpOnLaunch:         pulumi.Bool(false),
			Tags: pulumi.StringMap{
				"Name":                            pulumi.String("pulumi-vpc-private-1"),
				"Owner":                           pulumi.String("pulumi"),
				"Project":                         pulumi.String("pulumi-k8s-aws-cluster"),
				"kubernetes.io/role/internal-elb": pulumi.String("1"),
				"type":                            pulumi.String("private"),
			},
			VpcId: pulumi.String("vpc-0ad77710973388316"),
		}, pulumi.Protect(true))
		if err != nil {
			return err
		}
		return nil
	})
}
using Pulumi;
using Aws = Pulumi.Aws;

class MyStack : Stack
{
    public MyStack()
    {
        var application_vpc = new Aws.Ec2.Vpc("application-vpc", new Aws.Ec2.VpcArgs
        {
            AssignGeneratedIpv6CidrBlock = false,
            CidrBlock = "172.16.0.0/16",
            EnableDnsSupport = true,
            InstanceTenancy = "default",
            Tags =
            {
                { "Name", "pulumi-vpc" },
                { "Owner", "pulumi" },
                { "Project", "pulumi-k8s-aws-cluster" },
            },
        }, new CustomResourceOptions
        {
            Protect = true,
        });
        var public_1 = new Aws.Ec2.Subnet("public-1", new Aws.Ec2.SubnetArgs
        {
            AssignIpv6AddressOnCreation = false,
            CidrBlock = "172.16.32.0/19",
            MapPublicIpOnLaunch = true,
            Tags =
            {
                { "Name", "pulumi-vpc-public-1" },
                { "Owner", "pulumi" },
                { "Project", "pulumi-k8s-aws-cluster" },
                { "kubernetes.io/role/elb", "1" },
                { "type", "public" },
            },
            VpcId = "vpc-0ad77710973388316",
        }, new CustomResourceOptions
        {
            Protect = true,
        });
        var private_1 = new Aws.Ec2.Subnet("private-1", new Aws.Ec2.SubnetArgs
        {
            AssignIpv6AddressOnCreation = false,
            CidrBlock = "172.16.160.0/19",
            MapPublicIpOnLaunch = false,
            Tags =
            {
                { "Name", "pulumi-vpc-private-1" },
                { "Owner", "pulumi" },
                { "Project", "pulumi-k8s-aws-cluster" },
                { "kubernetes.io/role/internal-elb", "1" },
                { "type", "private" },
            },
            VpcId = "vpc-0ad77710973388316",
        }, new CustomResourceOptions
        {
            Protect = true,
        });
    }

}
The bulk import JSON file follows this schema:
| Property | Type | Required | Description |
|---|---|---|---|
nameTable | map[URN] | No | A mapping from in-language variable names to URNs. Used only when generating references to parents and providers. |
resources | array[Resource] | Yes | The list of resources to import. |
A Resource has the following schema:
| Property | Type | Required | Description |
|---|---|---|---|
id | string | Yes | The provider determined ID for this resource type. This is required unless component is true. |
type | Type Token | Yes | The type of the corresponding Pulumi resource. |
name | string | Yes | The name of the resource. |
logicalName | string | No | The logical name of the resource. The original name property is then used just for codegen purposes (i.e. the source name). If either property is not set then the other field is used to fill it in. |
parent | string | No | The name of the parent resource. The mentioned name must be present in the nameTable. |
provider | string | No | The name of the provider resource. The mentioned name must be present in the nameTable. |
version | string | No | The version of the provider to use. |
properties | array[string] | No | The list of properties to include in the generated code. If unspecified all properties will be included. |
component | boolean | No | This import should create an empty component resource. id must not be set if this is true. |
remote | boolean | No | This is a component in a component package. component must be true if this is true. |
To make it easier to import resources into complex programs, you can run pulumi preview --import-file <file> to generate a placeholder import file for every resource that would be created. The generated file will contain all the names, URNs, and types already filled in, with blank id fields that need to be filled in.
Example: Import a component with all resources
In this example, the Pulumi program defines a VPC component from the AWS Crosswalk for Pulumi library. The component is imported into the program using the pulumi import command.
The following code creates a new VPC using all default settings:
import * as pulumi from "@pulumi/pulumi";
import * as awsx from "@pulumi/awsx";

// Allocate a new VPC with the default settings.
const vpc = new awsx.ec2.Vpc("vpc");

// Export a few properties to make them easy to use.
export const vpcId = vpc.vpcId;
export const privateSubnetIds = vpc.privateSubnetIds;
export const publicSubnetIds = vpc.publicSubnetIds;
import pulumi
import pulumi_awsx as awsx

# Allocate a new VPC with the default settings.
vpc = awsx.ec2.Vpc("vpc")

# Export a few properties to make them easy to use.
pulumi.export("vpcId", vpc.vpc_id)
pulumi.export("publicSubnetIds", vpc.public_subnet_ids)
pulumi.export("privateSubnetIds", vpc.private_subnet_ids)
package main

import (
	"github.com/pulumi/pulumi-awsx/sdk/v3/go/awsx/ec2"
	"github.com/pulumi/pulumi/sdk/v3/go/pulumi"
)

func main() {
	pulumi.Run(func(ctx *pulumi.Context) error {

		// Allocate a new VPC with the default settings.
		vpc, err := ec2.NewVpc(ctx, "vpc", nil)
		if err != nil {
			return err
		}

		// Export a few properties to make them easy to use.
		ctx.Export("vpcId", vpc.VpcId)
		ctx.Export("privateSubnetIds", vpc.PrivateSubnetIds)
		ctx.Export("publicSubnetIds", vpc.PublicSubnetIds)
		return nil
	})
}
using Pulumi;
using System.Collections.Generic;
using Pulumi.Awsx.Ec2;

return await Deployment.RunAsync(() =>
{
    // Allocate a new VPC with the default settings.
    var vpc = new Vpc("vpc");

    // Export a few properties to make them easy to use.
    return new Dictionary<string, object?>
    {
        ["vpcId"] = vpc.VpcId,
        ["vpcPrivateSubnetIds"] = vpc.PrivateSubnetIds,
        ["vpcPublicSubnetIds"] = vpc.PublicSubnetIds,
    };
});
package myproject;

import com.pulumi.Pulumi;
import com.pulumi.awsx.ec2.Vpc;

public class App {
    public static void main(String[] args) {
        Pulumi.run(ctx -> {

            // Allocate a new VPC with the default settings.
            var vpc = new Vpc("vpc");

            // Export a few properties to make them easy to use.
            ctx.export("vpcId", vpc.vpcId());
            ctx.export("privateSubnetIds", vpc.privateSubnetIds());
            ctx.export("publicSubnetIds", vpc.publicSubnetIds());
        });
    }
}
name: awsx-vpc-yaml
runtime: yaml
description: An example that creates a new VPC using the default settings.
resources:
  # Allocate a new VPC with the default settings.
  vpc:
    type: awsx:ec2:Vpc

outputs:
  # Export a few properties to make them easy to use.
  vpcId: ${vpc.vpcId}
  publicSubnetIds: ${vpc.publicSubnetIds}
  privateSubnetIds: ${vpc.privateSubnetIds}
Here is how you can import your existing infrastructure to start managing it with Pulumi:
pulumi preview --import-file import.jsonto generate a placeholder import file for every resource that would be created. The resultingimport.jsonfile will look like this:{ "resources": [ { "type": "awsx:ec2:Vpc", "name": "vpc", "component": true }, { "type": "aws:ec2/vpc:Vpc", "name": "vpcVpc", "id": "<PLACEHOLDER>", "parent": "vpc", "logicalName": "vpc" }, //... more resources ] }Note that the component is defined as a separate resource, and all
parentvalues are set according to the preview.Edit the JSON file to replace all
<PLACEHOLDER>values with existing resource IDs from your AWS account.Import all the resources in one operation with:
pulumi import --file import.json
The same approach can be used to import any component resource and its sub-resources.
Importing resources in code
Another way to import existing cloud resources into a Pulumi project is in code, using the import resource option. This approach involves writing the code to define the resource yourself, which may be preferable in scenarios that call for importing multiple resources of the same type across multiple stacks and/or deployment environments.
Code-based import also differs from the CLI-based approach in that it doesn’t imperatively modify the state of the current stack. Whereas running pulumi import with the CLI adds imported resources to your stack state directly, using the import resource option delegates that responsibility to the program to be handled as part of the normal infrastructure lifecycle — for example, on the next pulumi up.
Example
The following example imports an existing AWS EC2 security group with an assigned cloud provider ID of sg-04aeda9a214730248:
import * as aws from "@pulumi/aws";

const group = new aws.ec2.SecurityGroup("my-sg", {
    name: "my-sg-62a569b",
    ingress: [{
        protocol: "tcp",
        fromPort: 80,
        toPort: 80,
        cidrBlocks: ["0.0.0.0/0"]
    }],
}, {
    import: "sg-04aeda9a214730248"
});
# IMPORTANT: Python appends an underscore (`import_`) to avoid conflicting with the keyword.

import pulumi_aws as aws
from pulumi import ResourceOptions

group = aws.ec2.SecurityGroup('my-sg',
    name='my-sg-62a569b',
    description='Enable HTTP access',
    ingress=[
        { 'protocol': 'tcp', 'from_port': 80, 'to_port': 80, 'cidr_blocks': ['0.0.0.0/0'] }
    ],
    opts=ResourceOptions(import_='sg-04aeda9a214730248'))
group, err := ec2.NewSecurityGroup(ctx, "web-sg",
    &ec2.SecurityGroupArgs{
        Name:        pulumi.String("web-sg-62a569b"),
        Description: pulumi.String("Enable HTTP access"),
        Ingress: ec2.SecurityGroupIngressArray{
            ec2.SecurityGroupIngressArgs{
                Protocol:   pulumi.String("tcp"),
                FromPort:   pulumi.Int(80),
                ToPort:     pulumi.Int(80),
                CidrBlocks: pulumi.StringArray{pulumi.String("0.0.0.0/0")},
            },
        },
    },
    pulumi.Import(pulumi.ID("sg-04aeda9a214730248")),
)
if err != nil {
    return err
}
var group = new SecurityGroup("my-sg",
    new SecurityGroupArgs {
        Name = "my-sg-62a569b",
        Description = "Enable HTTP access",
        Ingress = {
            new SecurityGroupIngressArgs {
                Protocol = "tcp",
                FromPort = 80,
                ToPort = 80,
                CidrBlocks = { "0.0.0.0/0" }
            }
        }
    },
    new CustomResourceOptions {
        ImportId = "sg-04aeda9a214730248"
    }
);
When Pulumi encounters a resource with the import option set, it looks up the resource in the cloud provider using the specified ID, where the ID value corresponds to the resource’s designated lookup property. On the next pulumi up, if the resource is found, you’ll notice an = symbol beside the resource indicating that it’ll be imported:
$ pulumi up
Previewing update (dev):

     Type                       Name              Plan
     pulumi:pulumi:Stack        dev
 =   └─ aws:ec2:SecurityGroup   my-sg             import

Resources:
    = 1 to import
    1 unchanged
If the resource isn’t found, the preview will fail:
error: Preview failed: importing sg-04aeda9a214730248: security group not found
After successfully importing a resource, you can delete the import option if you like, then re-run pulumi up, and all subsequent operations will now behave as though Pulumi had provisioned the imported resource from the outset.
Be aware this applies to destroy operations also. Once an imported resource has been brought under management with Pulumi, destroying its containing stack will delete the imported resource as well in the usual way. If you wish to ensure that an imported resource survives through pulumi destroy, consider using the retainOnDelete resource option.
Mismatched state
When importing resources using the import resource option, the Pulumi engine compares the properties specified in your program with the actual state of the existing cloud resource. If there are differences, the engine will still perform the import and then issue an update step to reconcile the differences between the imported state and your program’s desired state.
For instance, keeping with the example above, if you’d specified the wrong ingress rule by choosing port 22 instead of port 80, you’d see a diff during preview showing both the import and a subsequent update:
$ pulumi preview
Previewing update (dev):
     Type                      Name        Plan       Info
     pulumi:pulumi:Stack       dev
 =   └─ aws:ec2:SecurityGroup  my-sg       import     [diff: ~ingress]
 ~   └─ aws:ec2:SecurityGroup  my-sg       update     [diff: ~ingress]

Resources:
    = 1 to import
    ~ 1 to update
    1 unchanged
To see details on what specifically doesn’t match, you can select the details option:
+ pulumi:pulumi:Stack: (create)
    [urn=urn:pulumi:dev::import::pulumi:pulumi:Stack::dev]
    = aws:ec2/securityGroup:SecurityGroup: (import)
        [id=sg-0d188488272df7df8]
        [urn=urn:pulumi:dev::import::aws:ec2/securityGroup:SecurityGroup::my-sg]
        [provider=urn:pulumi:dev::import::pulumi:providers:aws::default_1_22_0::04da6b54-80e4-46f7-96ec-b56ff0331ba9]
      ~ ingress: [
          ~ [0]: {
                  ~ cidrBlocks : [
                      ~ [0]: "0.0.0.0/0" => "0.0.0.0/0"
                    ]
                  - description: ""
                  ~ fromPort   : 80 => 22
                  ~ protocol   : "tcp" => "tcp"
                  ~ self       : false => false
                  ~ toPort     : 80 => 22
                }
        ]
After the import completes, Pulumi applies the update to bring the resource’s configuration into alignment with your program’s desired state. If you want the program to match the existing resource exactly without any updates, correct the mismatched properties in your code before running pulumi up.
name property explicitly, using Pulumi configuration where necessary.